Photoshop制作黄金质感立体字【英】
来源: Tutsplus.com 作者: Rose
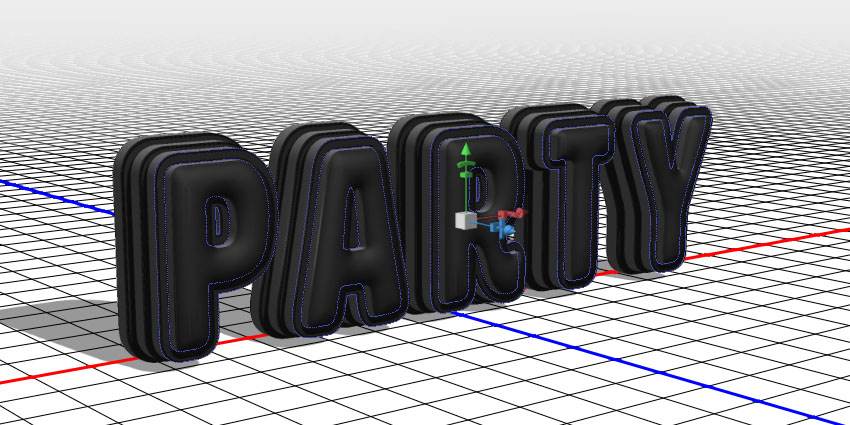
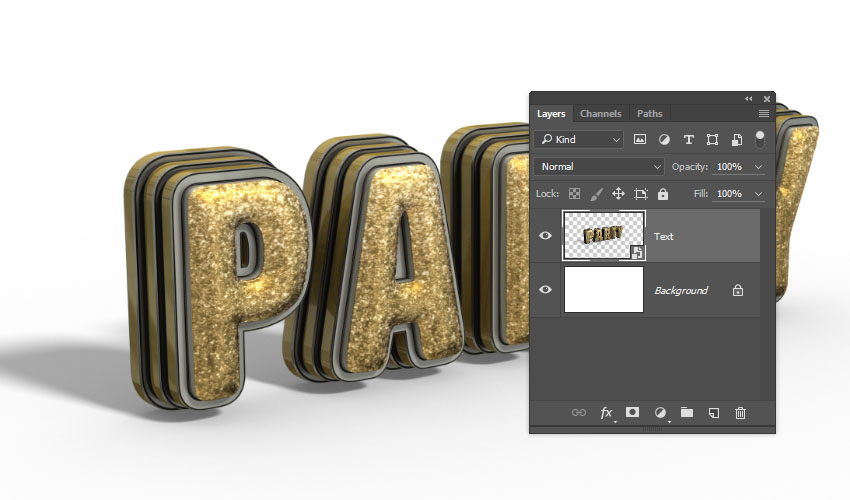
先看看效果图

What You'll Be Creating
This tutorial will show you how to use Photoshop's 3D Tools, adjustment layers, and a couple of textures to create a dazzling, glittery, festive text effect. Let's get started!
This text effect was inspired by the many Layer Styles available on GraphicRiver.
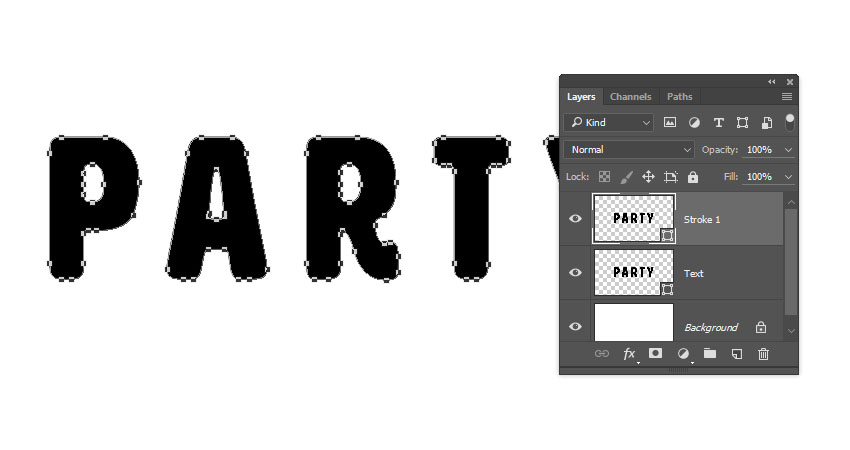
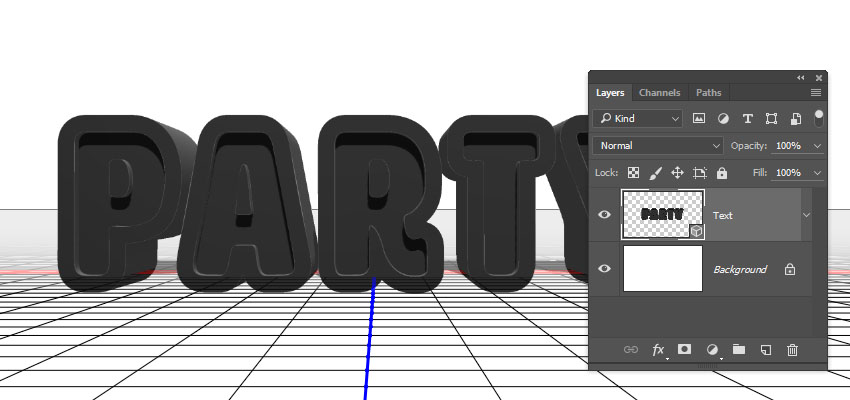
1. How to Create a Text Shape
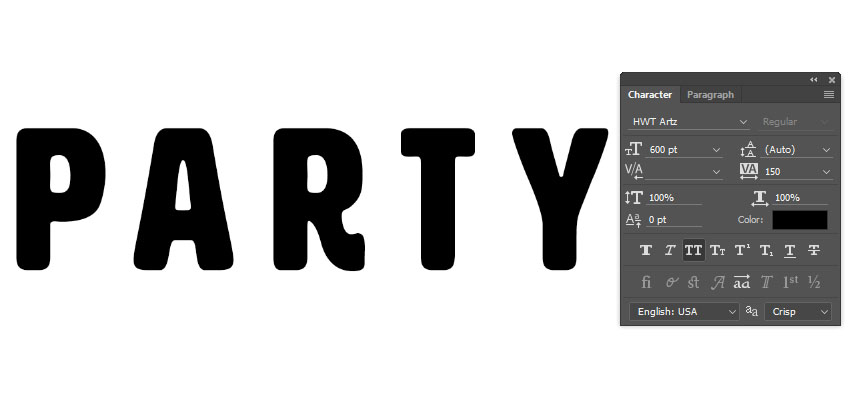
Step 1
Create a new 3500 x 2000 px document.
Then, create the text using the font HWT Artz. Set the Size to 600 pt and the Tracking to 150 pt.
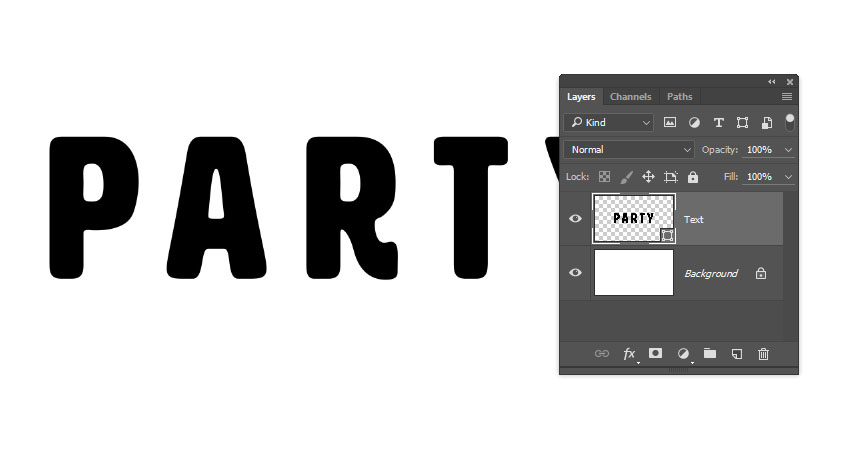
Step 2
Rename the text layer to Text, and then right-click it and choose Convert to Shape.
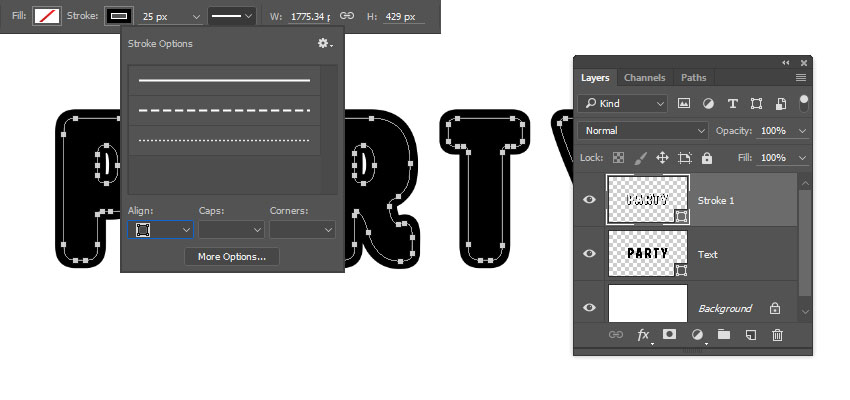
2. How to Create Stroke Layers
Step 1
Duplicate the Text layer and rename the copy to Stroke 1.
Step 2
Pick the Direct Selection Tool (A) to get the shape options in the Options bar.
Change the Fill to None, the Stroke Color to Black, and its Size to 25, and then click the Set shape stroke type icon, and change the Align to Outside.
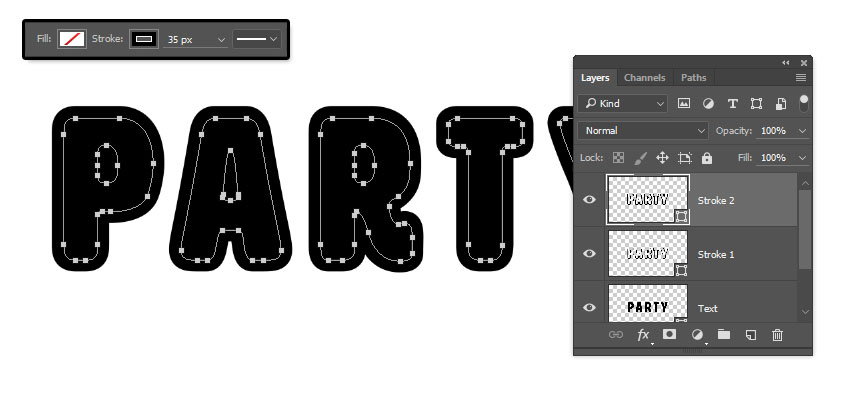
Step 3
Duplicate the Stroke 1 layer, rename the copy to Stroke 2, and change the Stroke Size to 35.
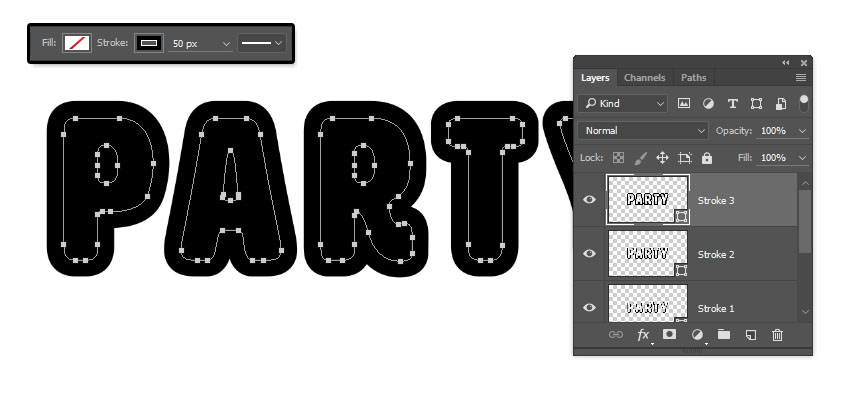
Step 4
Duplicate the Stroke 2 layer, rename the copy to Stroke 3, and change the Stroke Size to 50.
3. How to Create 3D Layers
Step 1
For each shape layer you have, select it, and then go to 3D > New 3D Extrusion from Selected Path.

Step 2
Select all 3D layers you have, and go to 3D > Merge 3D Layers.
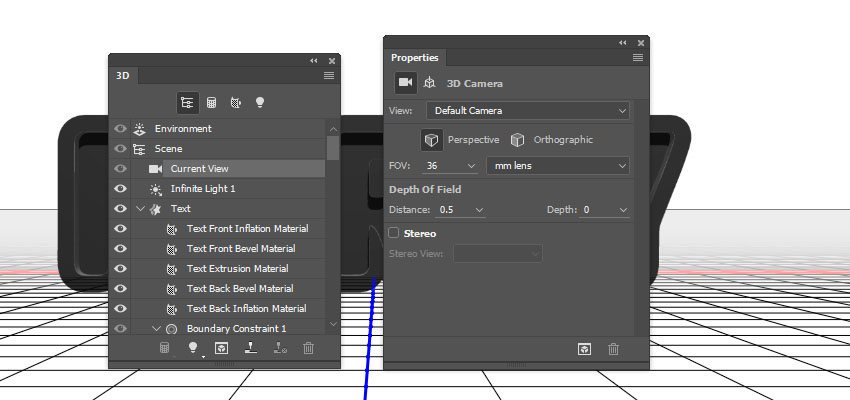
4. How to Work With a 3D Scene
Step 1
To access the 3D mesh settings and properties, you’ll need to open two panels: the 3D panel and the Properties panel (both found under the Window menu).
The 3D panel has all the components of the 3D scene, and when you click the name of any of those, you’ll be able to access its settings in the Properties panel. So make sure to always select the tab of the element you want to modify in the 3D panel before you change its settings in the Properties panel.
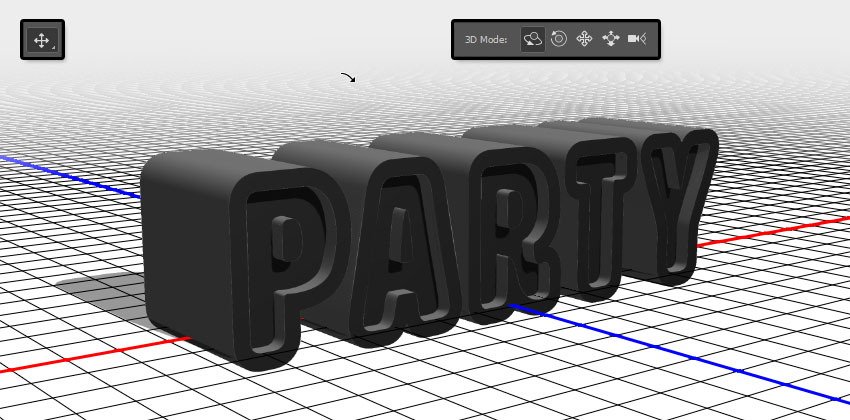
Step 2
If you select the Move Tool, you’ll find a set of 3D Modes for it to the right of the Options bar.
When you choose one of those, you can then click and drag to perform changes (on the selected element in the 3D panel).
Use those modes to change the Current View into an angle you like.
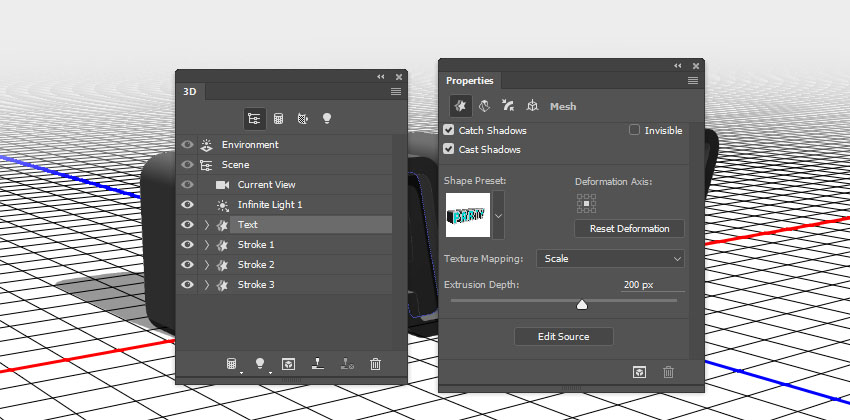
5. How to Modify 3D Mesh Settings
Step 1
Select the Text mesh tab in the 3D panel, and then, in the Properties panel, change the Extrusion Depth to 200.
Step 2
Select all the Stroke mesh tabs, and change their Extrusion Depth to 35.

6. How to Modify 3D Cap Settings
Step 1
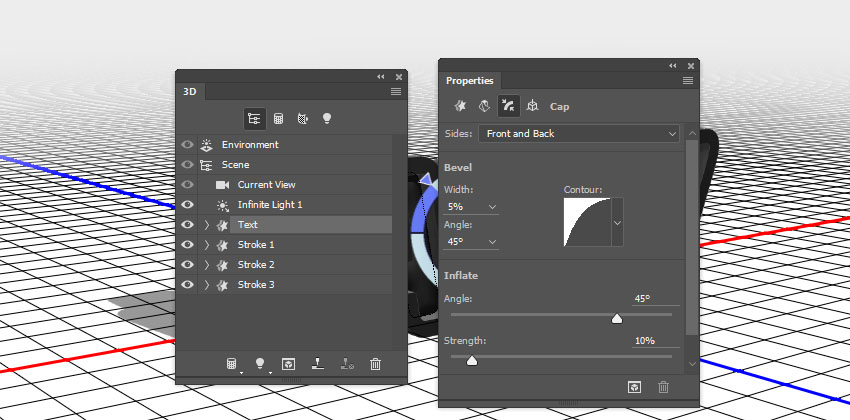
Select the Text tab again. Then click the Cap icon at the top of the Properties panel.
Set the Sides to Front and Back, and change the Bevel Width to 5%, the Contour to Half Round, and the Inflate Strength to 10%.
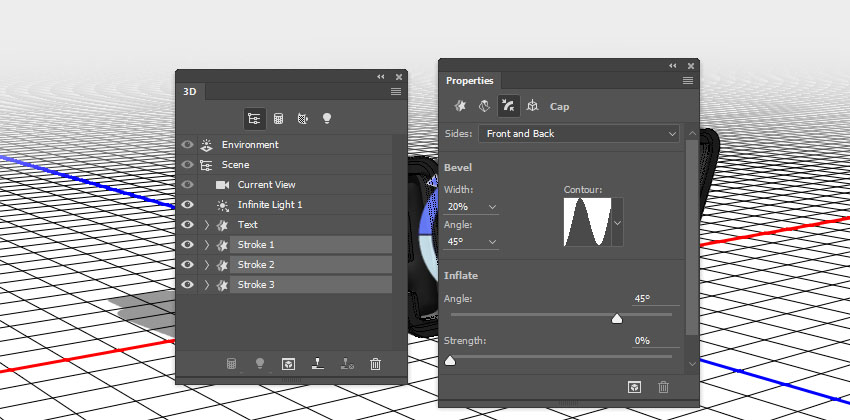
Step 2
Select the Stroke tabs, set the Sides to Front and Back, and then change the Bevel Width to 20% and the Contour to Ring.
7. How to Reposition 3D Meshes
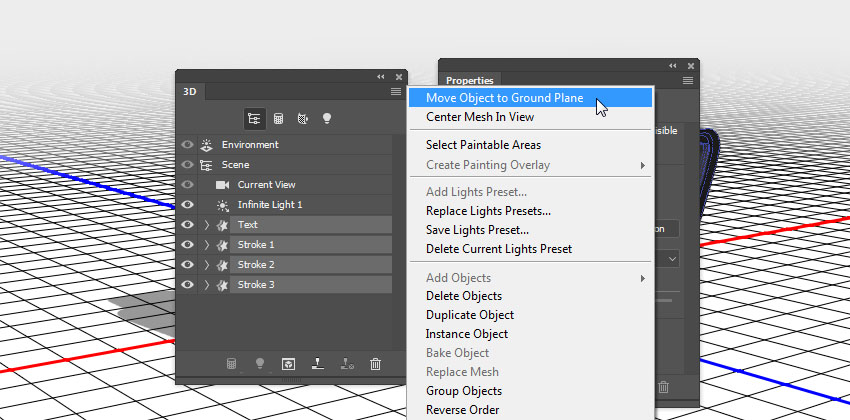
Step 1
Select all the mesh tabs in the 3D panel, and then click the 3D panel menu icon, and choose Move Object to Ground Plane.
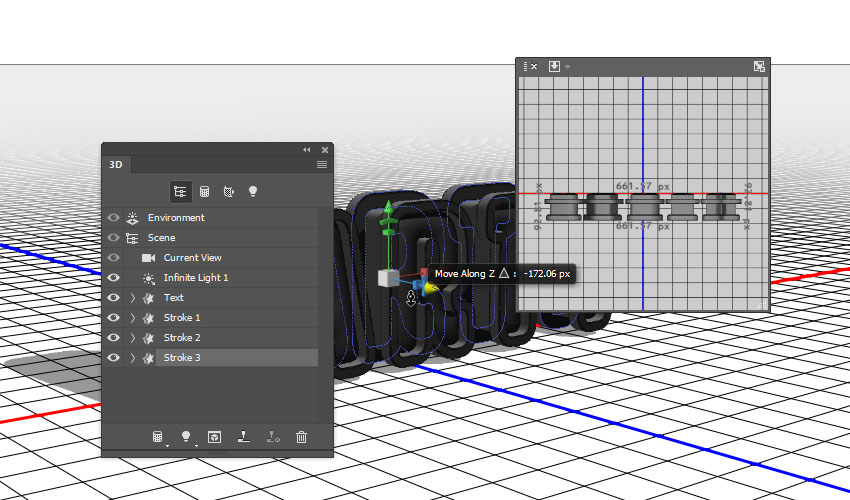
Step 2
Pick the Move Tool, and use the 3D Axis to move the Stroke meshes apart from each other, and spread them over the 3D text you have.
The arrows at the ends of the axis move the mesh, the part below them is used for rotation, and the cubes are used for scaling. The cube in the center is used to scale the object uniformly. All you need to do is click and drag the part you want.
You can also open the 3D Secondary View window (View > Show > 3D Secondary View), and then click the little arrow to the left and choose the Top view, to better see what you are doing.
Step 3
Make sure that the biggest stroke is at the back and the smallest is in the front.
8. How to Create a 3D Text Front Inflation Material
Step 1
Select the Text Front Inflation Material tab in the 3D panel, and then, in the Properties panel, click the Diffuse texture icon, and choose Edit Texture.
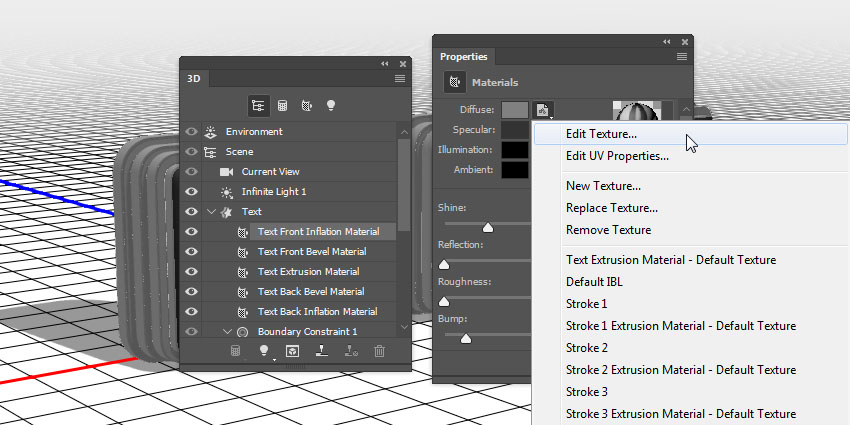
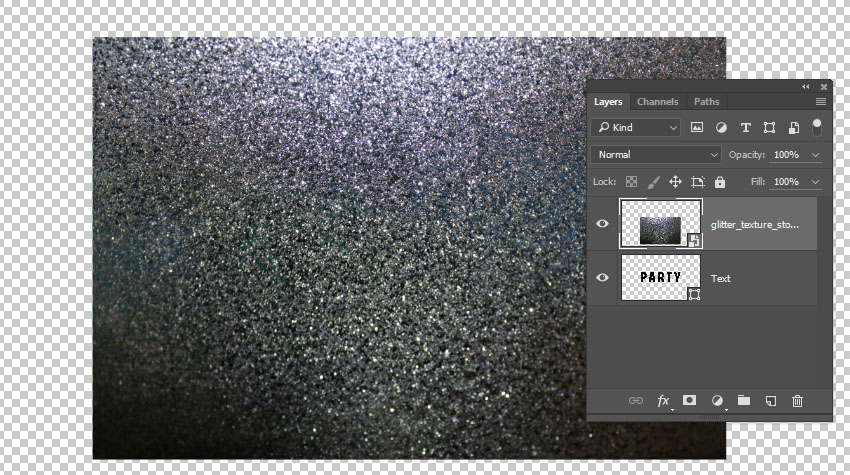
Step 2
Place the Silver Glitter Texture Stock image on top of the Text shape layer, and resize it to the text's width.
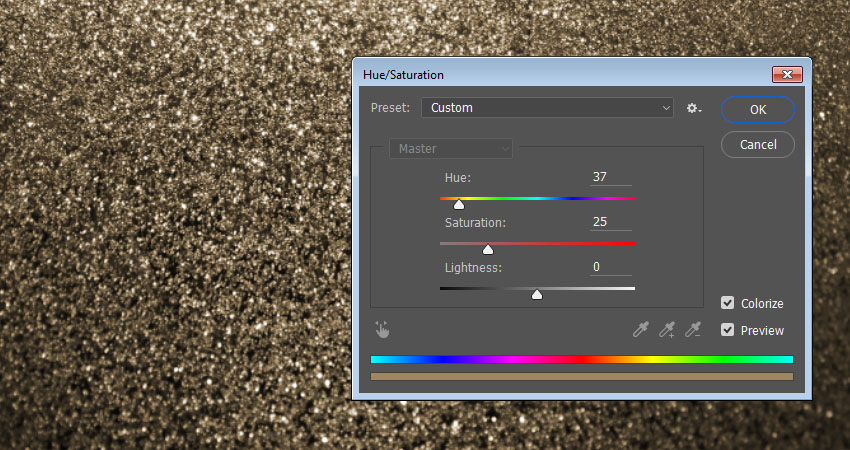
Step 3
Press Command-U to get the Hue/Saturation window, check the Colorize box, and change the Hue value to 37.
Go to File > Save, and then File > Close to go back to the 3D Scene.
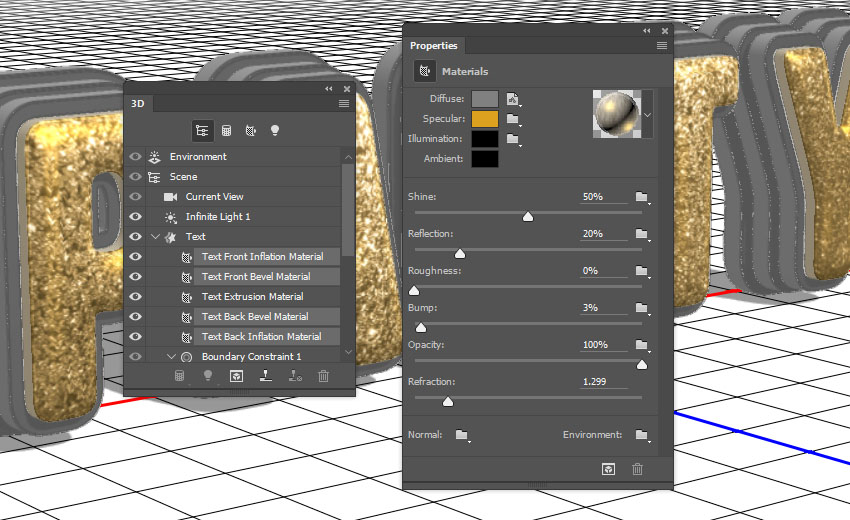
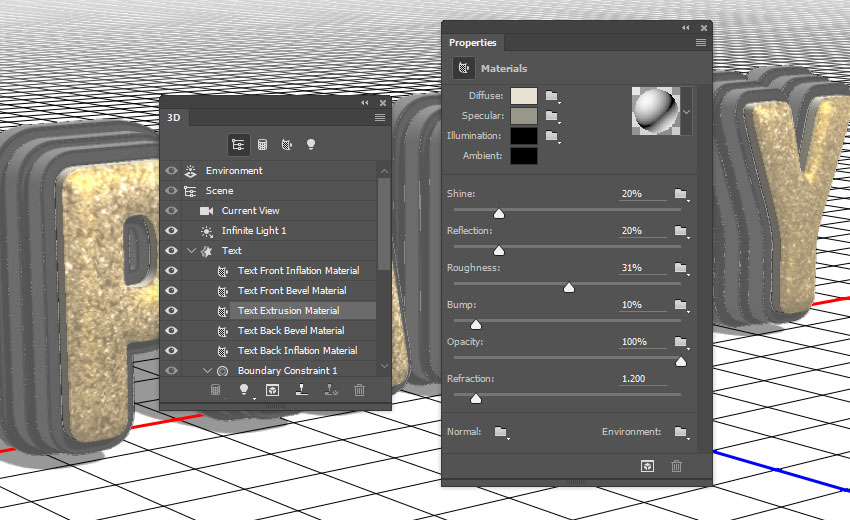
9. How to Adjust 3D Text Inflation and Bevel Material Settings
Step 1
Select the Text Front and Bevel Material tabs, and then use these material settings:
Specular: (221, 161, 32)
Shine: 50
Reflection: 20
Bump: 3
Refraction: 1.3
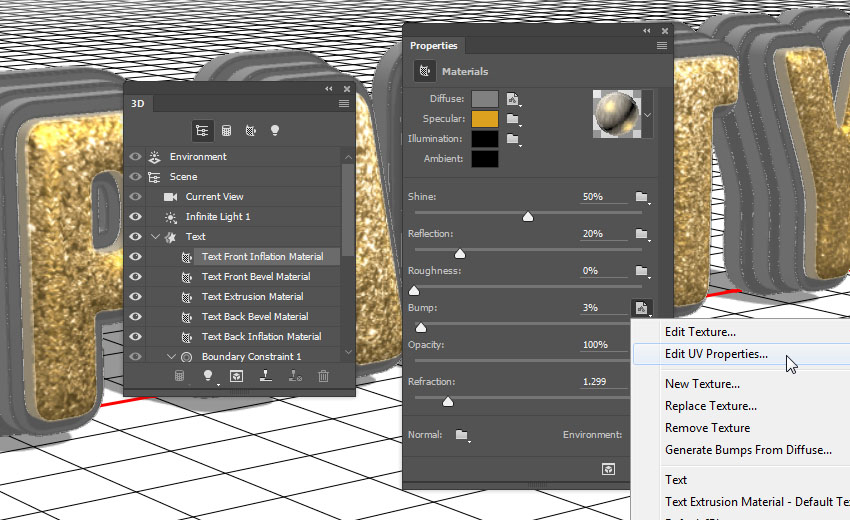
Step 2
Select the Text Front Inflation Material tab, click the Bump folder icon, click Load Texture, and then load the Metallic_Silver image.

Step 3
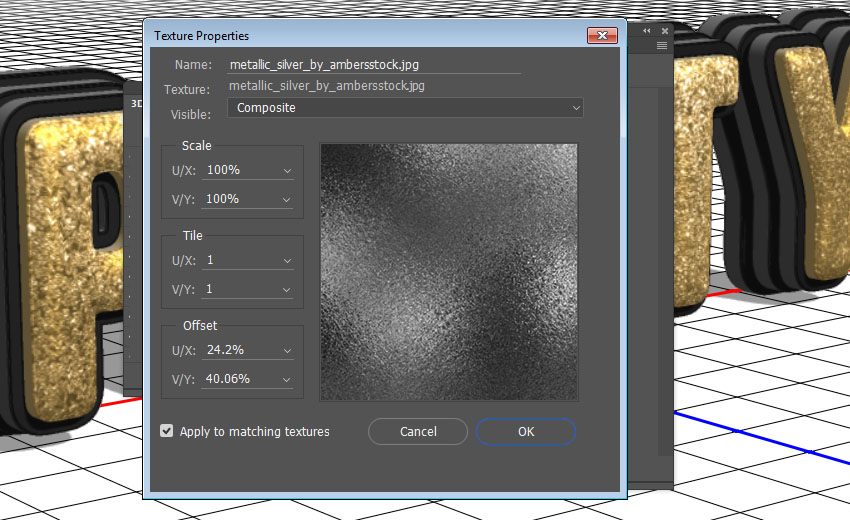
Click the Bump texture icon, and choose Edit UV Properties.
Step 4
Set both Tile values to 1.
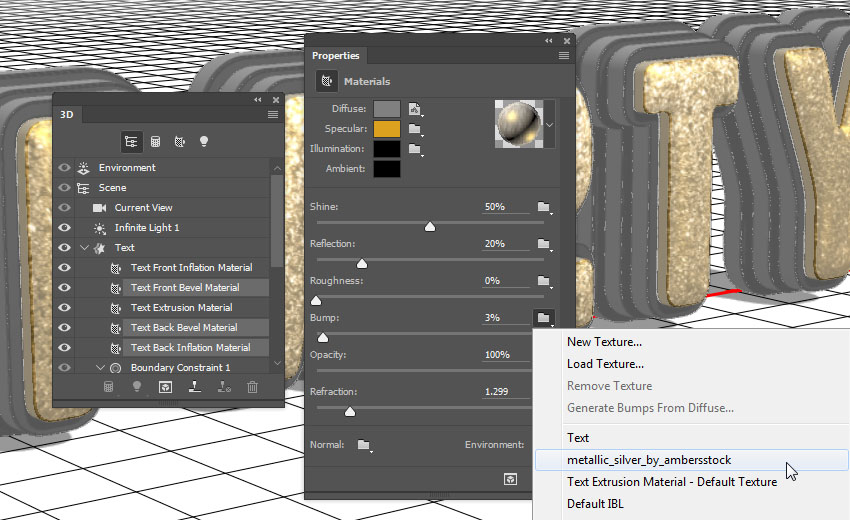
Step 5
Select the rest of the Text Inflation and Bevel Material tabs, click the Bump folder icon, and choose the Metallic_Silver texture name from the list.
10. How to Create a 3D Text Extrusion Material
Step 1
Select the Text Extrusion Material tab, click the Diffuse texture icon, and choose Remove Texture.
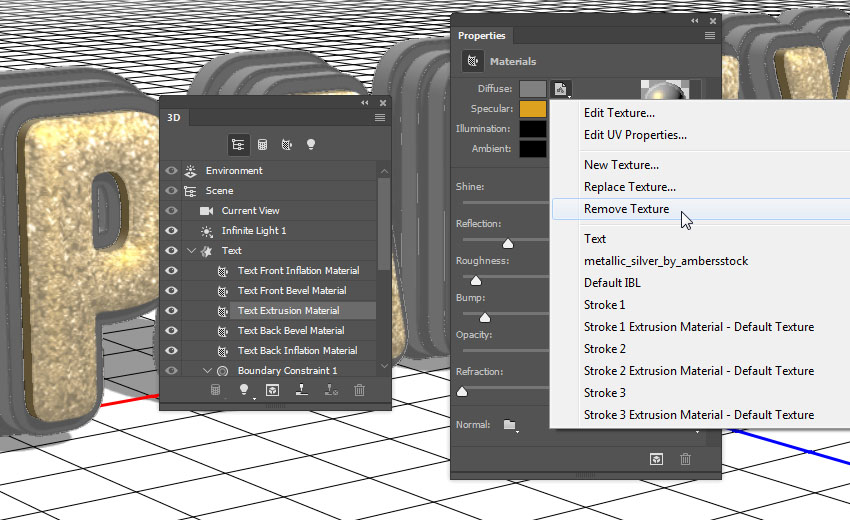
Step 2
Change the rest of the values as below:
Diffuse: (232, 226, 211)
Specular: (153, 151, 137)
Shine: 20
Reflection: 20
Roughness: 31
Refraction: 1.2
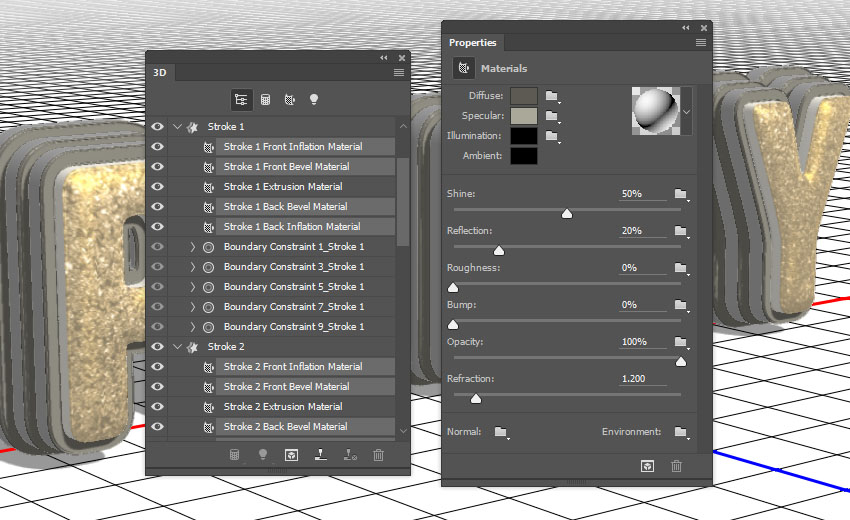
11. How to Create 3D Stroke Materials
Step 1
Select all the Stroke Inflation and Bevel Material tabs, remove their Diffuse texture, and change the rest of the settings as below:
Diffuse: (92, 90, 83)
Specular: (170, 168, 152)
Shine: 50
Reflection: 20
Refraction: 1.2
Step 2
Select all the Stroke Extrusion Material tabs, remove their Diffuse texture, and change the rest of the settings as below:
Diffuse: (228, 183, 63)
Specular: (51, 51, 51)
Shine: 20
Reflection: 20
Refraction: 1.2

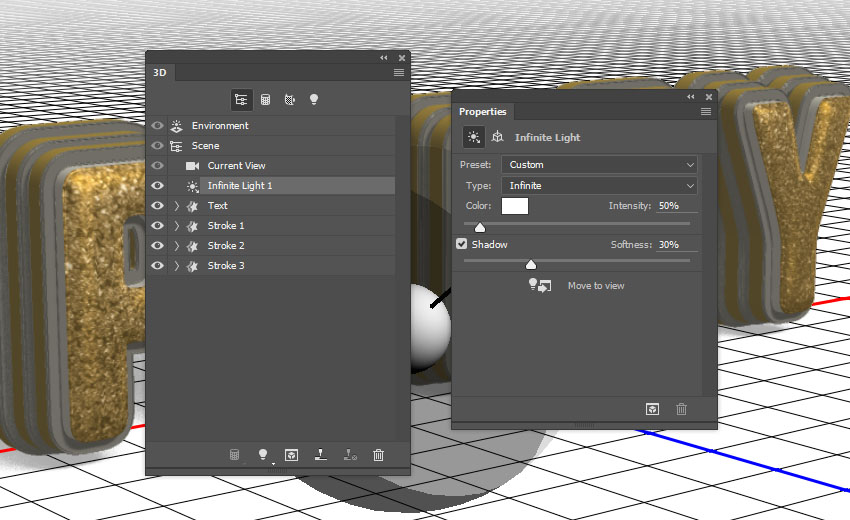
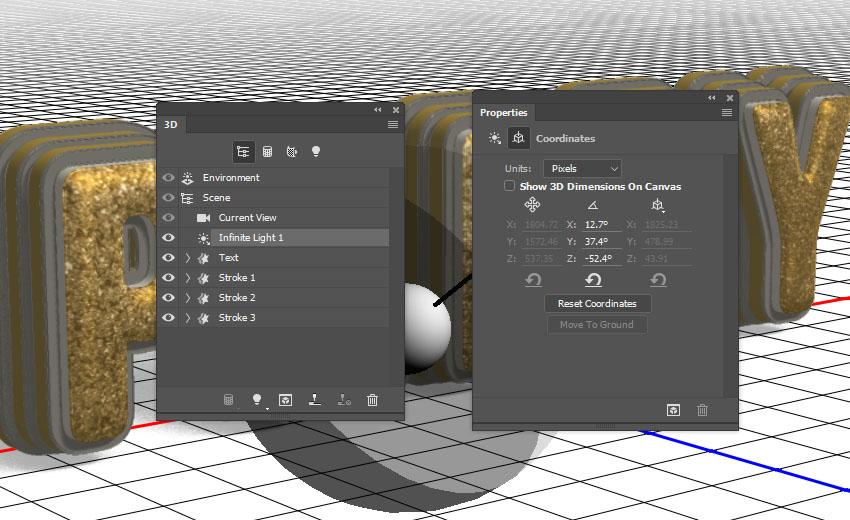
12. How to Adjust a 3D Scene's Lighting
Step 1
Select the Infinite Light tab, and change the Intensity to 50% and the Shadow Softness to 30%.
Step 2
You can then use the Move Tool to move the light, or click the Coordinates icon at the top of the Propertiespanel to enter numerical values.
Step 3
Select the Environment tab, click the IBL texture icon, choose Replace Texture, and then load the Roomimage.
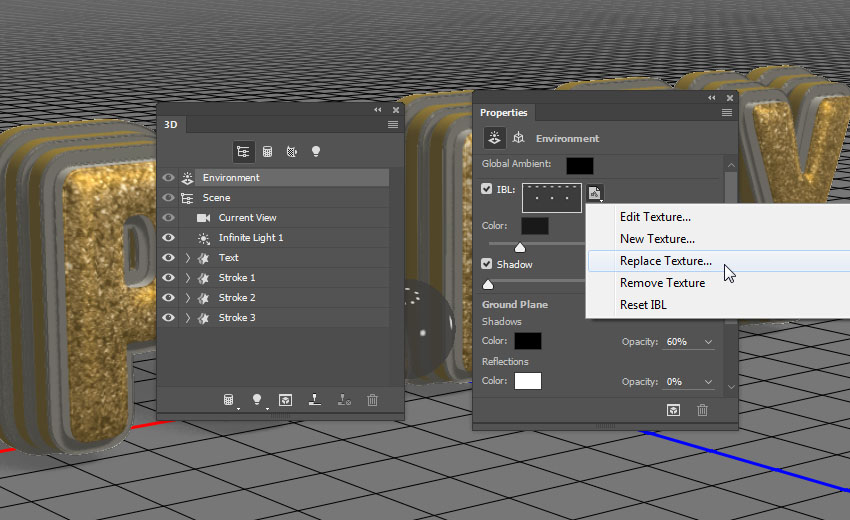
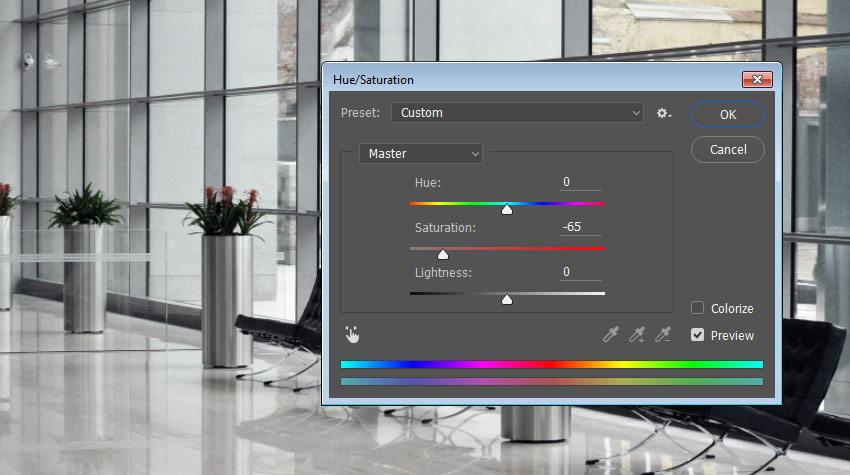
Step 4
Click the IBL texture icon again, choose Edit Texture, then press Command-U, and change the Saturationvalue to -65.
Save and close the file.
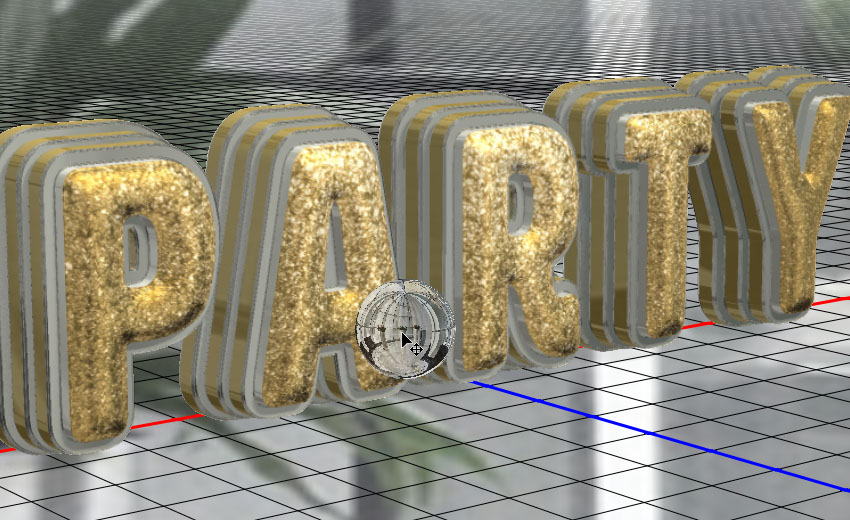
Step 5
Change the IBL light's Intensity to 50%.

Step 6
You can use the Move Tool to move the texture until you get a result you like.
13. How to Modify a Rendered 3D Layer
Step 1
Once you're done modifying the 3D scene, go to 3D > Render to render it. The rendering might take a while, but you can stop it any time by pressing the Esc key.

Step 2
Once the rendering is finished, right-click the 3D layer, and choose Convert to Smart Object.
Step 3
Go to Image > Image Size, and set the Width to 1500 px.

14. How to Use Adjustment Layers
Step 1
Click the Create new fill or adjustment layer icon at the bottom of the Layers panel, and choose Selective Color.
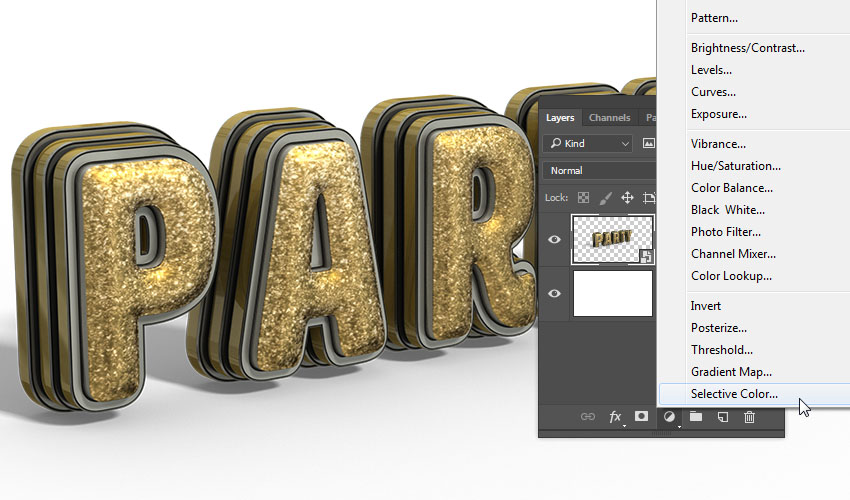
Step 2
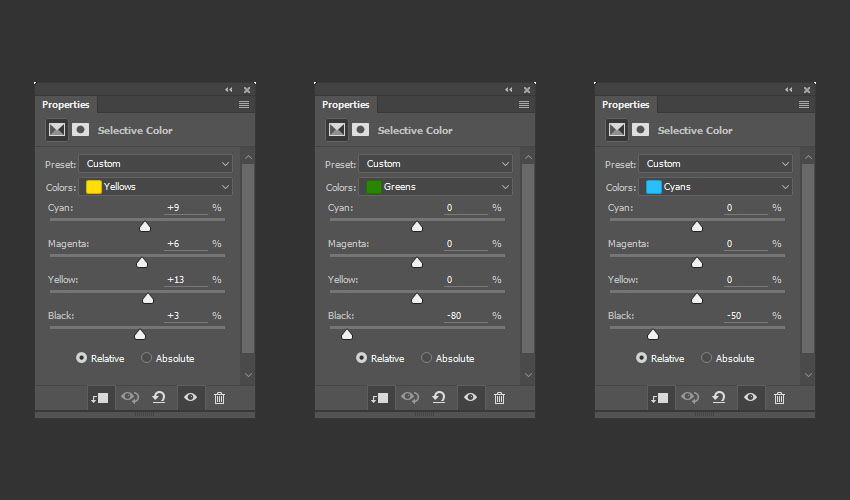
Clip the Selective Color layer to the 3D layer, and then modify these channels as below:
Yellows:
Cyan: 9
Magenta: 6
Yellow: 13
Black: 3
Greens:
Black: -80
Cyans:
Black: -50
Whites:
Cyan: -15
Magenta: 10
Yellow: 20
Black: -90
Neutrals:
Cyan: -2
Yellow: 5
Blacks:
Cyan: -5
Magenta: 5
Yellow: -20
Black: 5
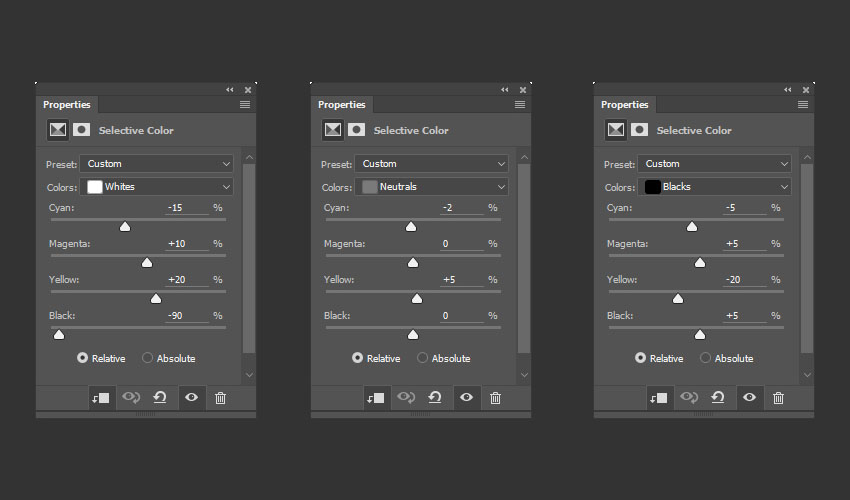
This will enhance the coloring of the text.

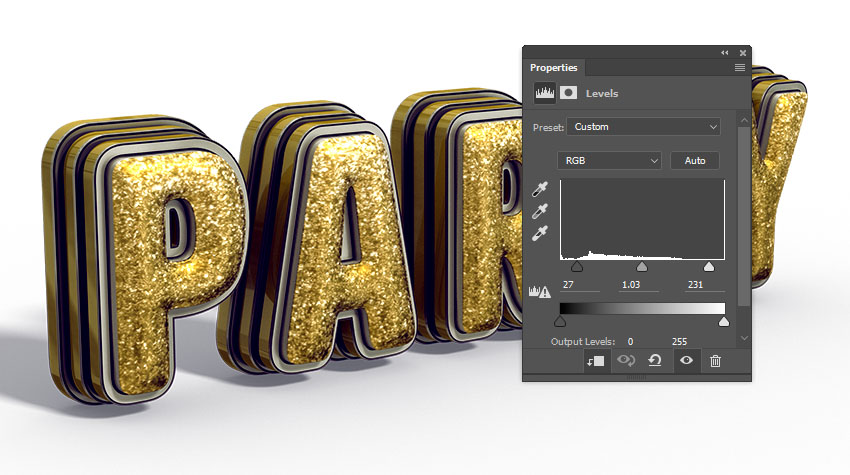
Step 3
Add a Levels adjustment layer, clip it to the 3D layer, and then change the Highlights to 27, the Gamma to 1.03, and the Shadows to 231.
This will enhance the contrast.
15. How to Create a Background
Step 1
Add a Gradient Fill layer on top of the Background layer, and create the Gradient using the colors #8f8e8e to the right, #ebeaea in the center, and #8f8e8e to the left.
Change the Angle to 105, and the Scale to 250. You can then click-drag the gradient fill inside the document to position it behind the text.

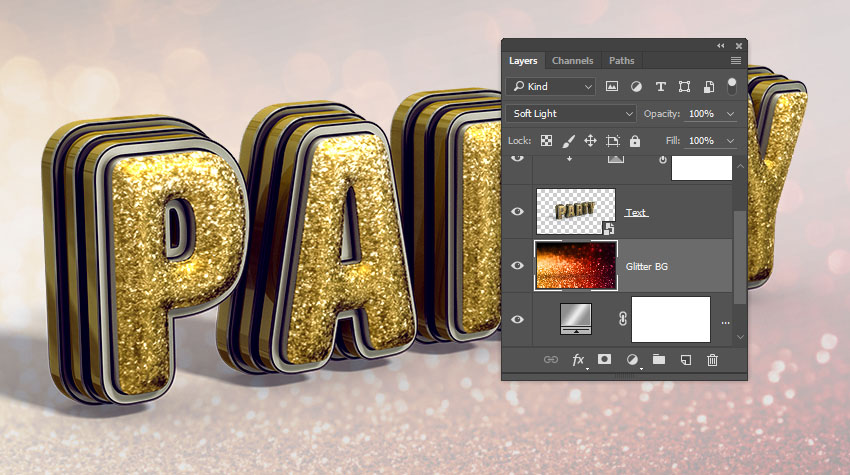
Step 2
Place the Glitter Bokeh texture on top of the Gradient Fill layer, resize it as needed, rename its layer to Glitter BG, and change its Blend Mode to Soft Light.
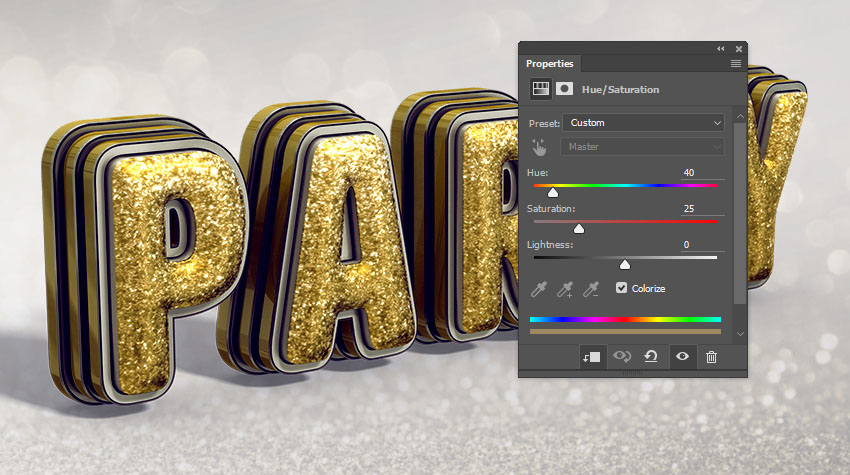
Step 3
Add a Hue/Saturation adjustment layer, clip it to the Glitter BG layer, check the Colorize box, and change the Hue to 40.
Step 4
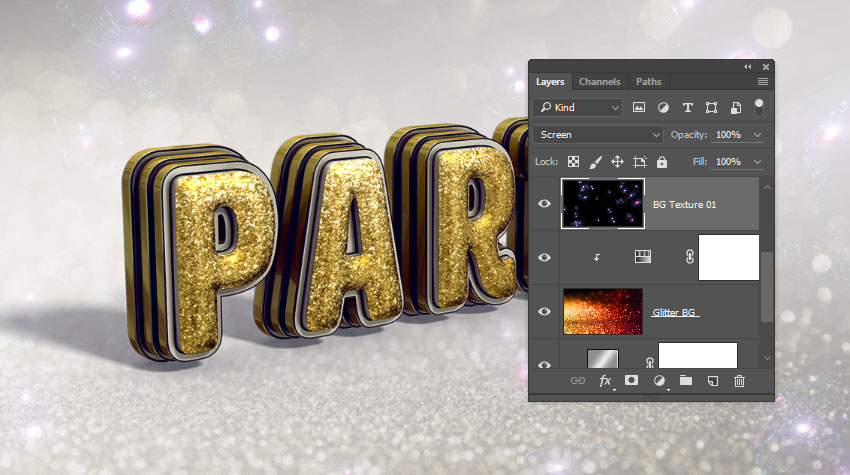
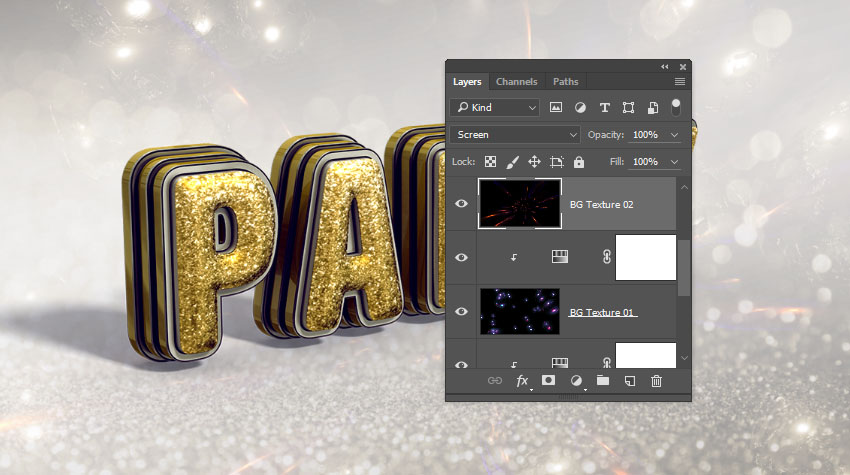
Place the hybrid3 image from the Salomdi hybrid c4d pack on top of the Glitter BG layer, and rename its layer to BG Texture 01.
Change the BG Texture 01 layer's Blend Mode to Screen, and resize it as needed.
Step 5
Add a Hue/Saturation adjustment layer, clip it to the BG Texture 01 layer, check the Colorize box, and change the Hue to 38.
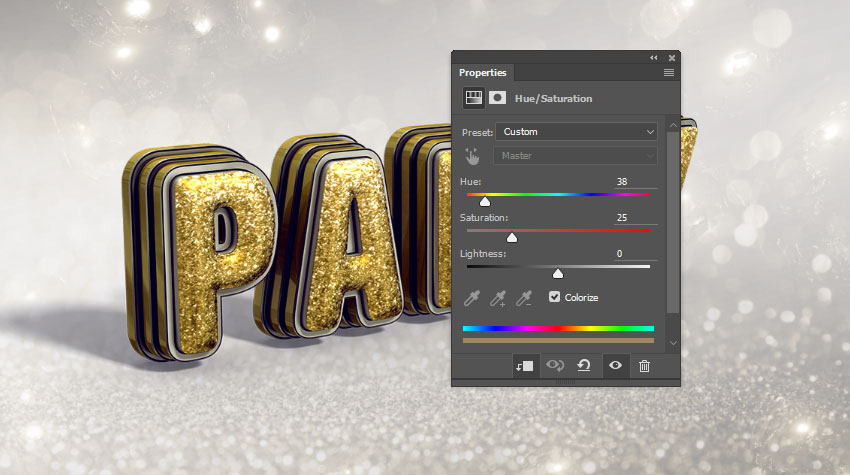
Step 6
Place the Platinafx4 image from the C4d Pack 12 By Platina set on top of the BG Texture 01 layer, and rename its layer to BG Texture 02.
Change the BG Texture 02 layer's Blend Mode to Screen, and resize it as needed.
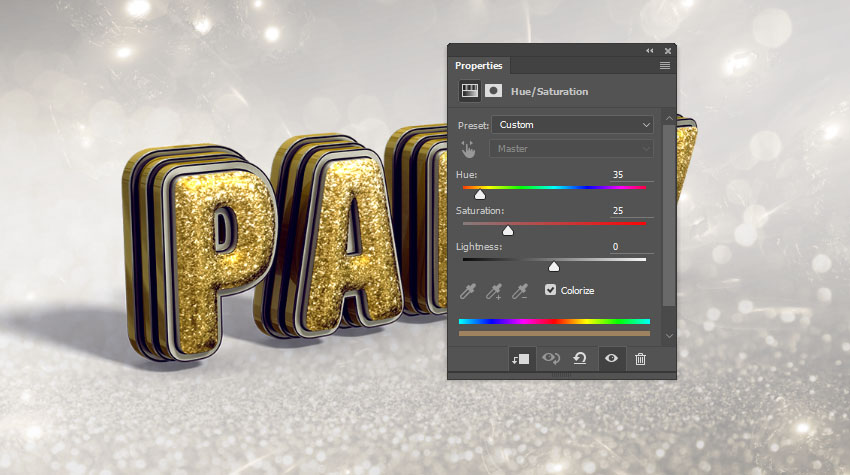
Step 7
Add a Hue/Saturation adjustment layer, clip it to the BG Texture 02 layer, check the Colorize box, and change the Hue to 35.
16. How to Add Sparkles
Step 1
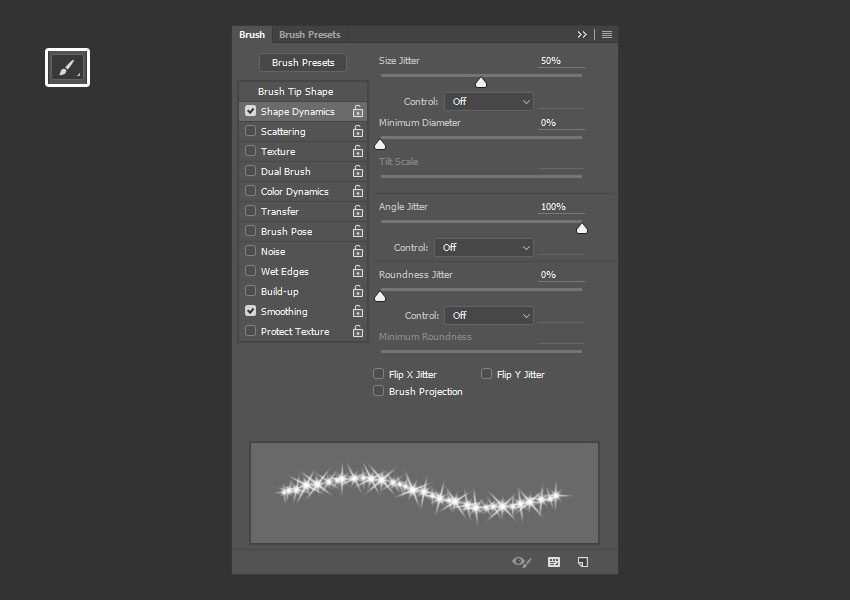
Pick the Brush Tool, and open the Brush panel (Window > Brush).
Choose a brush tip you like from the Stars and Flares Brush Set, and then, under the Shape Dynamics tab, change the Size Jitter to 50%, and the Angle Jitter to 100%.
Step 2
Set the Foreground Color to #d6d6d6, create a new layer on top of all layers, call it Sparkles, and change its Blend Mode to Overlay.
Decrease the brush tip Size to a value that you think looks good for the text, and start clicking over some bright areas of the text to add the sparkles.

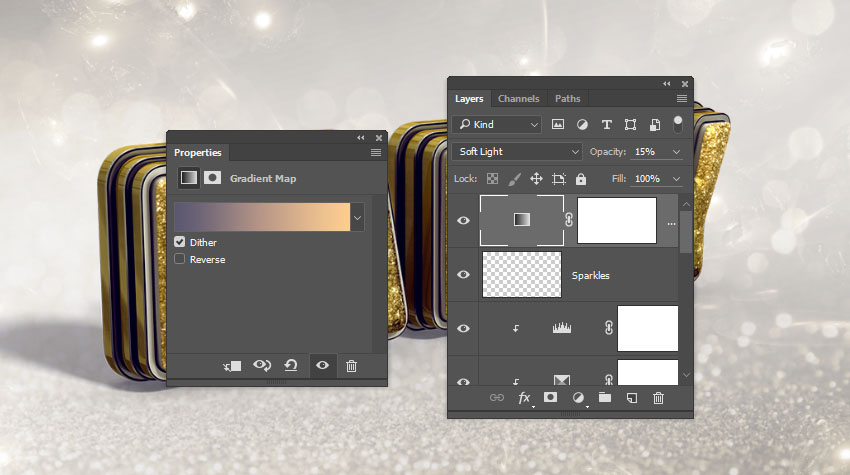
17. How to Modify a Gradient Map
Step 1
Add a Gradient Map adjustment layer, and change its Blend Mode to Soft Light and its Opacity to 15%.
Check the Dither box, and then create the Gradient fill using the colors #5a5871 to the left, #b79787 in the center, and #fdcd90 to the right.
Advertisement
Step 2
You can try different colors and Opacity values to get different results if you like.

Congratulations! You're Done
In this tutorial, we created a text layer, converted it into a shape layer, and created the stroke layers.
Then, we converted the shape layers into 3D layers, and modified their settings. After that, we created the 3D materials, worked on the lighting of the scene, and rendered it.
Finally, we worked on the coloring and the background, using adjustment layers and textures, as well as adding some sparkles to finish off the effect.
Please feel free to leave your comments, suggestions, and outcomes below.