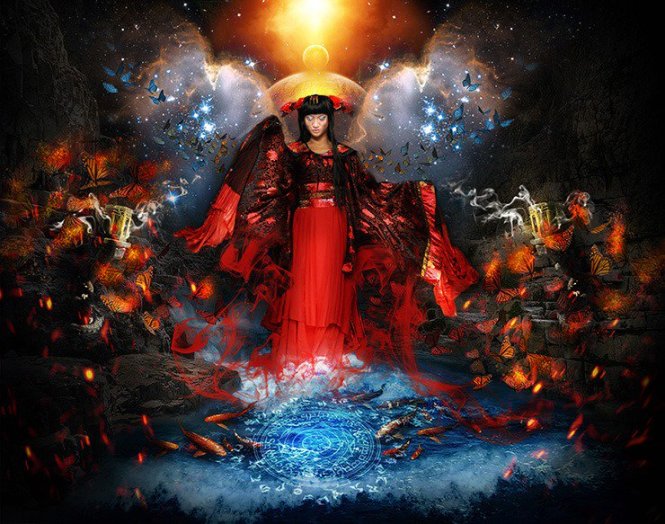
Photoshop合成正在施法的巫师【英】
来源: photoshoptutorials.ws 作者:MARIA SEMELEVICH
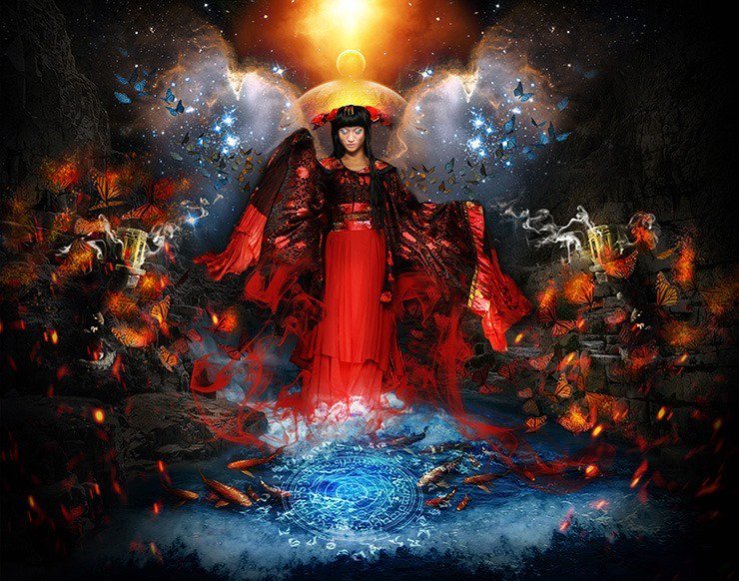
Learn how to this surreal photo manipulation of an Great Enchantress with Photoshop. In this tutorial, you’ll learn how to create your amazing atmosphere and adventure tales with realistic shadows and lighting, then complete it with a bleak color tone effect. Throughout the tutorial, you’ll learn techniques that will help you create better matte paintings and photo manipulations. Read this tutorial and find out how easy it is!
What you’ll be creating
Let’s start creating pictures by creating a landscape, then add mystical items. The next step is to create the model and work with animals. The final step will be drawing the shadows and work on atmospheric paintings, correction and adding effects. You’ll need any version of Photoshop, inspiration and good mood!
Step 1
Begin with we will create a vast landscape for our further manipulations. I believe that we will create that – something like an amphitheater. This will give depth and mystery our picture.
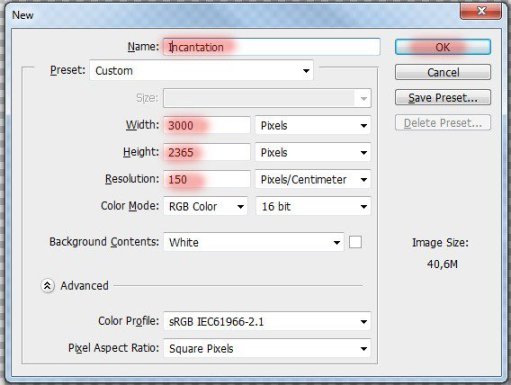
Start by creating! Create a new document. Go to File > New or the short key Ctrl+ N. A blank document with size of 3000 pixels wide and 2365 pixels high. I named the document “Incantation”.
Step 2
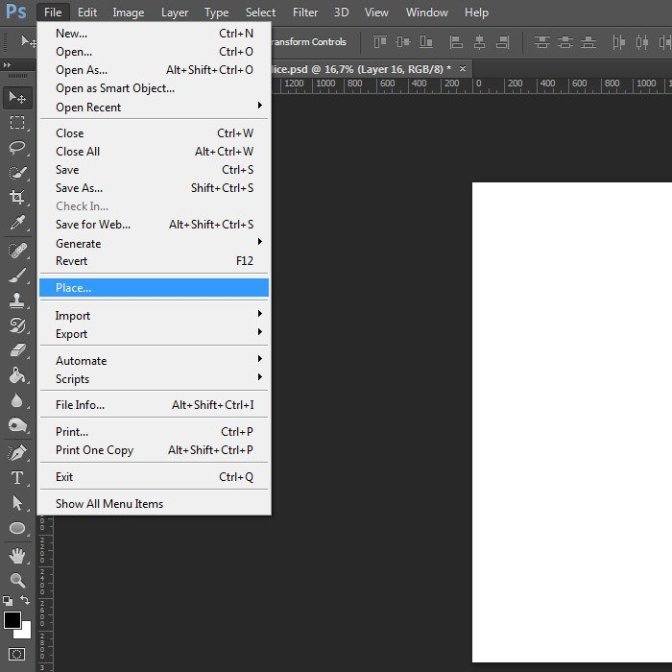
Let’s start off adding the landscape to our manipulation. Go to File > Place and select the image of landscape.
Step 3
After addition Place a landscape in the lower right corner without changing its size.
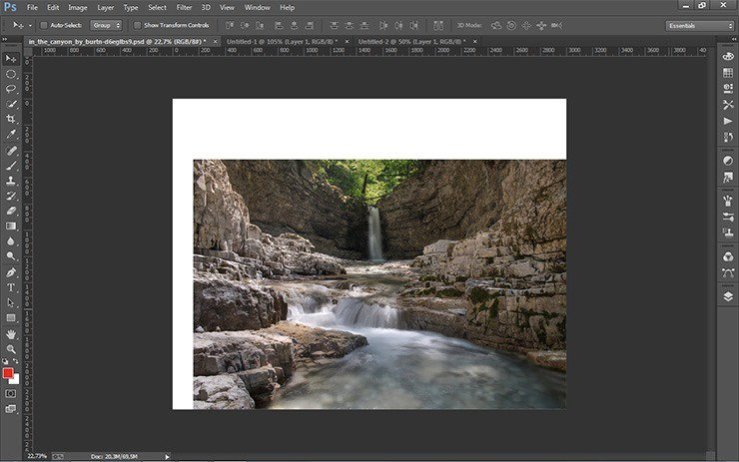
Step 4
Duplicate the landscape 2 times. The short key Ctrl+ J.
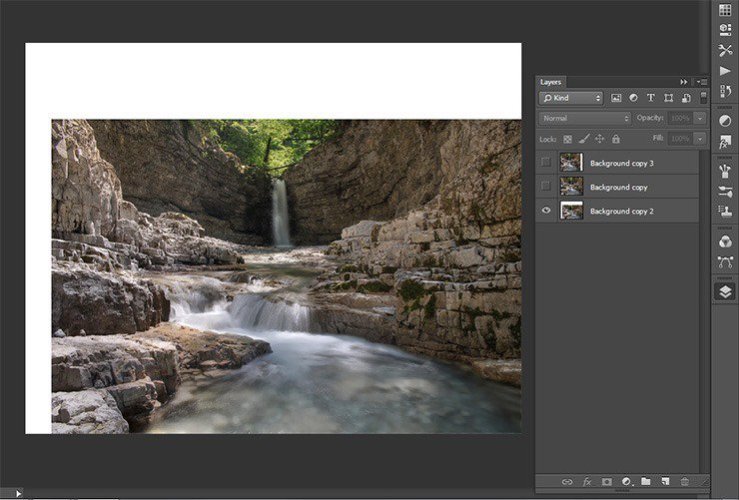
Step 5
Transform (the short key Ctrl+ T) the layer “background copy” on the size of a little more the working document.
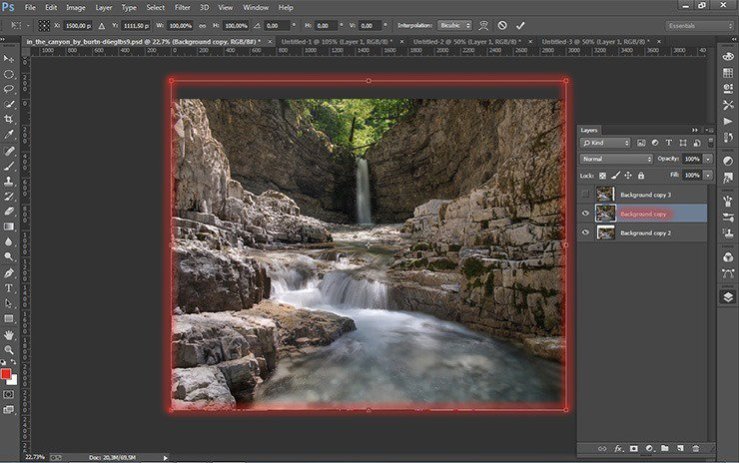
Step 6
Repeat the same with the last layer. Transform (the short key Ctrl+ T) the layer “background copy2” on the size of a little more the working document. Place it to the left, as shown in Figure.
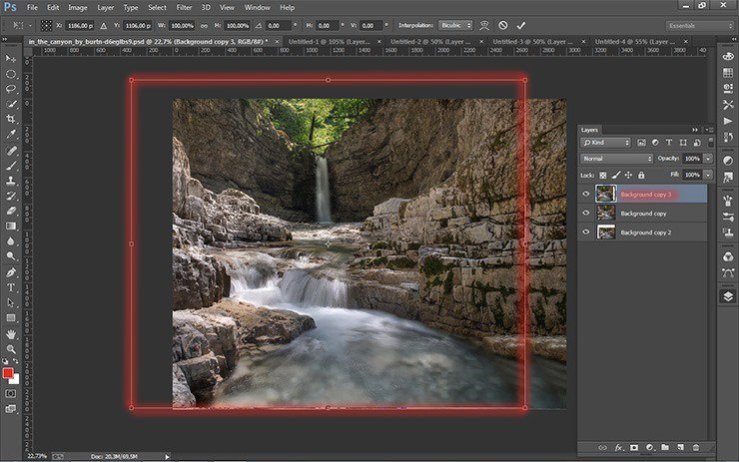
All we have done is to make the landscape more and more expressive. I think that if all the original picture landscape stretch for the entire document, it is not realistic to happen and there will be little space for our next steps.
Step 7
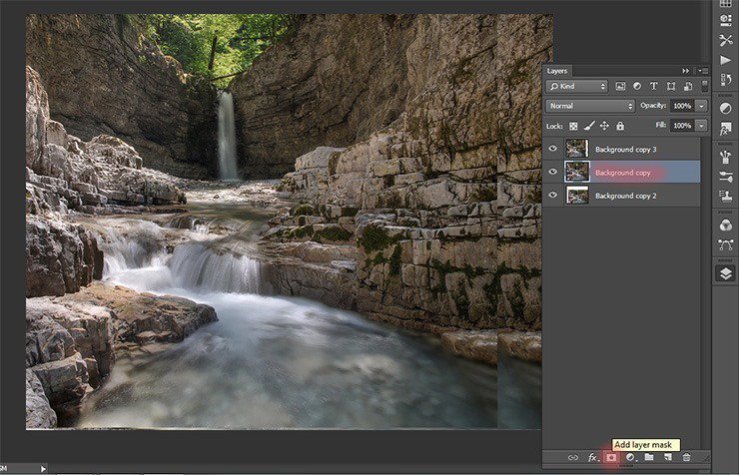
Begin to create. You have a unique opportunity to become briefly creator and create a new piece of magical scenery :) First, add a layer mask to “background copy” By clicking on the layer mask icon in the Layers panel.
Step 8
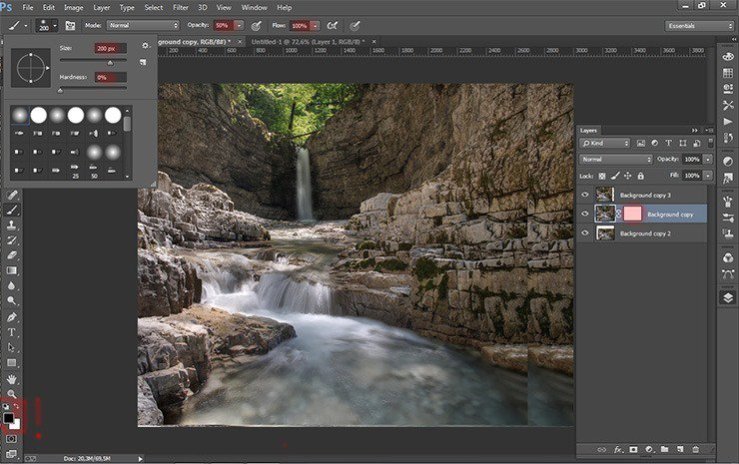
Now take the Brush Tool (B) on the toolbar. Expose what settings Size: 200px, Hardness: 0% Opacity: 50% Flow: 100%. Press D to set the color to black and white. Be sure to brush should be soft for a smooth transition between the layers background.
Step 9
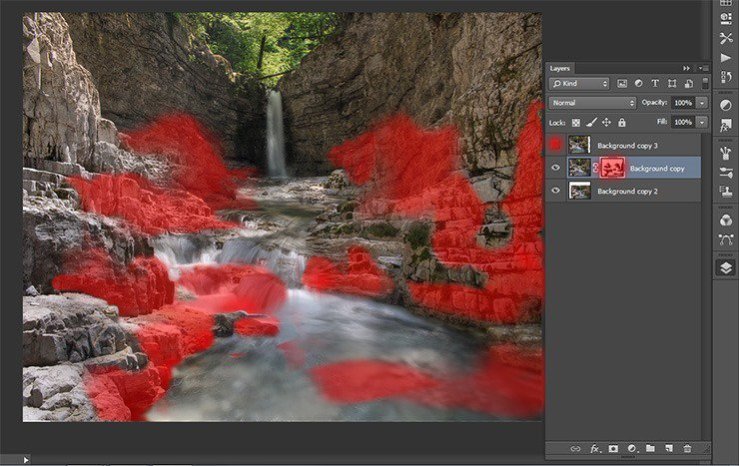
Begin to change. Turn off the top layer with the background by clicking on the eye icon in the Layers panel Activate the layer mask and remove the brush part of the landscape as shown. Draw black color.
Step 10
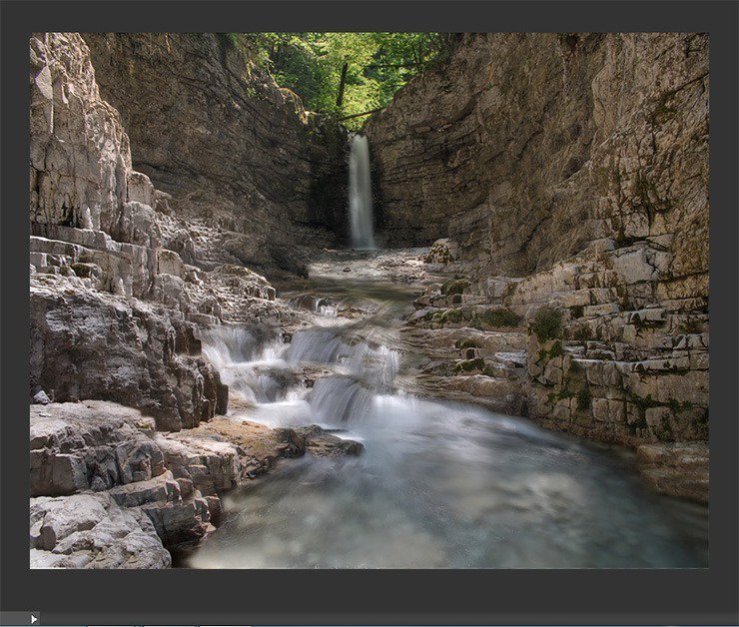
That’s how I got.
Step 11
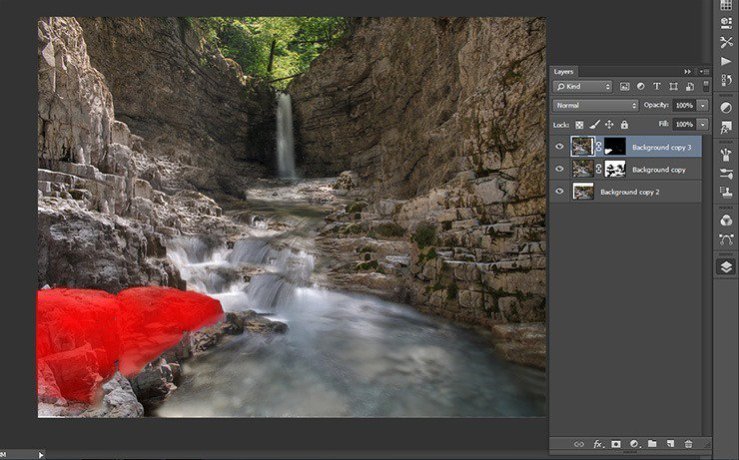
If you find that an option that arranges proceed to the next layer. Add a layer mask to the layer “background copy2” and remove some of the excess. To make it easier to paint over the stone, and then invert the layer mask (the short key Shift+ Ctrl+ I).
Step 12
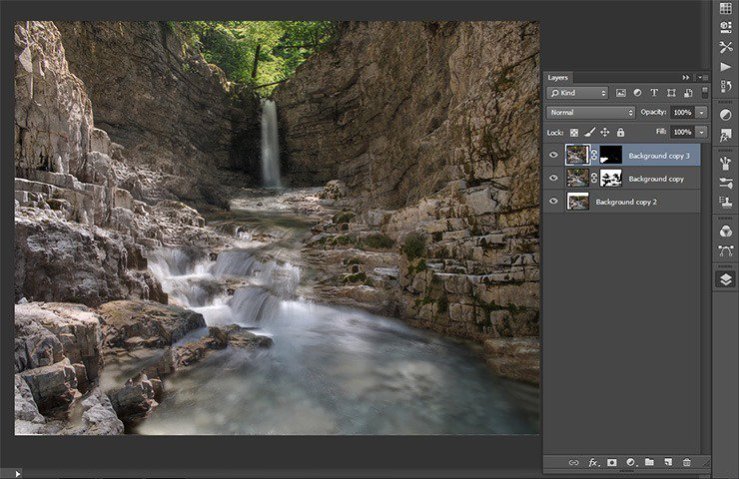
That’s it. Our landscape is ready. Now proceed to the creation of water. In the original image, water is not dynamic, so I decided to add dynamic waves. This will give freshness and unusual images.
Step 13
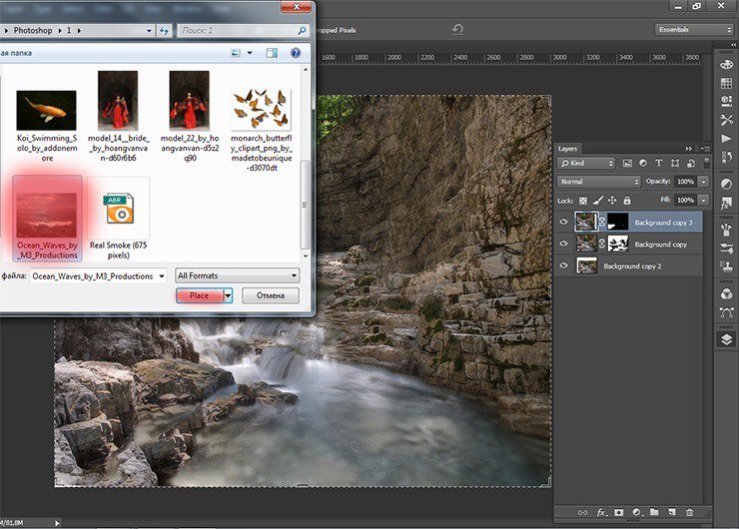
Go to File > Place and select the image of wave.
Step 14
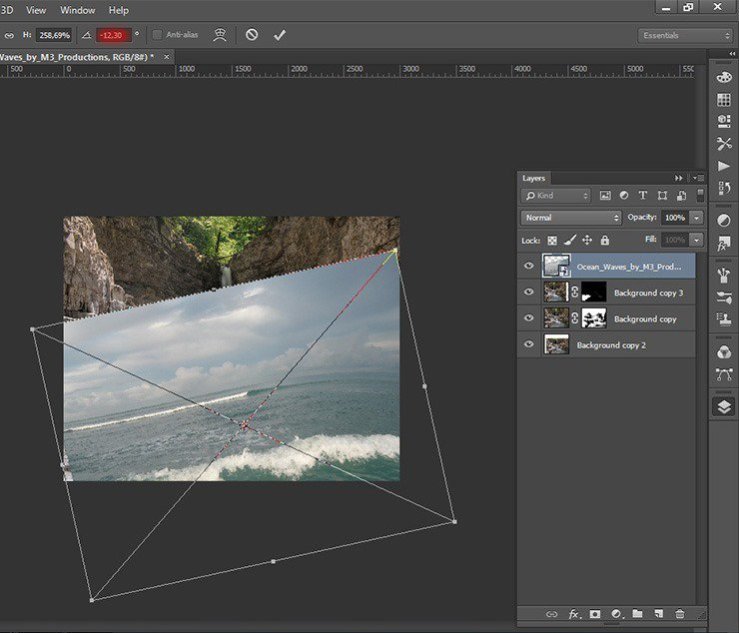
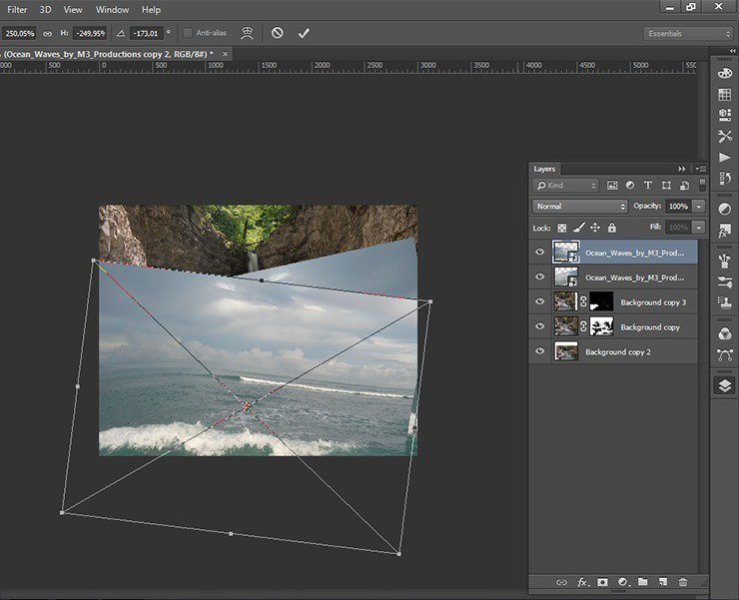
Now transform the image placed so that a large wave was a little farther from the edge of the document and the edges of the wave touches the shore landscape and rotate the image by an angle -12, 30.
Step 15
Now duplicate the layer with the wave and transform it. Click LMB from the list, select Flip Horizontal. To apply the changes, click Enter. Move the wave a little left.
Step 16
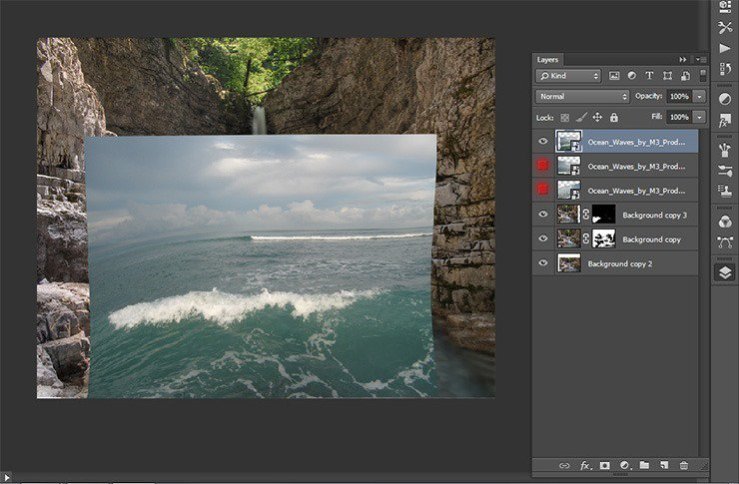
Now duplicate the layer with the wave and change its size. Make it a little smaller and move it closer to the falls.
Step 17
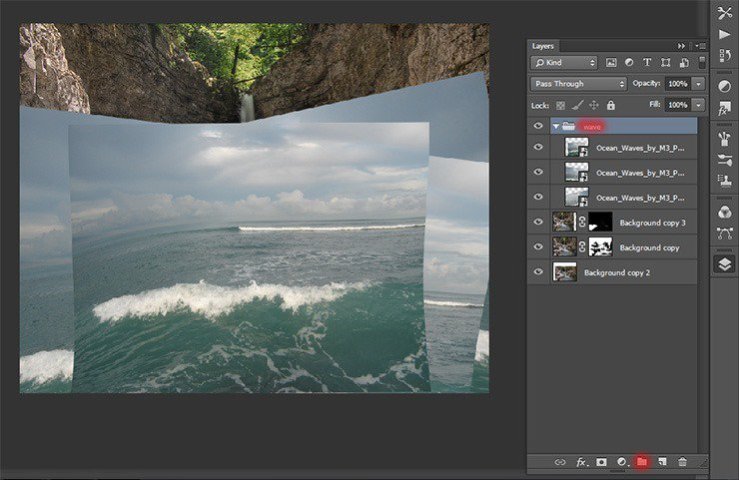
Now merge the layers with a wave of the group. Click on the desired layers hold Shift and click on the folder icon in the Layers panel or the short key Ctrl+ G. Rename the group, double click on the group name and call it “wave”.
Step 18
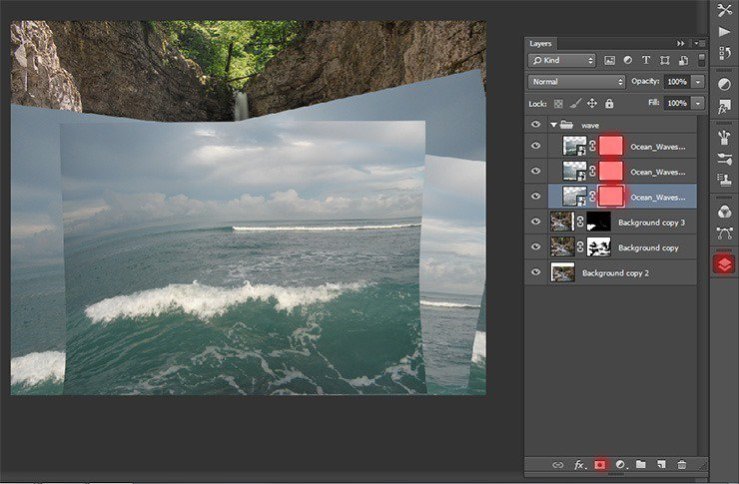
Now remove the unwanted parts of waves that they are only in the riverbed. Add to each layer with a layer mask clicking on the mask icon in the Layers panel.
Step 19
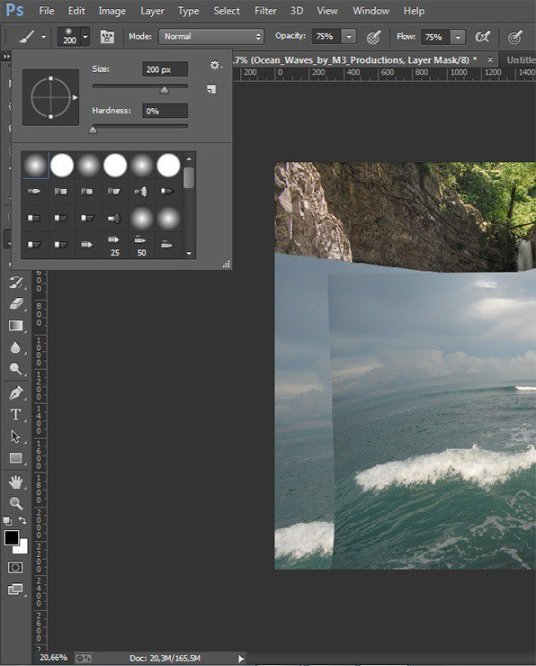
Select the Brush Tool (B) and use the settings: Size: 200px, Hardness: 0% Opacity: 75%, Flow: 70%. Be sure to check the main color black.
Step 20
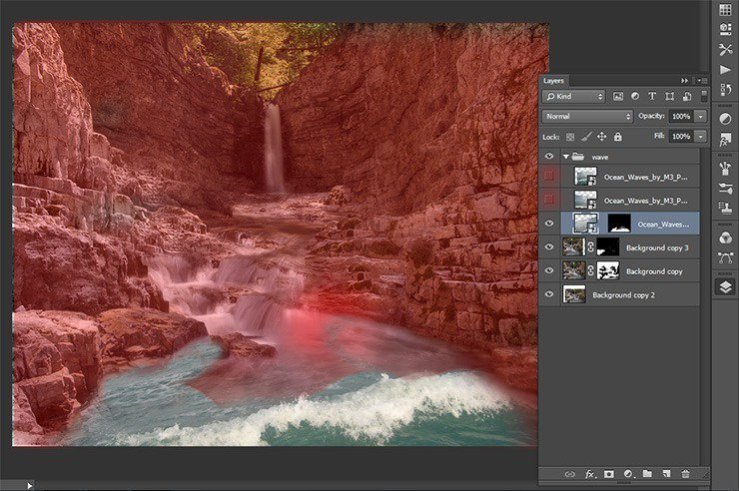
Remove unnecessary part of each layer. make invisible the upper layers by clicking the eye icon near the desired layer. So it will be easier to work.
Step 21
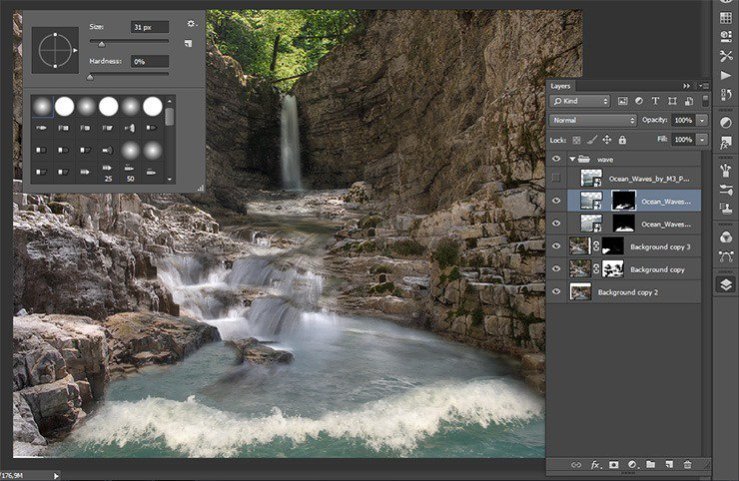
Change the brush size that you feel comfortable. Otherwise, you can remove what you need. To change the brush size shout RMB in our document and set the desired size.
Step 22
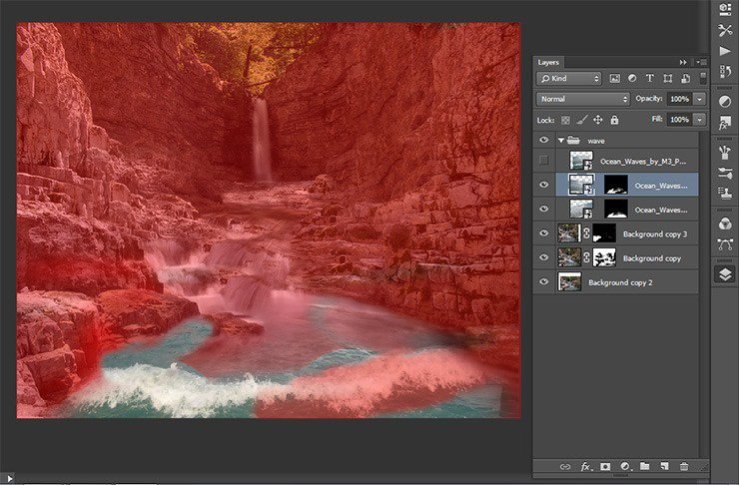
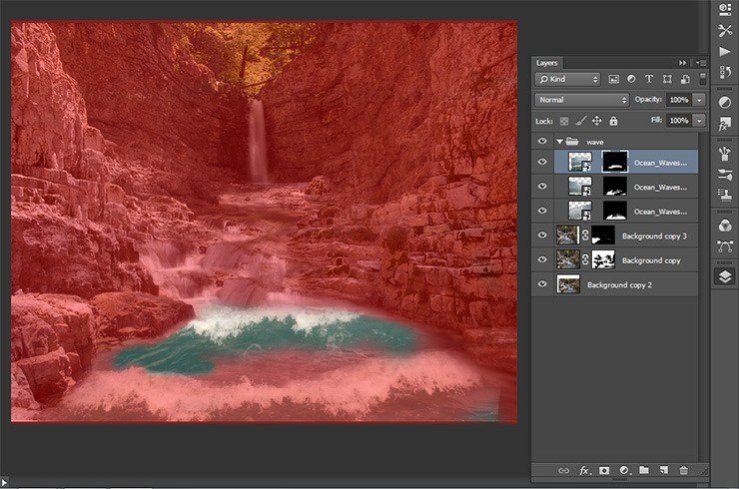
On the first and second layer, remove portions of the image beyond the borders of the river. Most of the sea, so that only stay the wave. The main thing is not to damage the crest of a wave.
Step 23
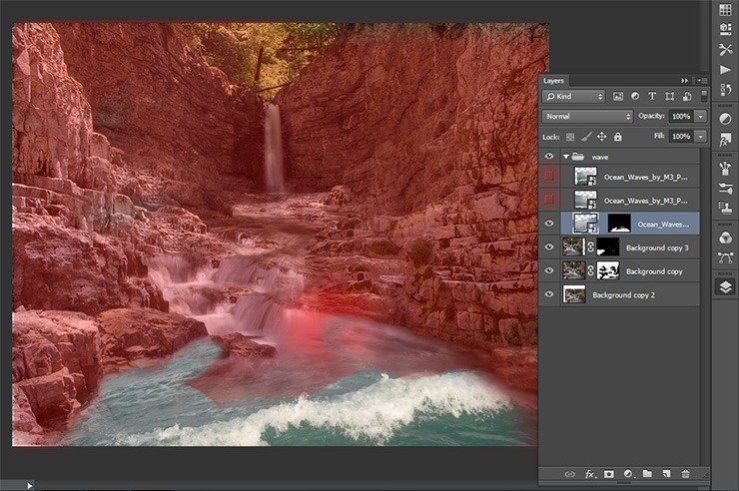
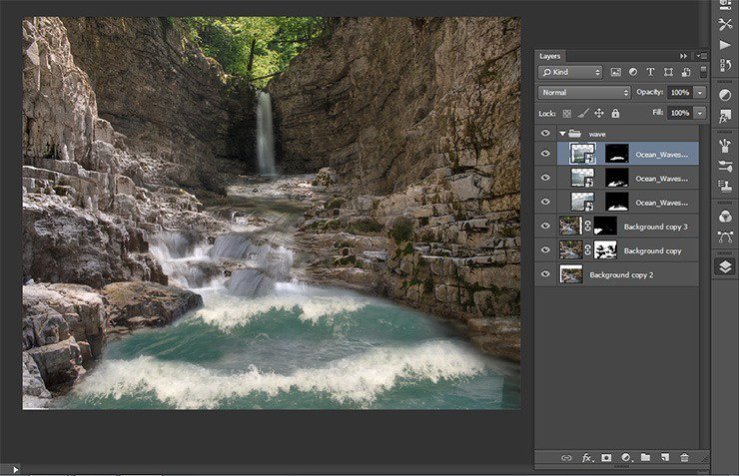
That’s how I got.
Step 24
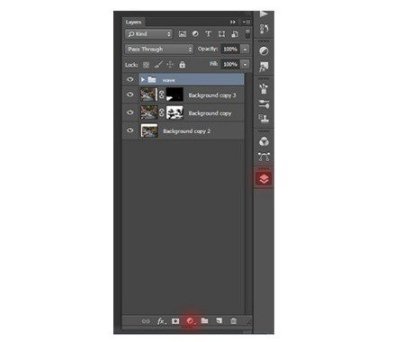
I do not like the color of the waves, so I added some adjustment layers to the group with the waves to change their color. The first is a photo filter. Go to Layer> New Adjustment Layer > Photo Filter.
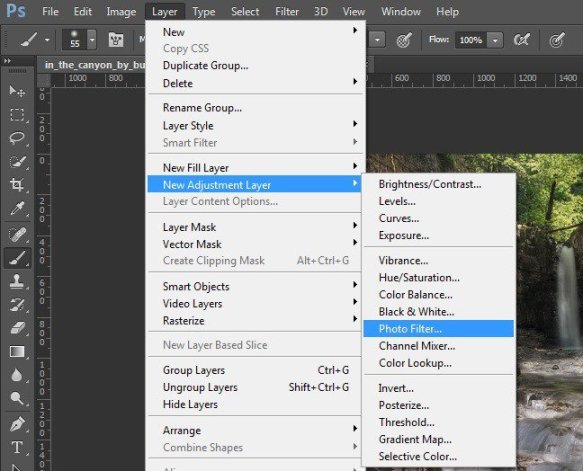
or click on the icon add an adjustment layer in the Layers palette.
Step 25
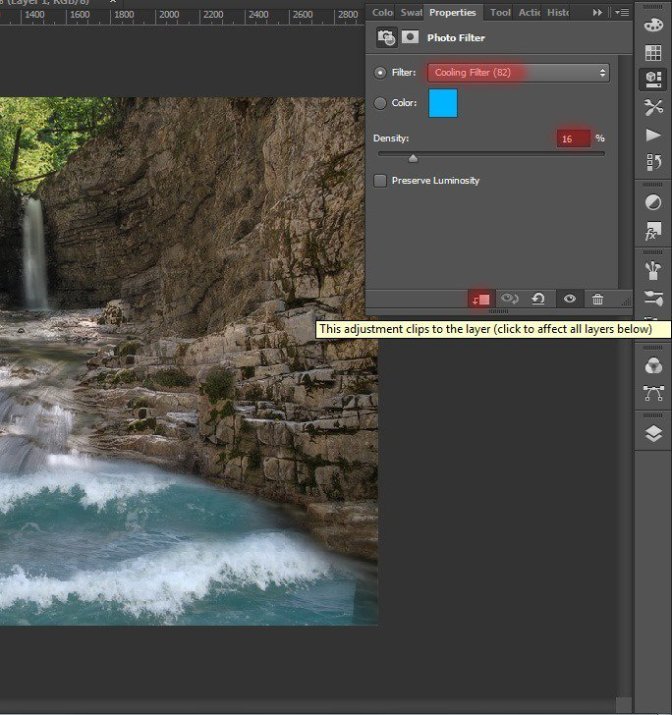
In the appeared window, enter the following settings: Filter – Cooling Filter (82), Density -16%.
Step 26
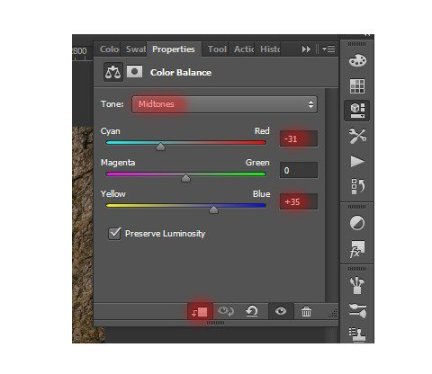
Adding a second layer. Go to Layer> New Adjustment Layer > Color Balance. In the appeared window, enter the following settings: Tone – Midtones, Cyan: -31, Yellow +35.
Step 27
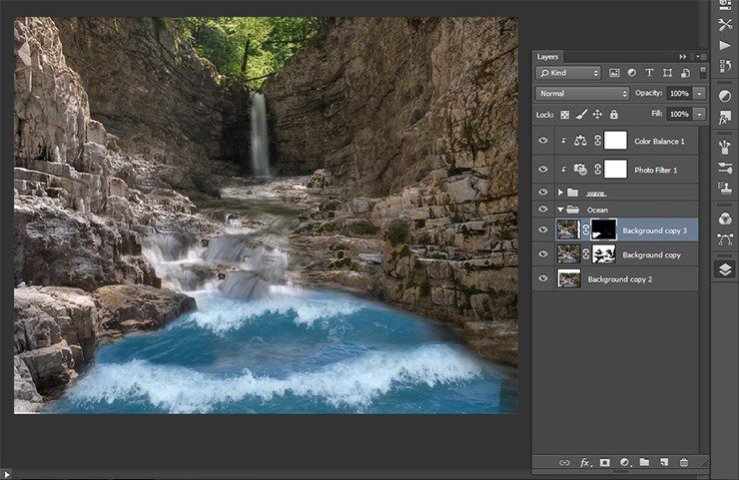
Here’s how is it after adding adjustment layers.
Step 28
I want the image looked more realistic. So, I’ll add little waves. Go to File > Place and select the desired file.
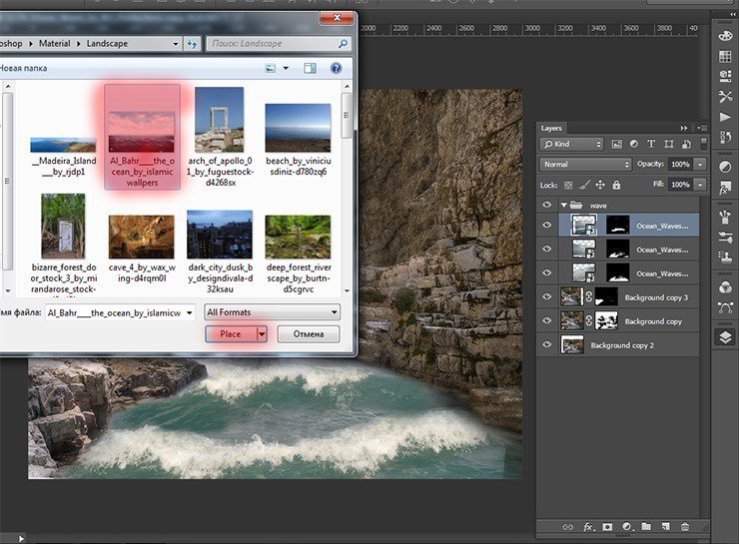
Step 29
Transform file placed so that the edges placed at the edge of the image came shores.
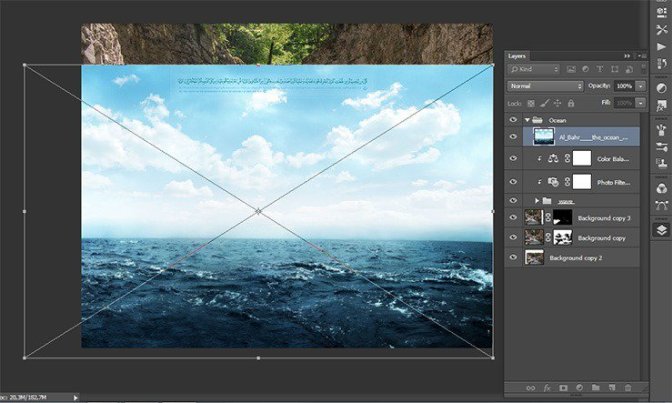
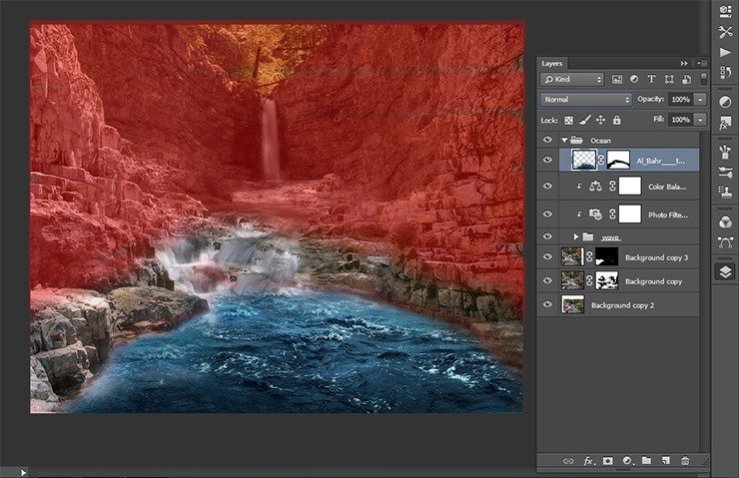
Step 30
Add a mask to this layer and previous Brush (Size: 200px, Hardness: 0% Opacity: 75%, Flow: 70%) and clean the parts of the image, where they not needed. Be sure to remove the waves from the shore and horizon. Not to make such a sharp transition waves near the horizon change brush opacity and size settings.
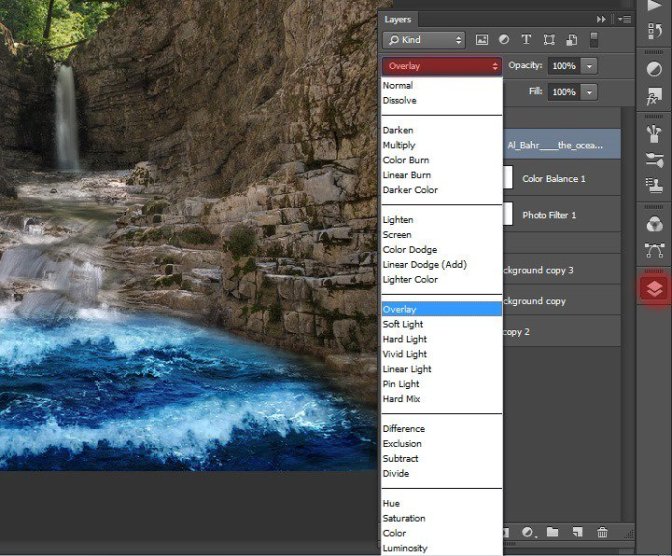
Step 31
Now change the blending mode for this layer. Click the Advanced tab, click on the layers. In drop-down list, select “Overlay”.
Step 32
Here is the result of the work done.
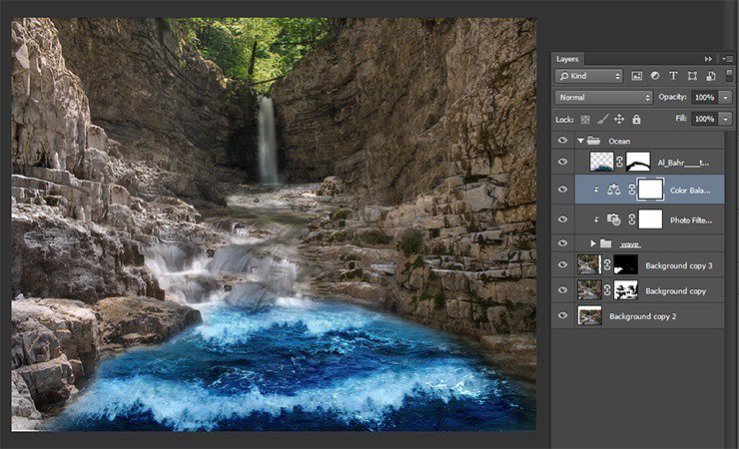
Step 33
Now I wanted to add brightness and blueness of the water and falls to combine composition. For our work needs bright colored water, it will give liveliness picture. So, create a new layer. Click on the new layer icon in the Layers panel or the short key Shift+ Ctrl+ N. The new layer should be under a layer with small waves.
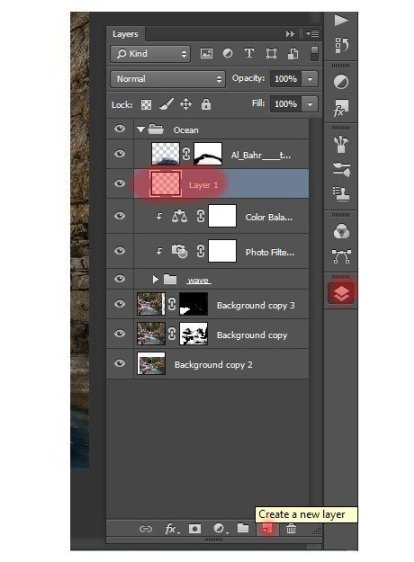
Step 34
Select a Brush Tool (B) with these settings: Size: 150px, Hardness: 0% Opacity: 100%, Flow: 100%. Set the color # 2c8ed2 and paint on the layer in places where there is water. Be sure to paint the waterfall and place seam texture waves and waterfalls. Change the brush size for more convenience.
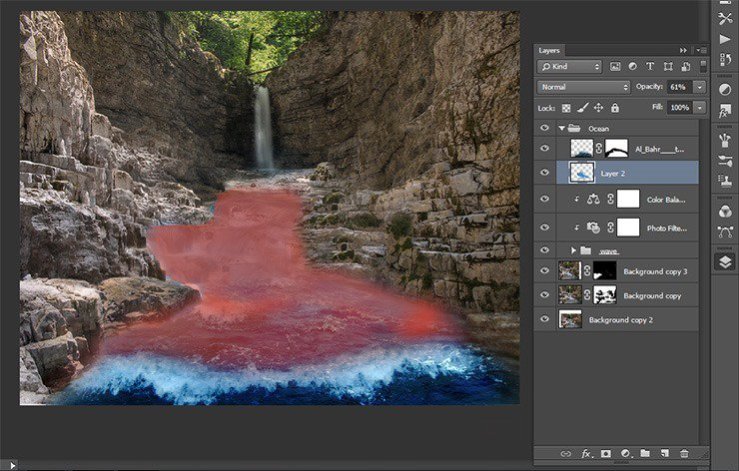
Step 35
Now change the blending mode for this layer. Click the Advanced tab, click on the layers. Drop-down list, select “Color”.
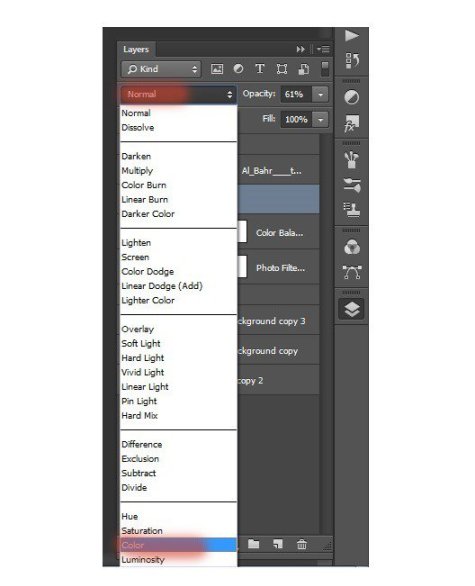
Step 36
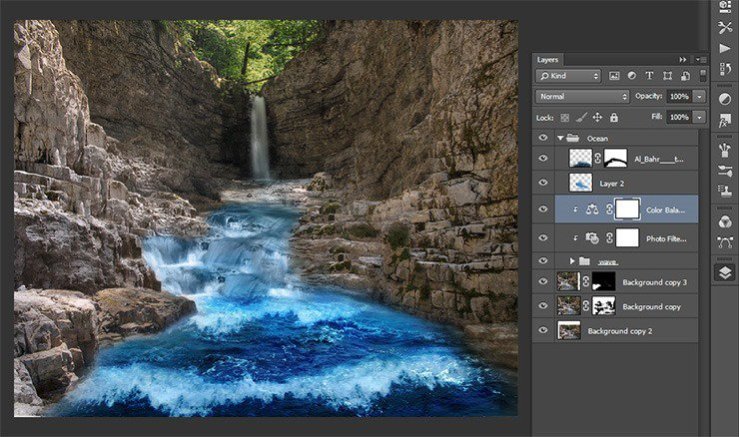
Our amphitheater is ready! Here’s how it has turned out at me. Now we will add a small item and proceed to the most interesting part of our image. Merge all layers in the group and name it “Ocean”.
Step 37
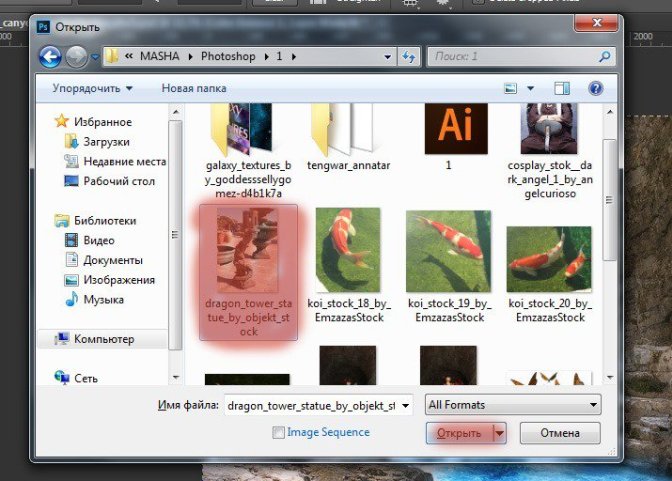
Add Stone lamps to our image. Go to file – Open or the short key Ctrl+ O. Locate the file with torches in the Chinese style, select it and click Open.
Step 38
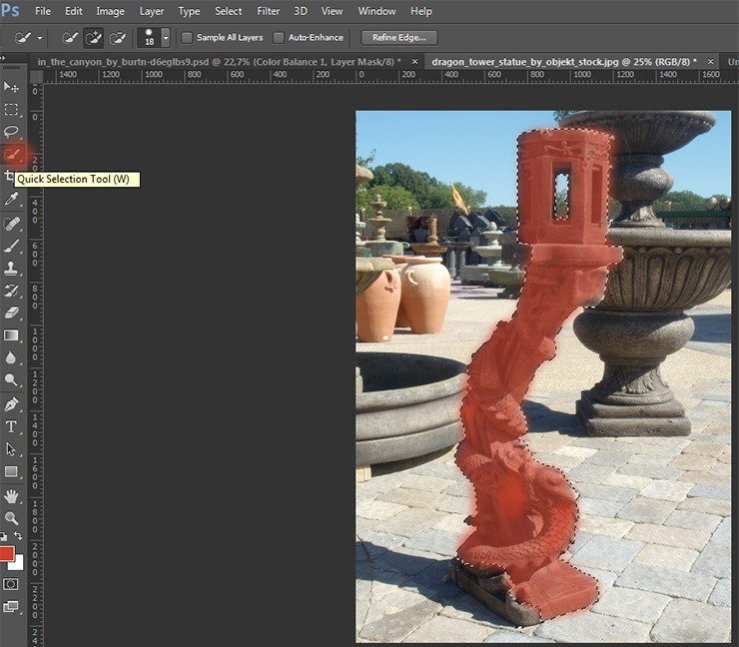
Now select the Quick Selection Tool (W) of the toolbar and draw the lantern. If you need to remove some of the region, which are not included in the selection, hold Alt and remove them.
Step 39
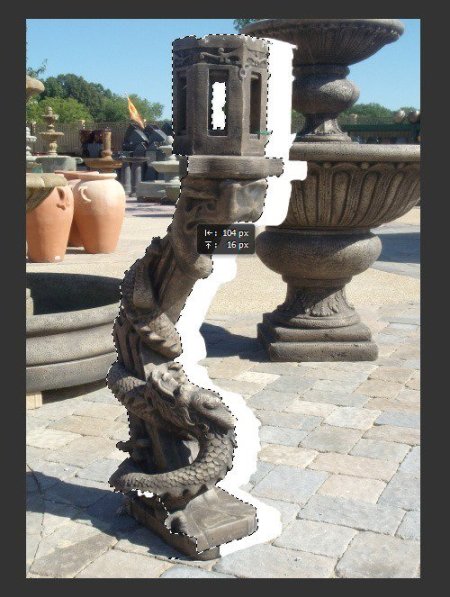
Now select the Move Tool (V). Move the cursor to our selection. He should change (scissors appear below). Grab the selection and pressing the button drag it into the document.
Step 40
Wow! So big for our picture! Well, nothing we now reduce it. Click the short key Ctrl+ T and reduce it to the desired size. Do not forget to clamp the Shift to proportional transform the object.
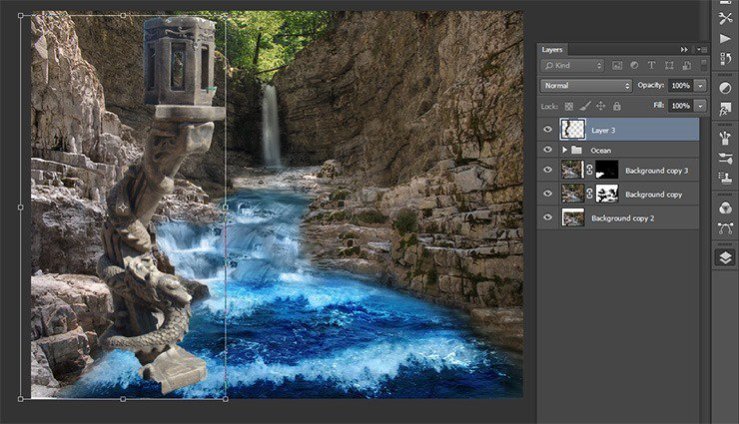
Step 41
Now we need to duplicate the layer with the luminaire. Click the short key Ctrl+ J.
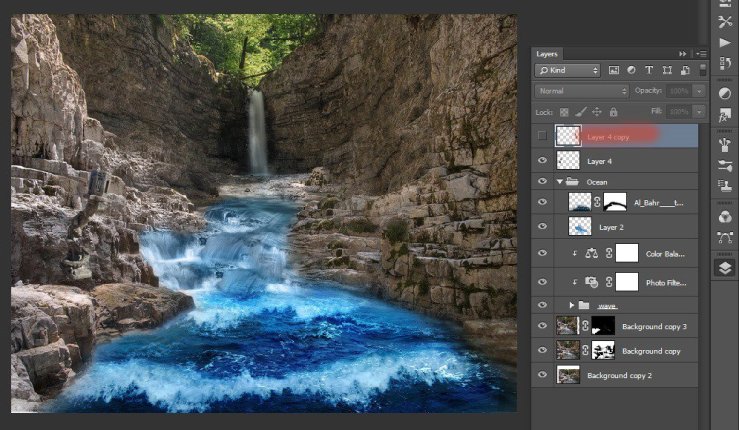
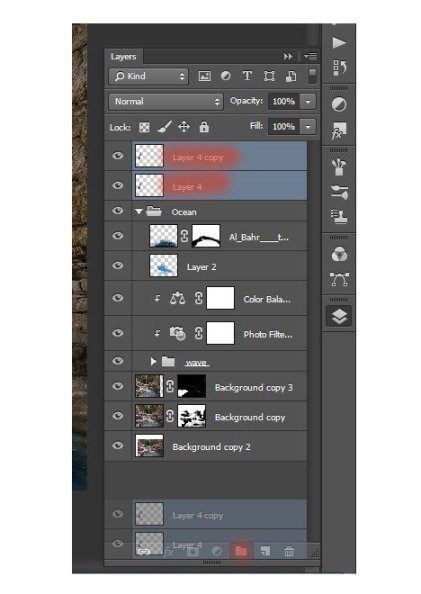
Step 42
Combine these two layers in the group. Select both layers by holding shift and pressing Ctrl+ G or drag the selected layers to the group icon and release them. Change the name of the group on “Statue”.
Step 43
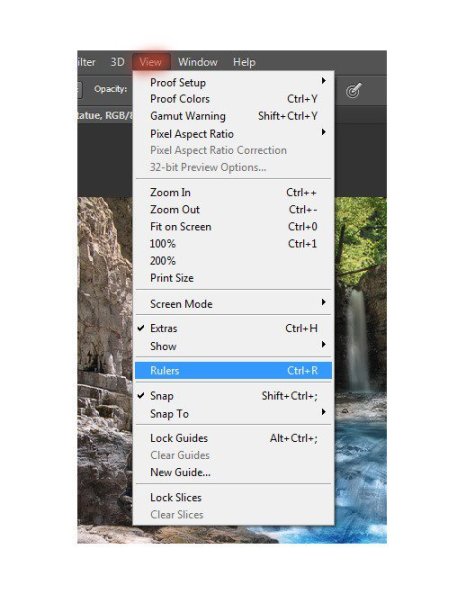
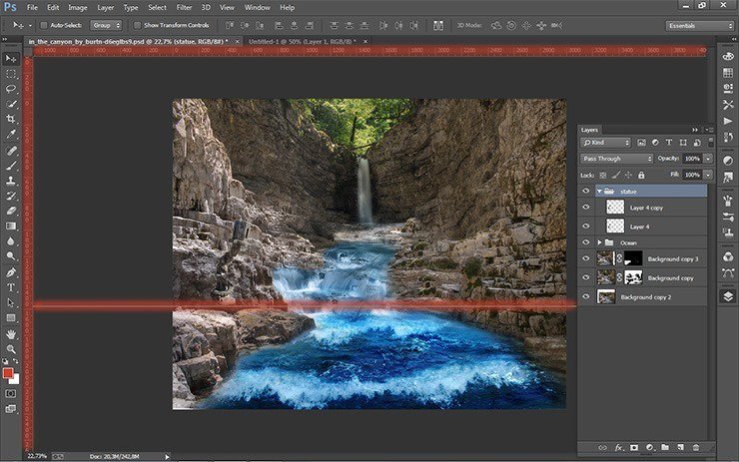
What would make a magical tint of our work we need to place lights strictly at the same height. Therefore, we need a ruler! Go View>Rulers, or press the short key Ctrl+ R. This command shows the ruler, and removes them
.
Step 44
When the ruler appeared, select the Move tool (V). Move to the top line, hold RMB, and drag to 1/3 from the bottom of the figure. Appear thin turquoise guide. You can always remove it.
Step 45
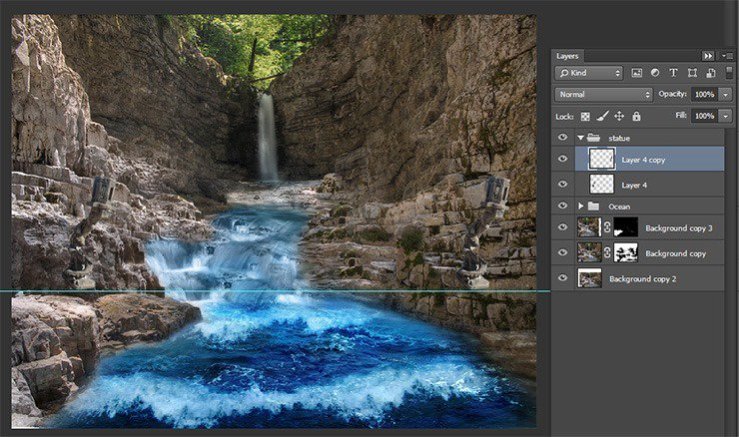
When exposed rail in position, go to our lamps. Move Tool, drag the lamp on the stone wall so that the bottom rail touched. To move exactly along rail the light clamp Shift.
Step 46
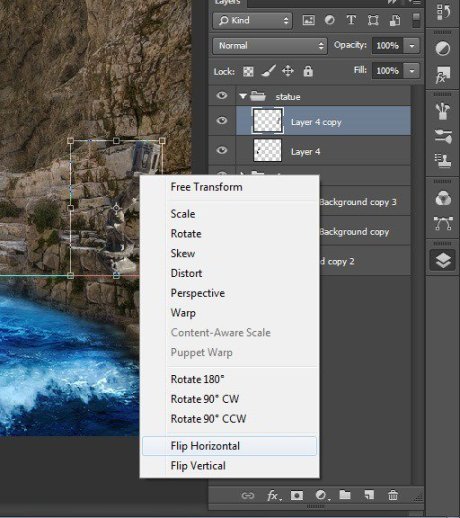
Now for the second lamp. Transform the second lamp. Click the short key Ctrl+ T. Then press the RMB and the drop-down list, select “Flip Horizontal”.
Step 47
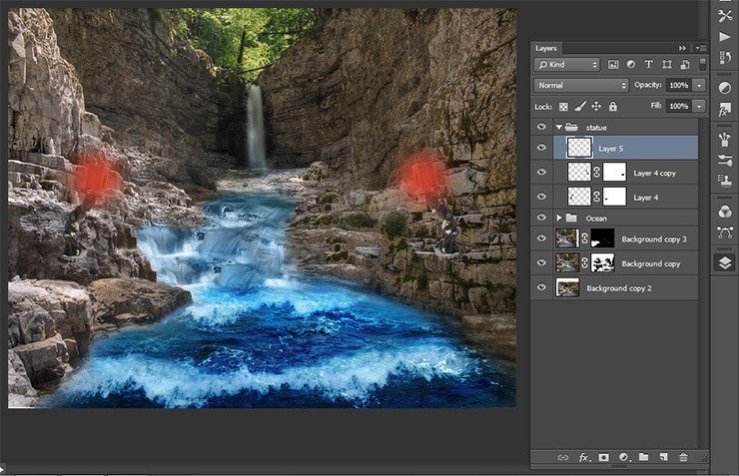
Let’s remove the stand from under the lamps. Each layer add a layer mask and with the brush remove holders.
Step 48
Our lamp ready. Now start adding them fire! Create a new layer. Select the Brush Tool (B) and set settings: Size: 300px, Hardness: 0% Opacity: 60%, Flow: 100%.
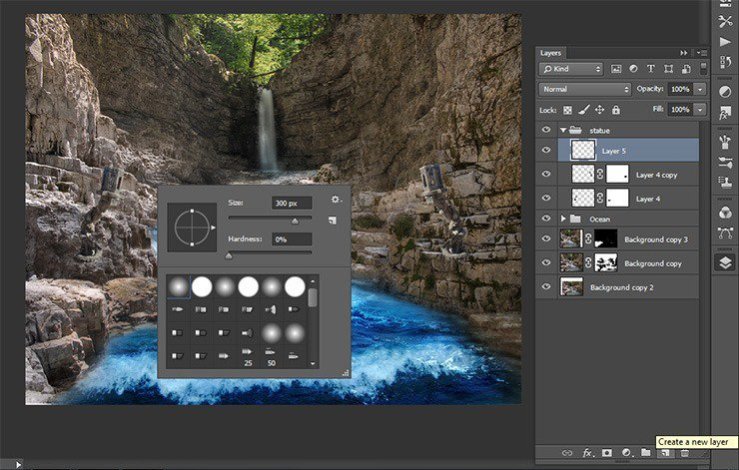
Step 49
Now set the color # d73d28 and put the dot several times in the same place on both spot lamps.
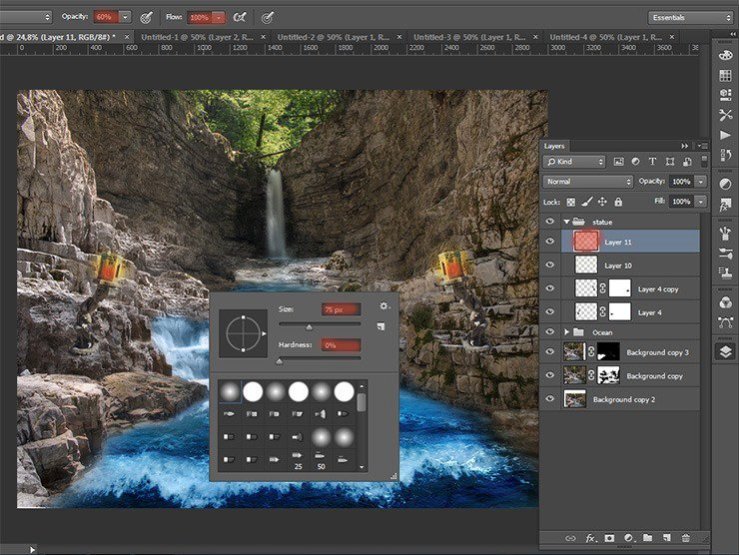
Step 51
Change the blending mode to Overlay in the Layers palette.
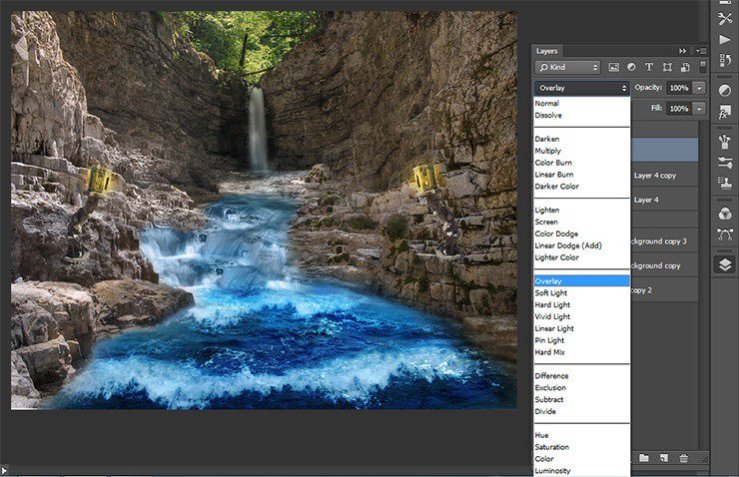
Step 52
Now add the source of the fire in the lamp. Create a new layer and select Brush Tool. Set settings: Size: 300px, Hardness: 0% Opacity: 60%, Flow: 100%. Set the color # d73d28 and put the dot several times in the same place on both spot lamps as shown in Figure.
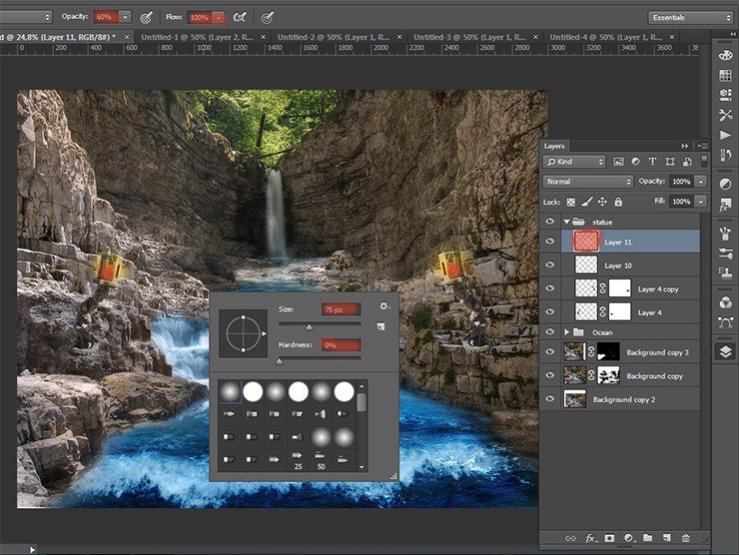
Step 53
Change the blending mode to Hard Light in the Layers palette.
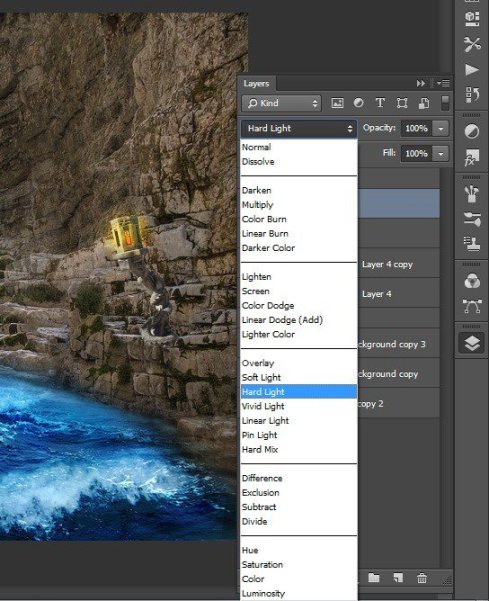
Step 54
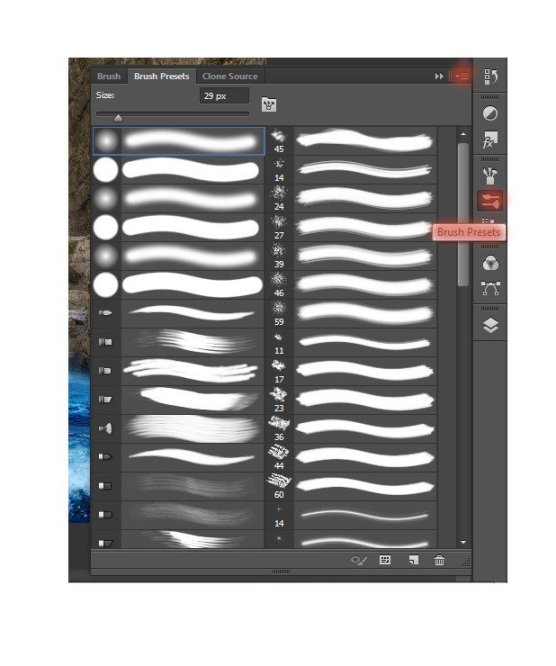
Effect of light and burning we have created. It remains to add smoke. For realism, we will use ready brushes (Source for download at the beginning of the article). Begin to add to our library of smoke brushes. To do this, click on the tab Brush Presets. Top of this window there is a small button (shown) of additional features. Click on it.
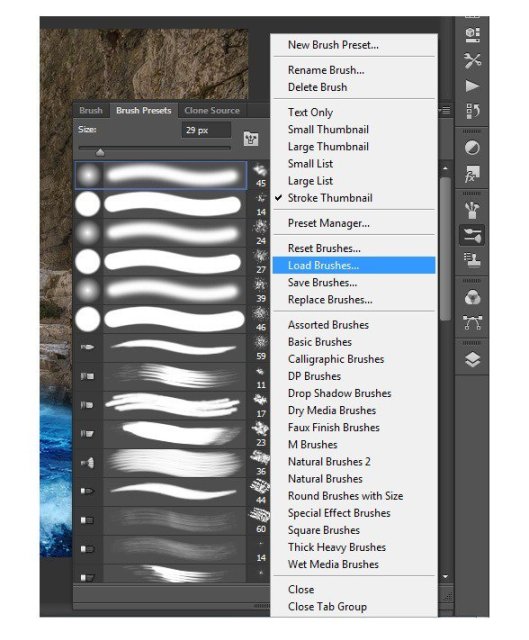
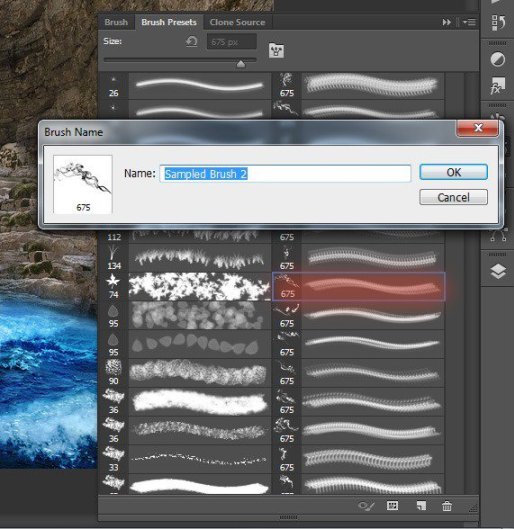
In the drop-down menu, select load brushes and specify the path where they are on your computer.
Step 55
Our brush loaded! Now in window Brush Presets, select the brush smoke what you like. I use this.
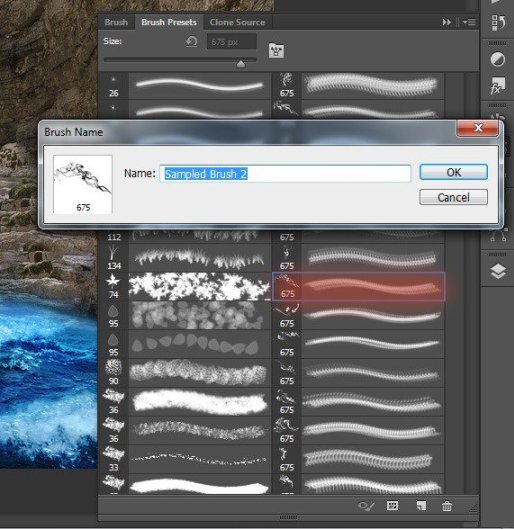
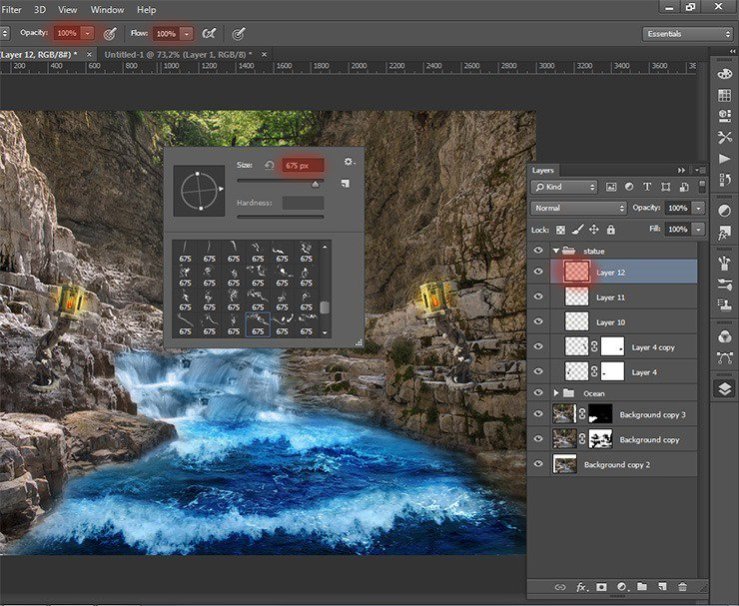
Brush settings: Size: 675px, Hardness: 0% Opacity: 100%, Flow: 100%, color: #dfdfdf, angle: 11° I deliberately did not choose white, because gray will look slightly more realistic than white.
Step 56
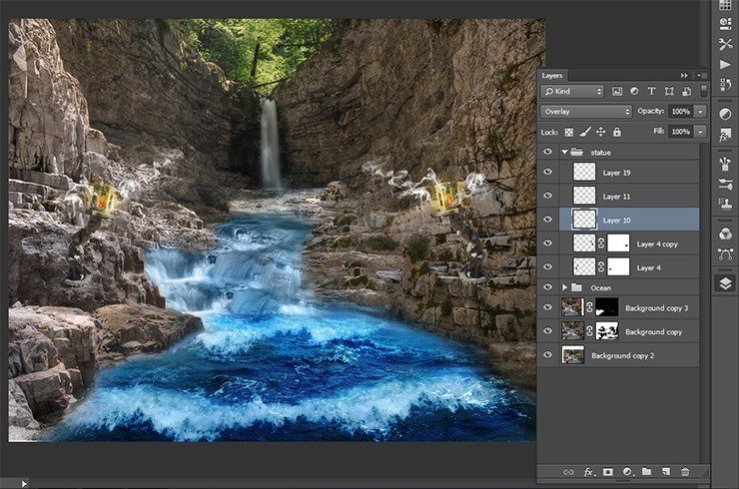
I added more smoke another smoke brush. Tinctures remain the same brush. Here is the result.
Step 57
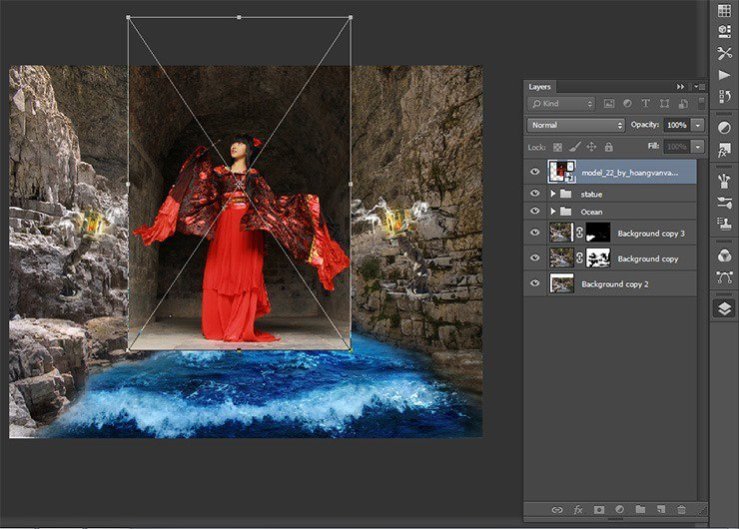
Now proceed to the very delicate and important parts of the image – creating a model. Go to File > Place and select the image of model. Now reduce the size put it at the source of the waterfall.
Step 58
Add a layer with the model in a group. Name it “Model”.
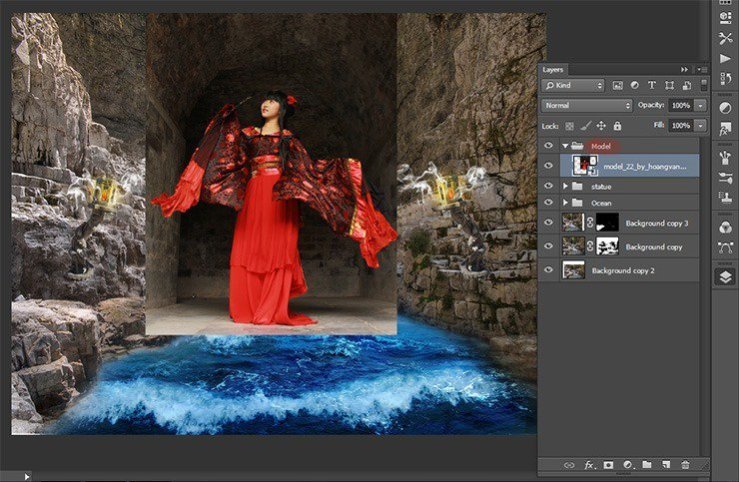
Step 59
Add a layer mask to a layer with the model. Select Brush Tool (B) with settings: Size: 150px, Hardness: 25% Opacity: 100%, Flow: 100%. Thoroughly clean background. Try not to remove parts of the costume.
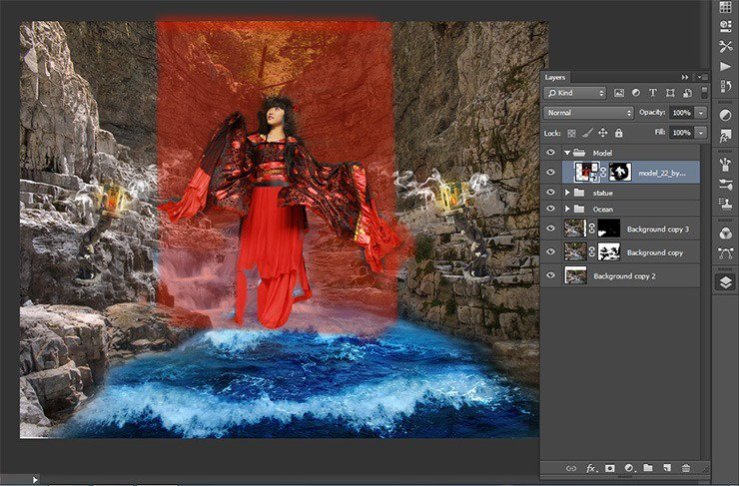
Step 60
Add the following picture with the model Go to File > Place and select the image of model. Very important to follow the sequence of overlay models differently nothing will turn.
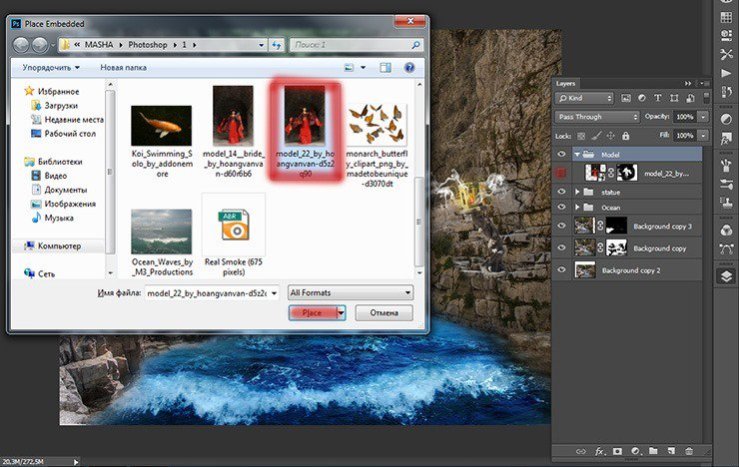
Step 61
Resize to the size of our model and reflect both models horizontally. Clamp the Shift and click the short key Ctrl+ T, Right click in any field pattern and in drop-down list, select Flip Horizontal.
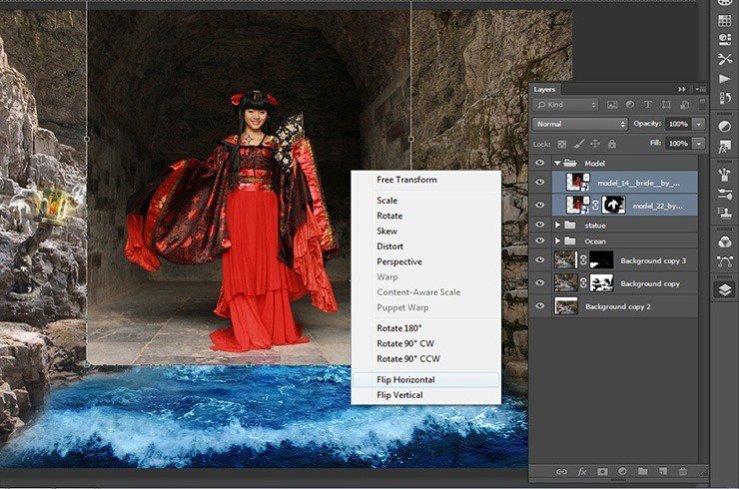
Step 62
add a mask to layer with second model.
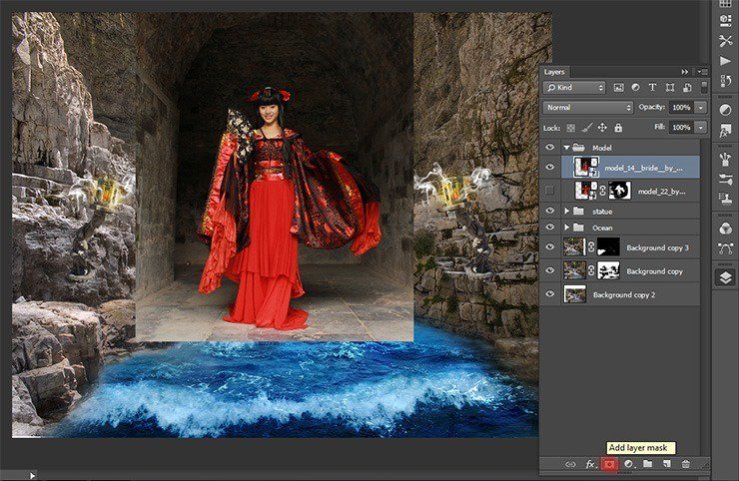
Step 63
Then remove the background with brush in these settings: Size: 150px, Hardness: 0% -100% Opacity: 100%, Flow: 100%. Blue boxes it that you want to remove.
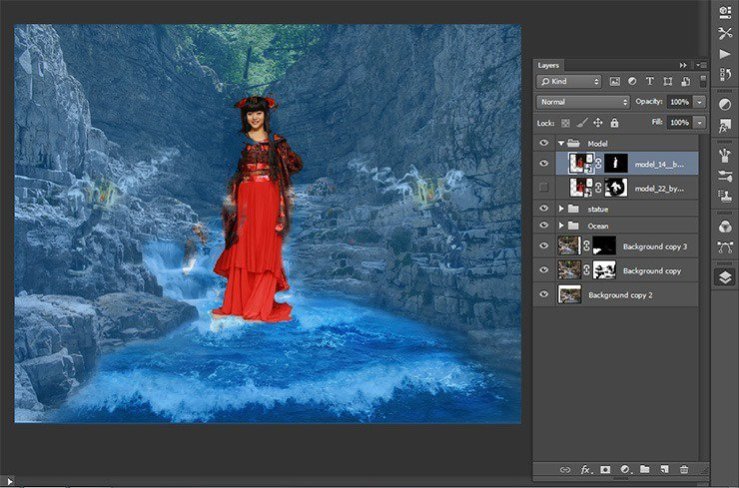
Step 64
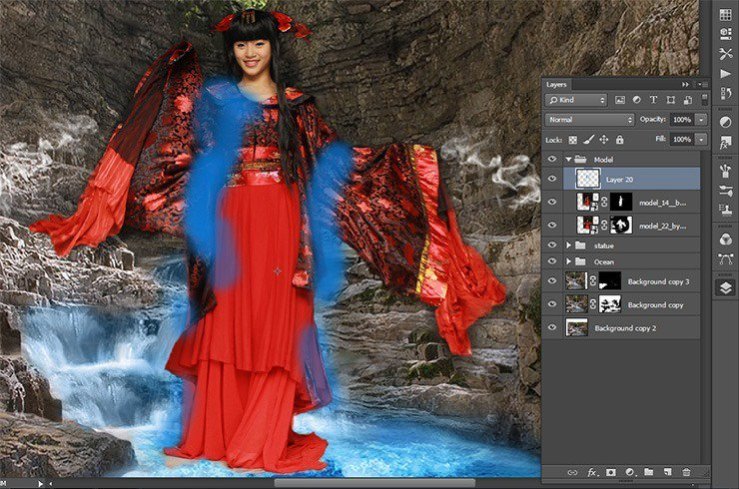
Try to fit the size of the models that they were identical. To do this, transform it, if needed. Remove the background near the dress very carefully! Change the settings hardness brush. Around the model should not be a glow, so remove unnecessary only a very hard brush. This selection of the second model.
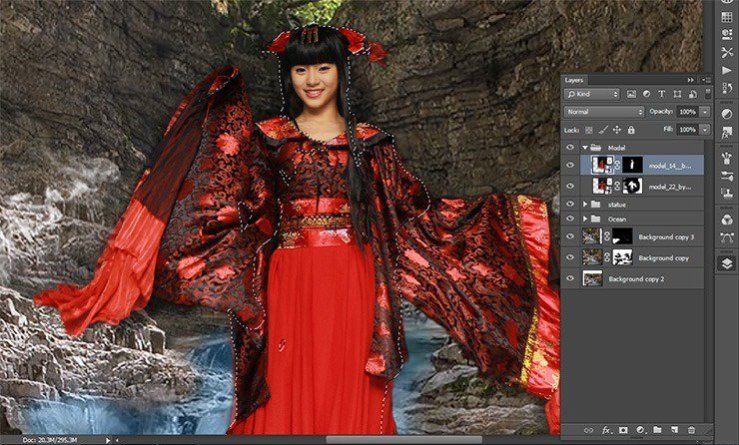
Blue shows where you have to remove the second part of the model to create the figure of what we need. Experiment! Combine hard and soft brush. Remove superfluous.
Step 65
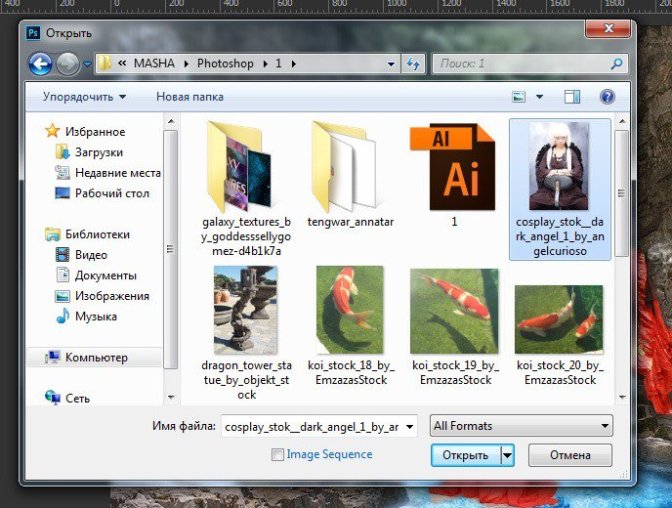
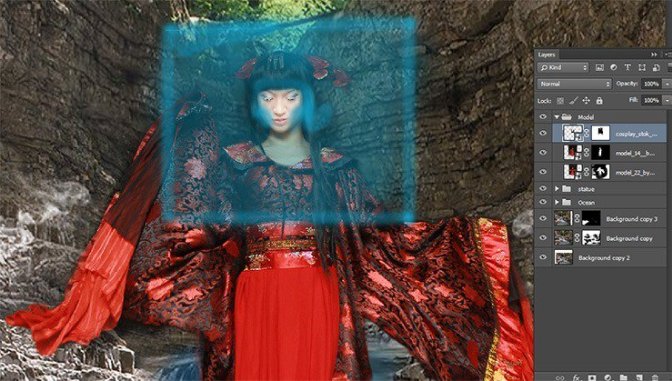
I do not like the expression on her face, so I found a more suitable option. Open girl – angel image, pressing Ctrl+ O or File> Open.
Step 66
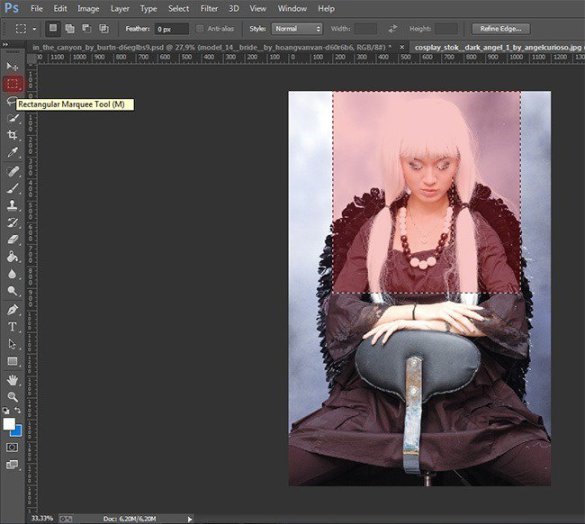
Select the Rectangular Marquee Tool (M) and select the part of the portrait. After selection, click on the Move Tool (V). Grab the selection and drag it to our work.
Step 67
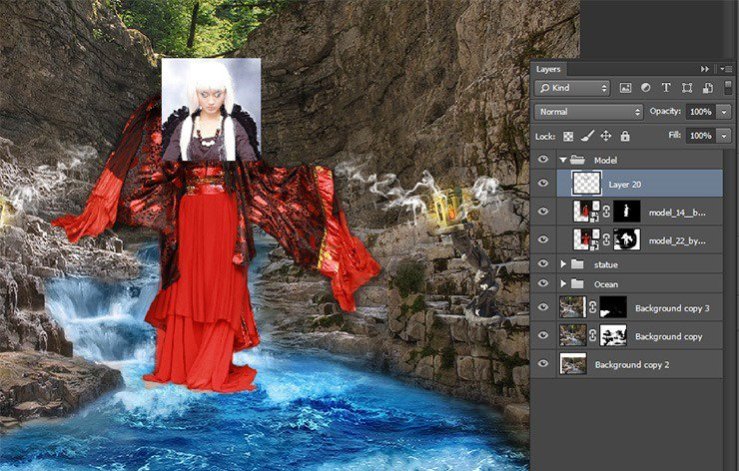
Transform it to the desired size the short key Ctrl+ T. Right click in any field pattern and in drop-down list, select Flip Horizontal.
Step 68
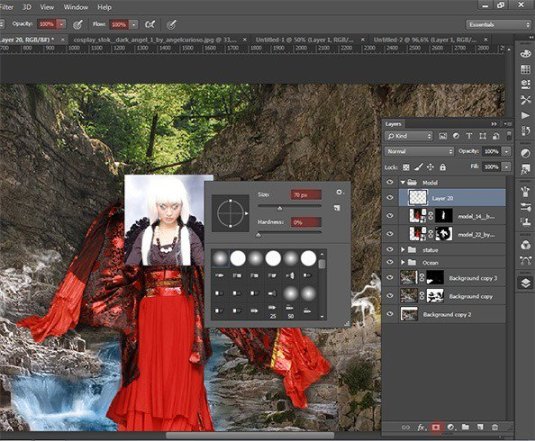
Add a layer mask. Select the Brush Tool (B) and set the following settings: Size: 70px, Hardness: 0% – 100% Opacity: 100%, Flow: 100%.
Step 69
Carefully remove any excess. Remove some of the cheeks using a Brush Tool (B): Size: 50px, Hardness: 0% Opacity: 100% Flow: 70%.
Step 70
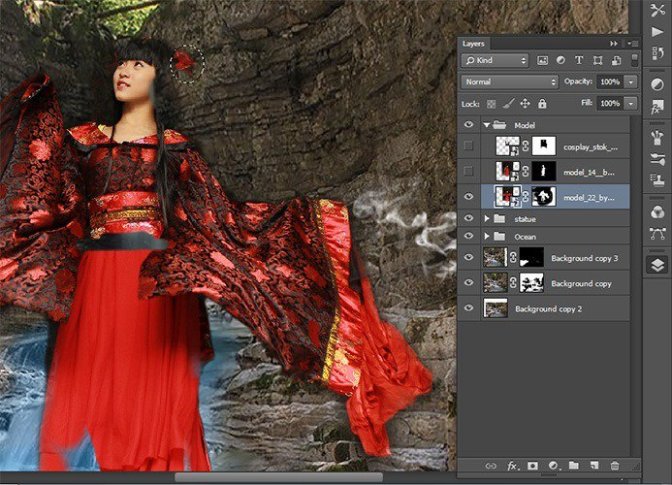
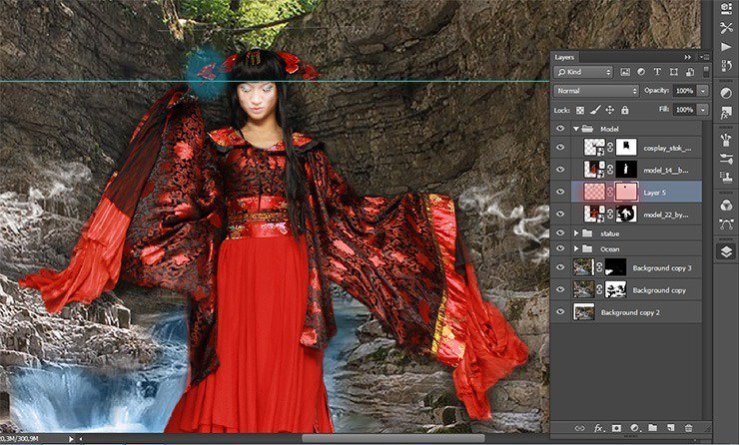
The model is almost ready! Go to the layer the first model. Select the Rectangular Marquee Tool (M). Circle the hairpin and copy the short key Ctrl+ C. Paste it the short key Ctrl+ V and Flip Horizontal. Put it symmetrically second.
Step 71
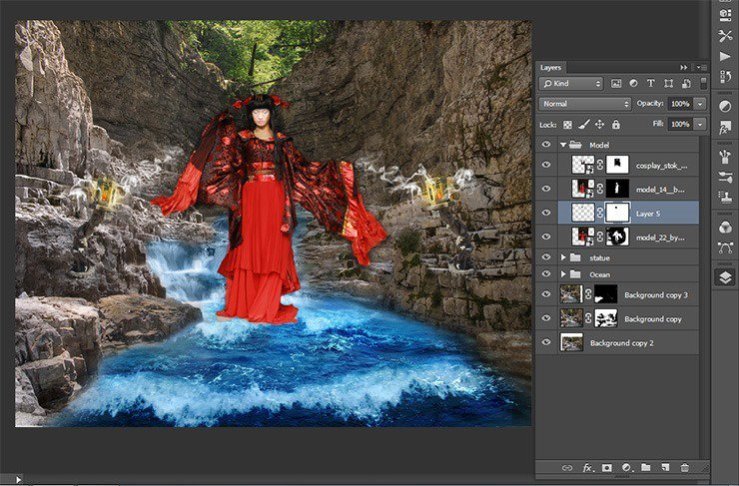
Finally, I made a model. Here is the finished result.
Step 72
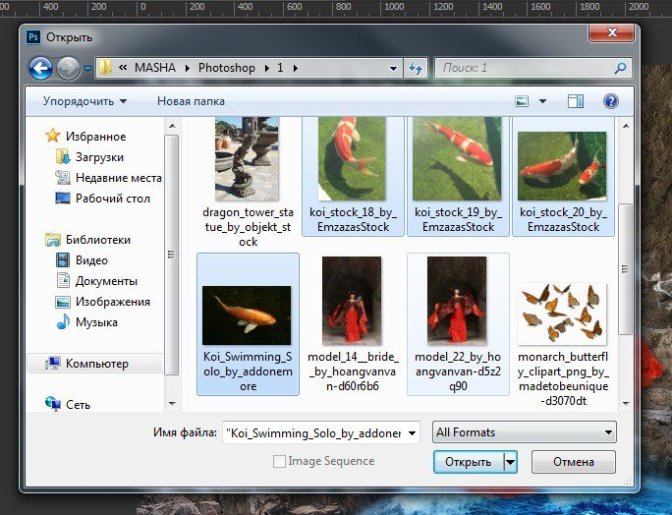
Now add the fish in the picture, because it will be very difficult to work with small objects. I believe that the fish give a dynamic picture. Let’s get started! Open fish image, pressing Ctrl+ O or File> Open. To open multiple images at once, hold down the Shift.
Step 73
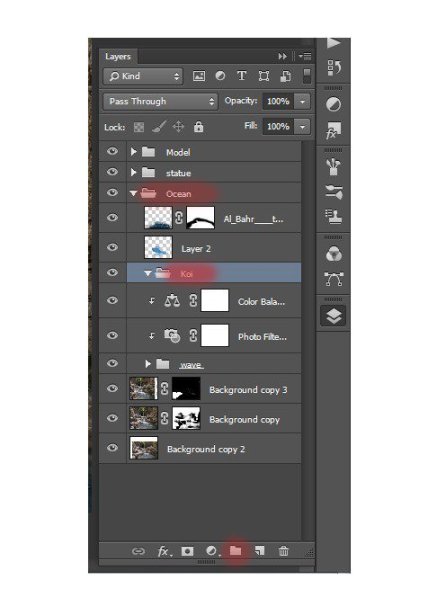
So back to the group “Ocean”. Create a group there. Call it “Koi”. So, it will be easier to work with layers.
Step 74
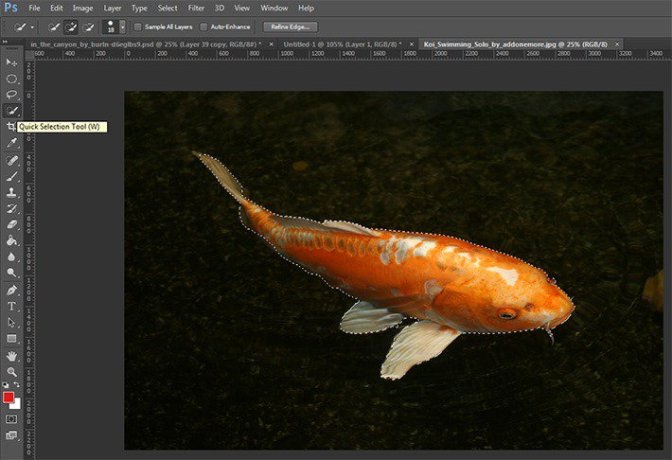
Put gold koi. Go to the tab with the desired fish. Choose a Quick Selection Tool (W). Select all the fish.
Step 75
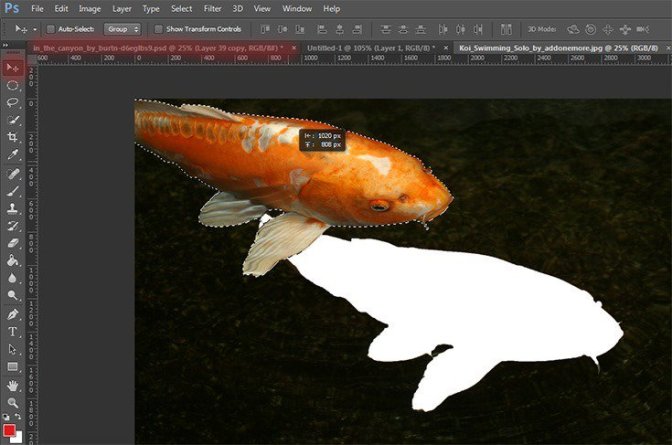
Now take the Move Tool (V). Capture the selection and drag it into the document with work.
Step 76
Now change the size of the fish. Ttransform it to the desired size. The short key Ctrl+ T make it small. Try to place the fish in a circle, but observing the randomness.
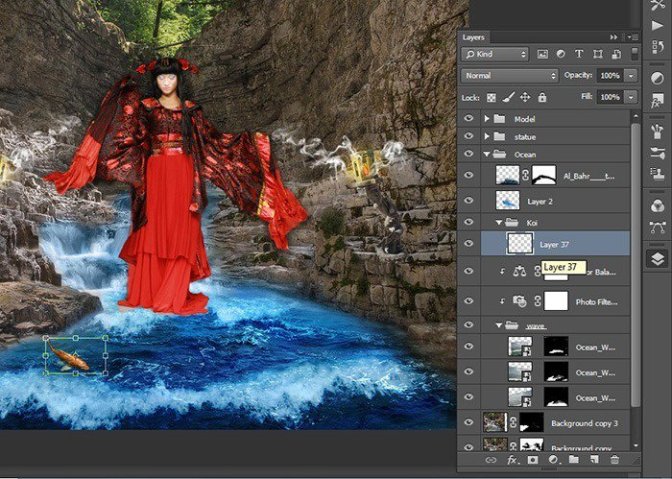
Step 77
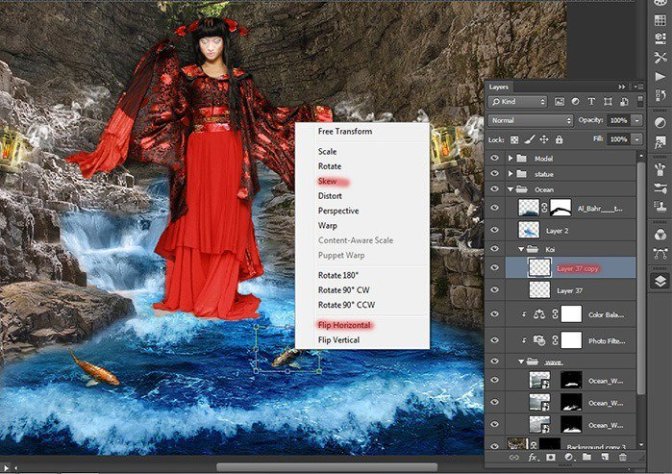
Now I duplicate the fish changed its size and tilted. Ttransform it to the desired size. The short key Ctrl+ T. Right click in any field pattern and in drop-down list, select “Flip Horizontal”. To tilt in the same list, select “Skew”.
Step 78
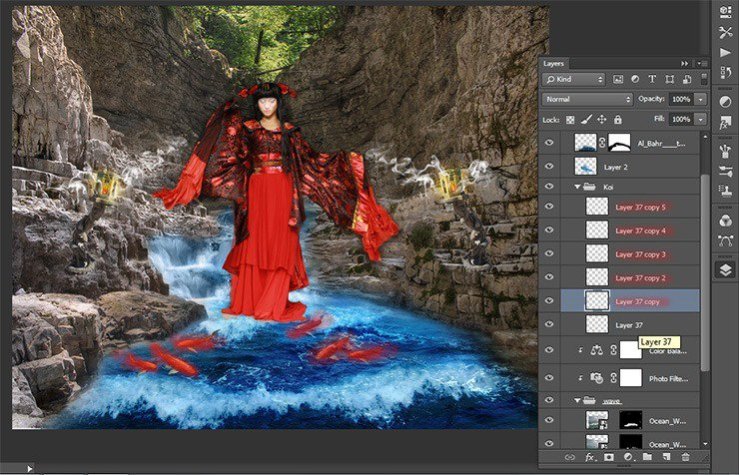
Duplicate 4 times. Change the fish want to you want or as shown in Figure. Placed them so. Remember this is a creative process and show how I did it. Not necessarily as I do.
Step 79
Let’s add some other fish. Go to tab with open red and white fish. Choose a Quick Selection Tool (W). Select fishes.
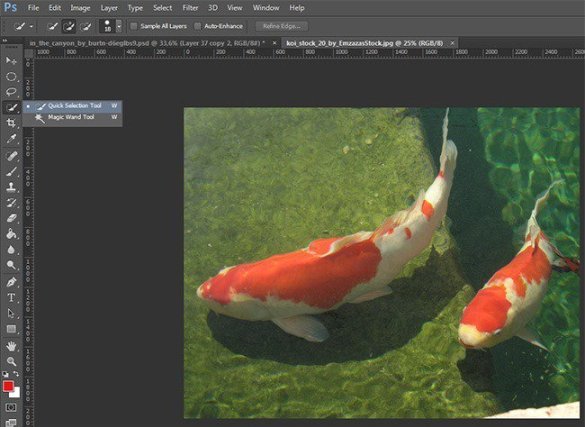
Step 80
Now take the Move Tool (V). Capture the selection and drag it into the document with work.
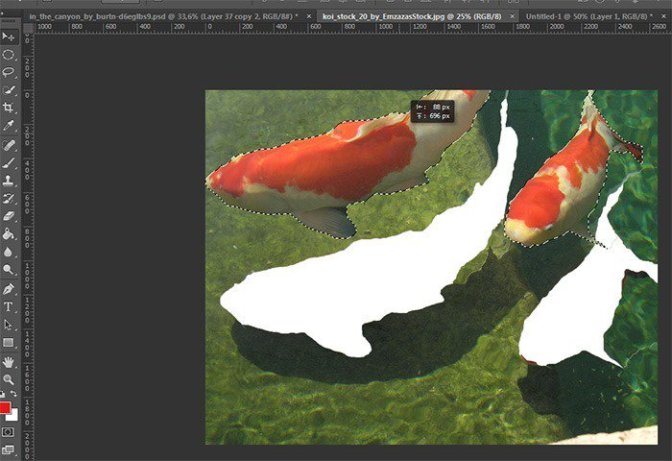
Step 81
Now I duplicate the fish changed its size. Ttransform it to the desired size. The short key Ctrl+ T. Right click in any field pattern and in drop-down list, select “Flip Horizontal”.
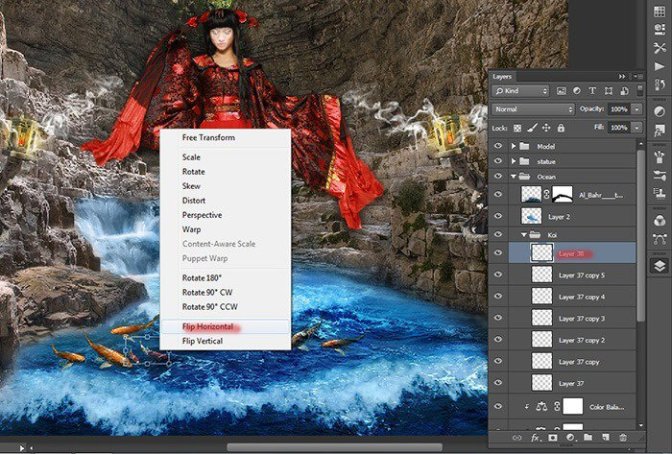
Step 82
Duplicate 3 times. Change the fish want to you want or as shown in Figure.
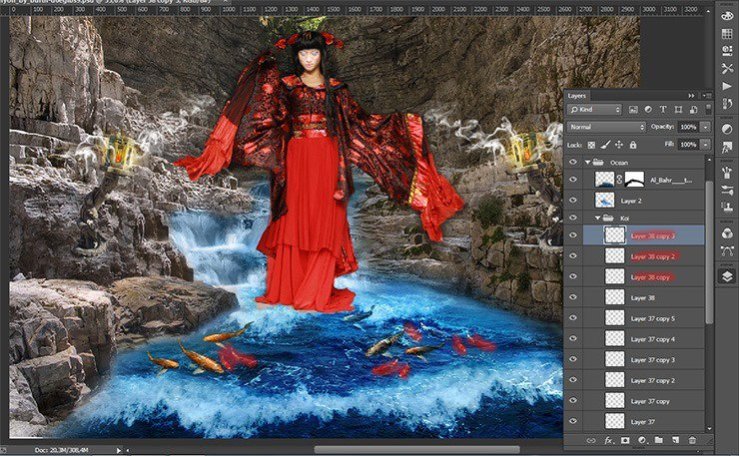
Step 83
It remains to add 2 more fish :) Repeat all have done with the last fish. I duplicate it once. Placed as shown in the figure.
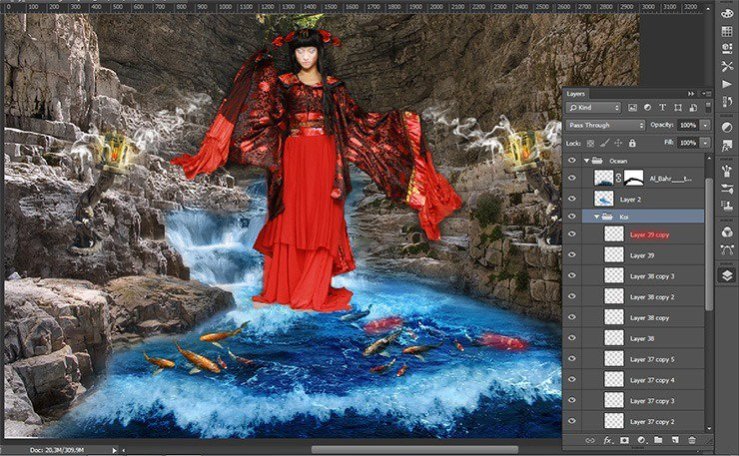
Step 84
Now I want to add shadows to the belly of fish and make them a little brighter. To do this, add two adjustment layers.
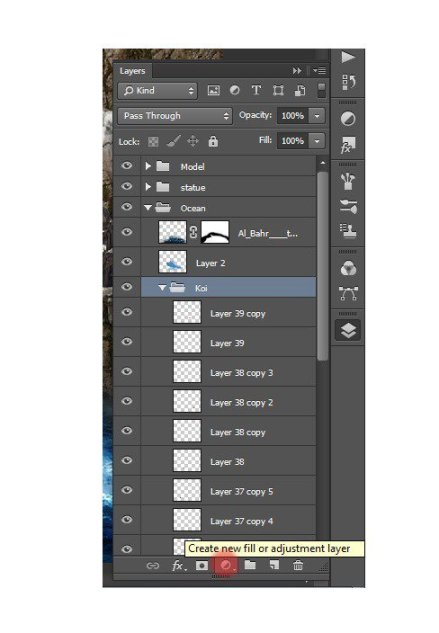
Step 85
The first layer is the Color Balance.
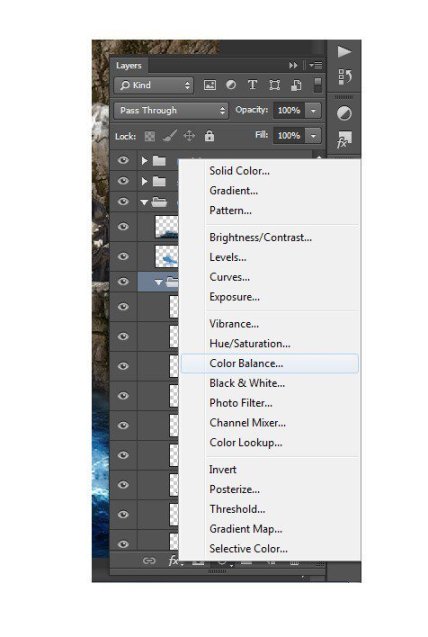
Step 86
In the window that appears, for midtones and highlights, set the settings as shown in the figure. Tone can change by clicking on the “tone”. Be sure to apply to a group of adjustment layer.
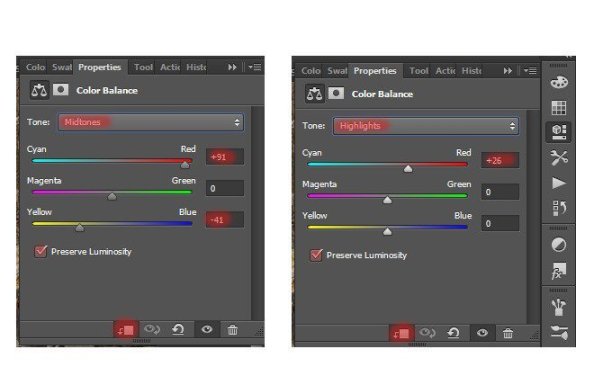
Step 87
Next adjustment layer is Hue/Saturation…
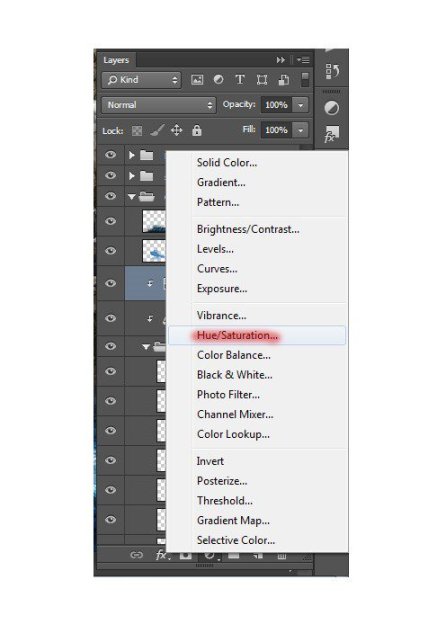
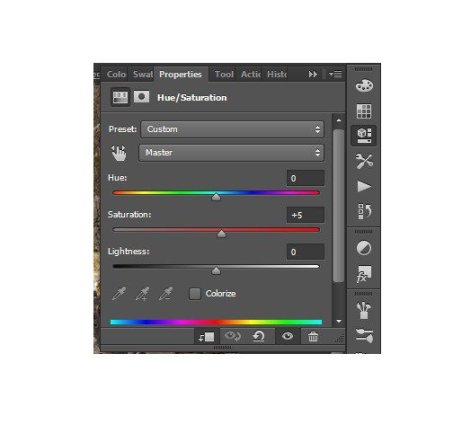
Step 88
Set the settings as shown in the figure.
Step 89
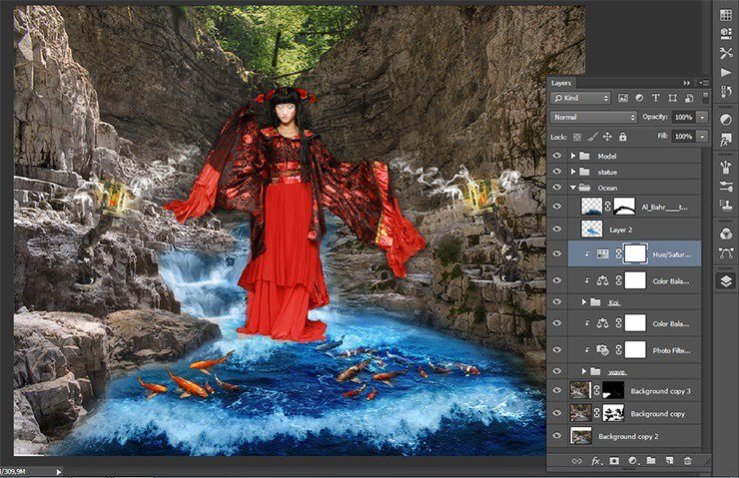
Our work with a fish is complete! Here is the result.
Step 90
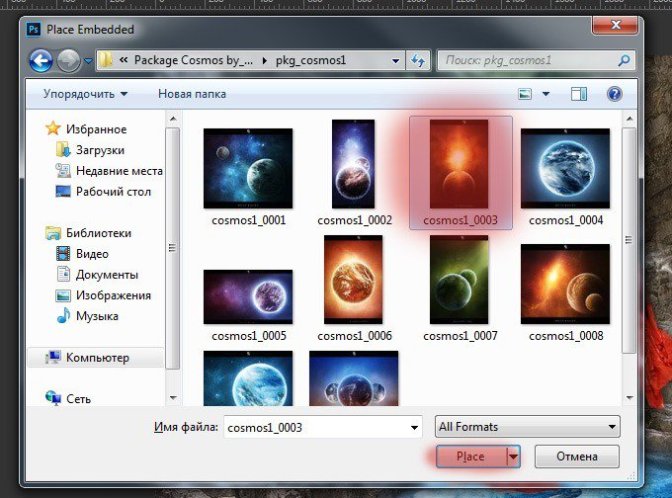
I really wanted to add the magic, so I used the space. Begin to create space landscape. Go to File> Place and select file with two yellow planet.
Step 91
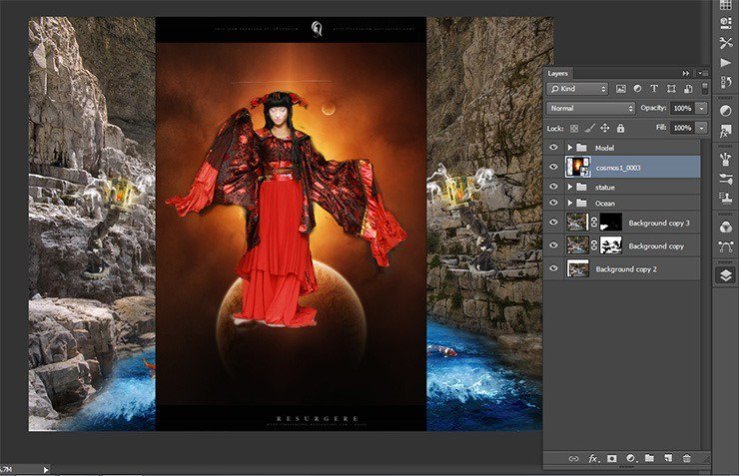
Select the with planets and click on folder icon in Layer panel to add in group the short key Ctrl+ G. Name it “Galaxy” Space group must be a under group with the model.
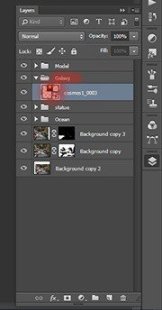
Step 92
Transform the planets (the short key Ctrl+ T). Reduce their size so that they are slightly larger than the model and move them behind model head as shown in the figure.
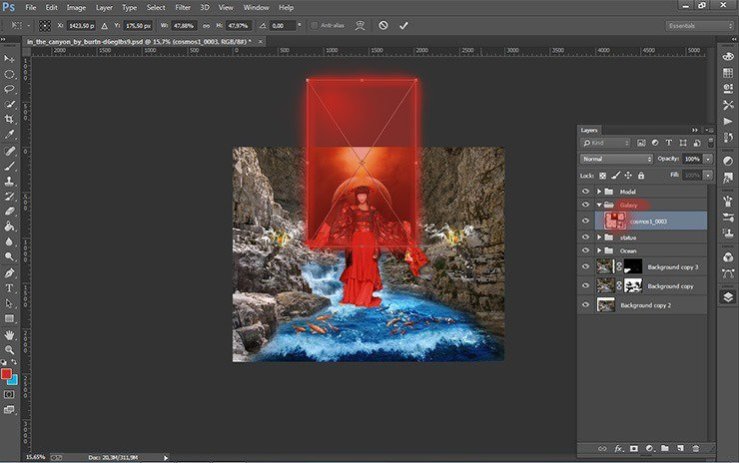
Step 93
Add a layer mask picture with planets and take the Brush Tool (B) on the toolbar.
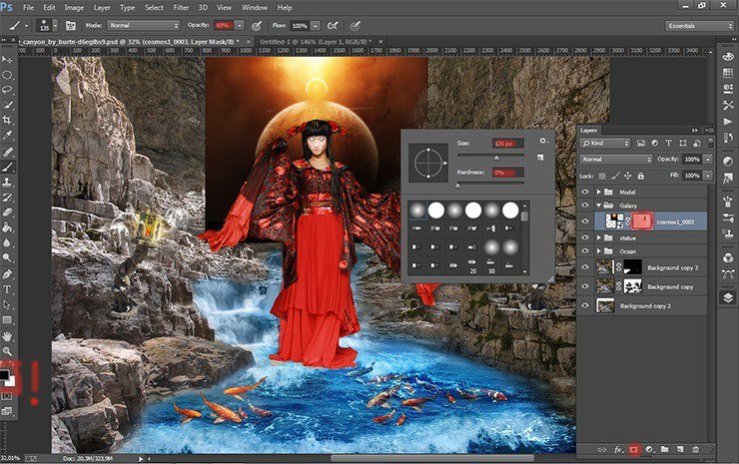
Step 94
Remove some of the dark using a Brush Tool (B) Size: 135px, Hardness: 0% Opacity: 60% Flow: 100%. Do not forget to set black color as your foreground color.
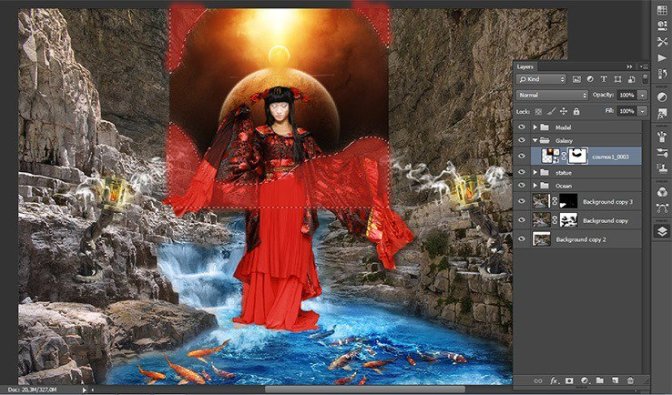
Step 95
Here’s how should get.
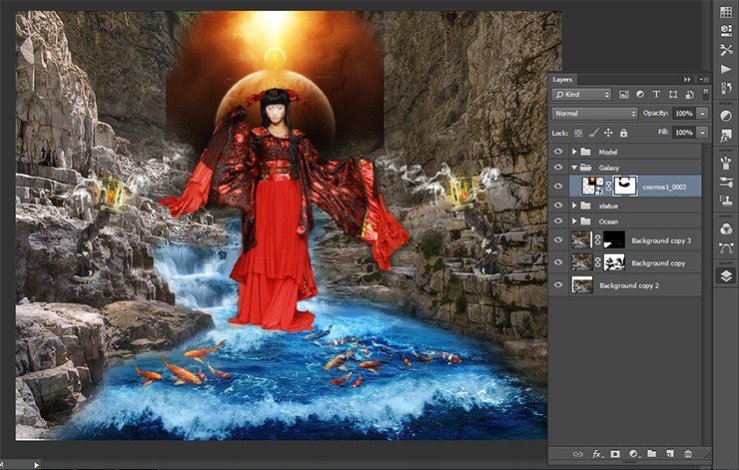
Step 96
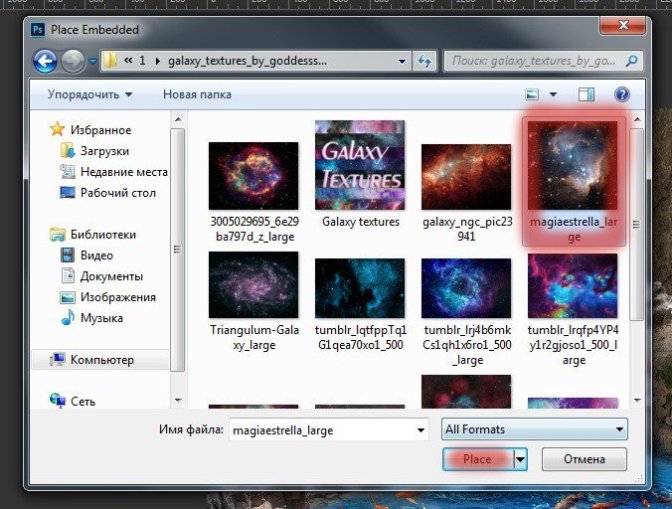
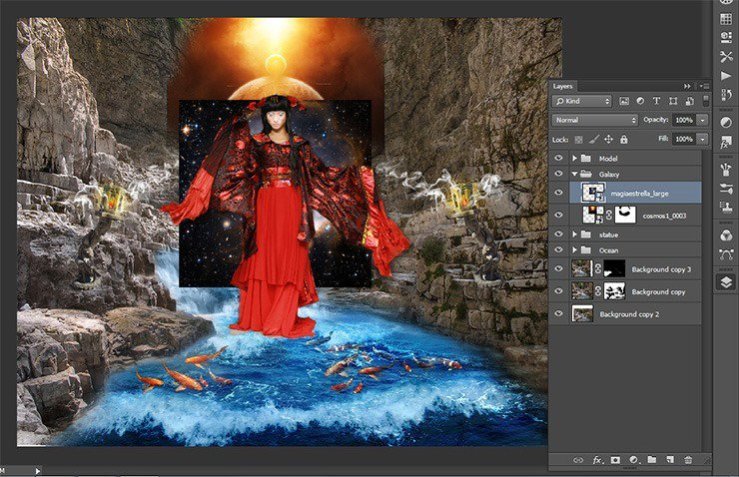
The next step I did the wings of galaxies. I saw an amazing thing that the shape of the galaxy resembles wings and decided that it would be watered in addition to picture Go to File> Place and select file with galaxies.
Step 97
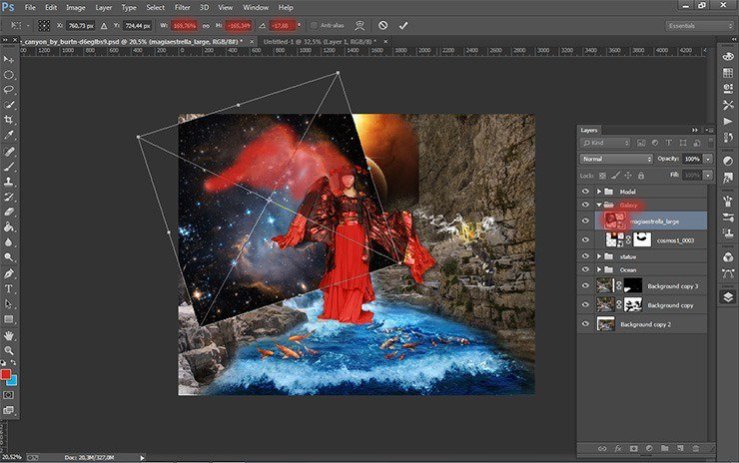
Transform the galaxies (the short key Ctrl+ T). Increase their size by pulling the cubes on the edges of the selection. Tilt them slightly (-17, 88).
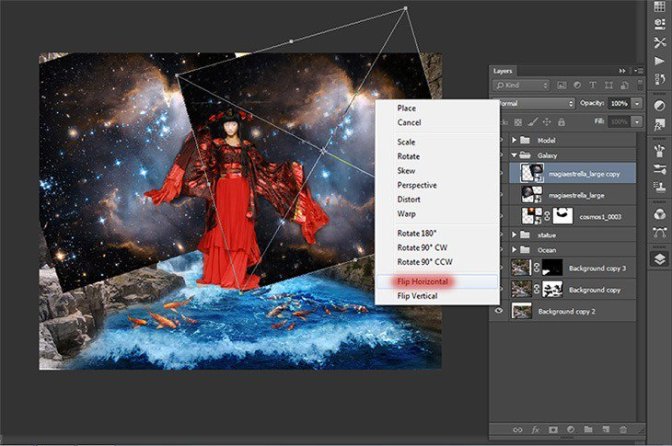
Step 98
Duplicate this layer. Transform it. Press the short key Ctrl+ T. Click RMB on the document, in the drop-down list, select Flip Horizontal. Move this layer slightly to the right to get a symmetrical.
Step 99
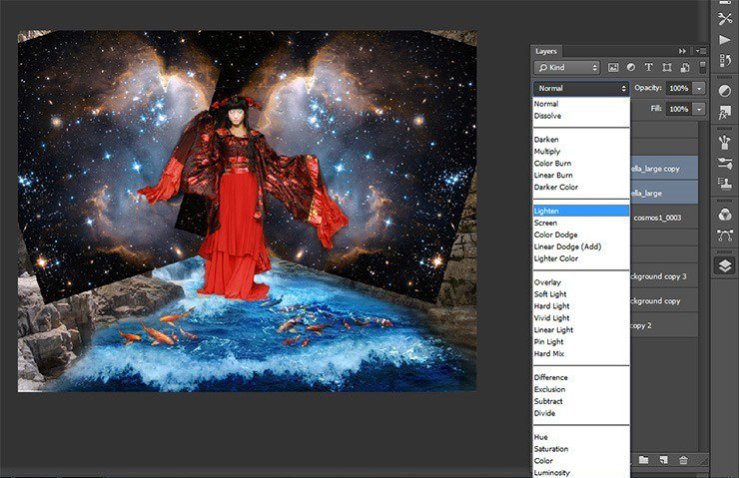
Now change the blending mode of both layers with galaxies. In the Layers palette. Click on the “normal” and from the drop down list, select “Lighten”.
Step 100
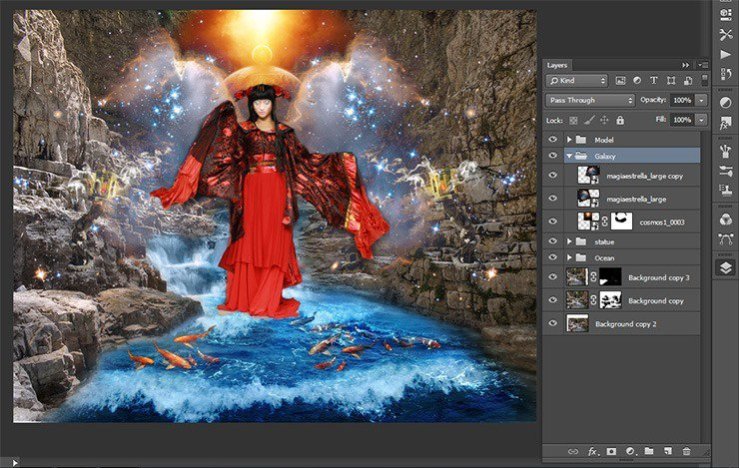
Here so I got.
Step 101
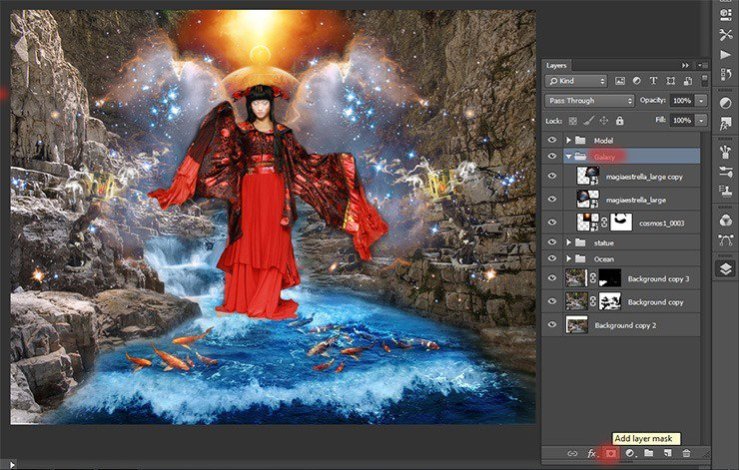
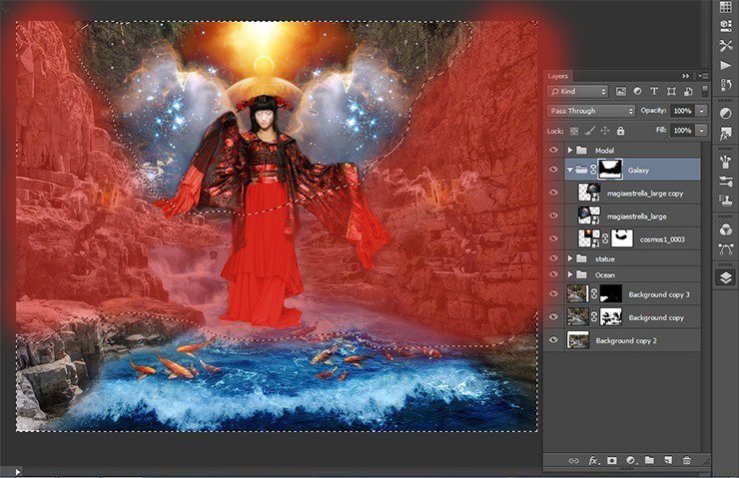
Next, remove the unnecessary part of the galaxy and stars. Add a mask to the group “Galaxy”.
Step 102
Remove some of the stars using a Brush Tool (B) Size: 230px, Hardness: 0% Opacity: 100% Flow: 100%. Do not forget to set black color as your foreground color.
Step 103
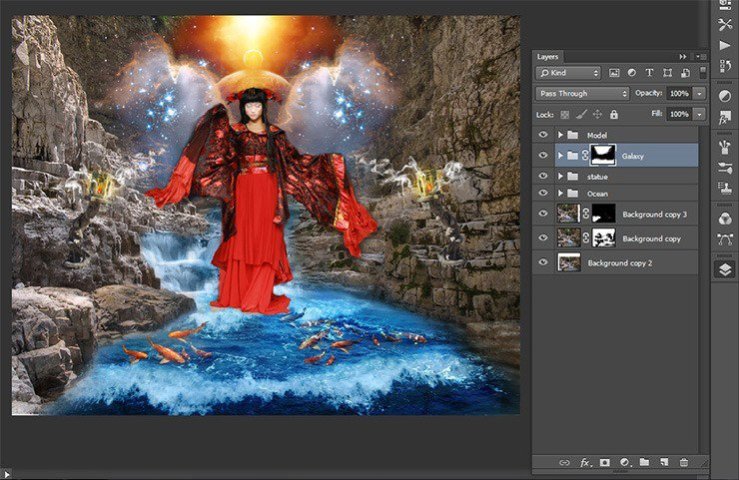
Here is my result.
Step 104
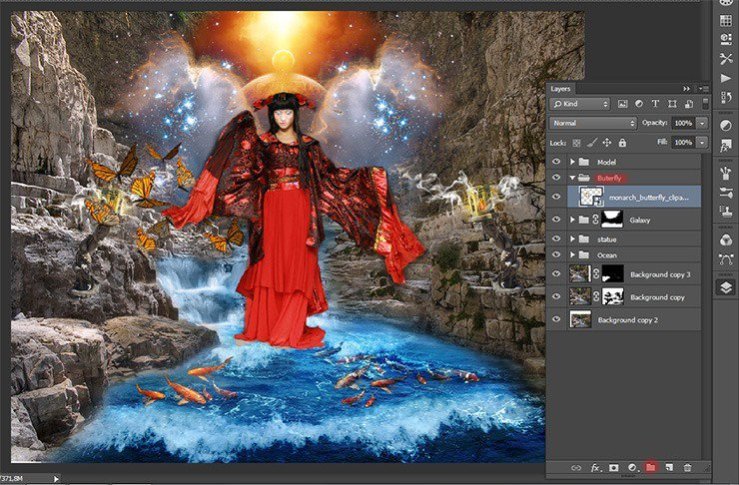
The picture was lighter and more mysterious; I added space and fiery flying butterflies. Get down! Go to File > Place and add photo with butterflies. Reduce their size.
Step 105
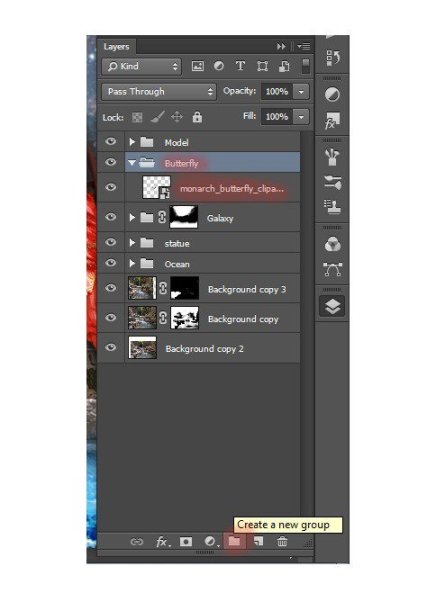
Create a new group and name it “butterflies”. This group will be sorted butterfly on the right and left. Then color. In this group will fire.
Step 106
I will begin with fiery butterflies on the left side. Transform the butterflies to the desired size. Near dresses butterfly should be small. Tilt them a bit to give the direction of flight.
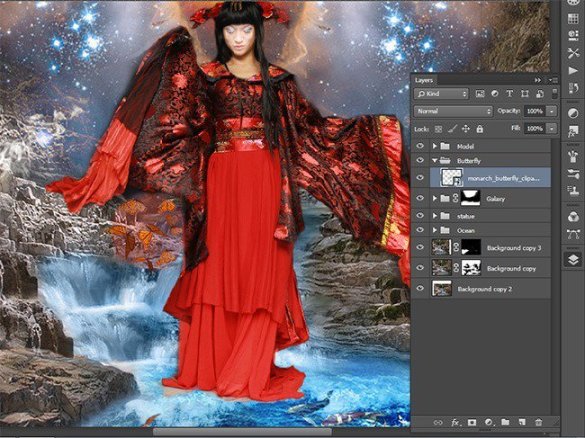
Step 107
Duplicate the layer with butterflies 2 times. Using Move Tool butterflies to move to the desired position.
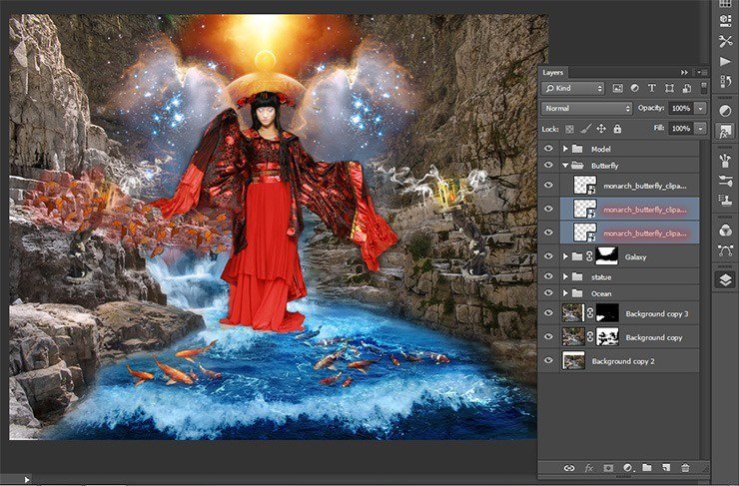
Step 108
Transform (the short key Ctrl+ T) each layer, making more and more butterflies.
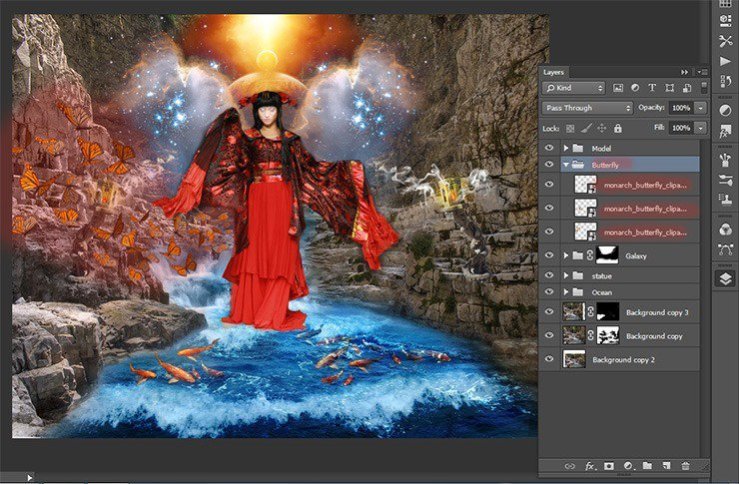
Step 109
Now duplicate group. Transform it (the short key Ctrl+ T). Click RMB on the document, in the drop-down list, select Flip Horizontal.
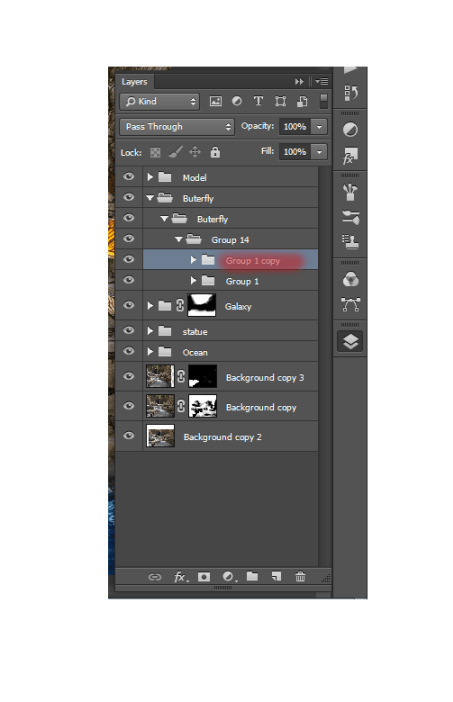
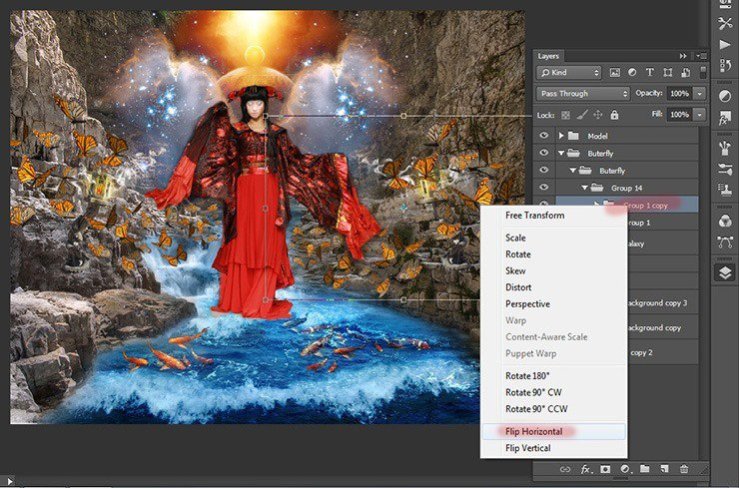
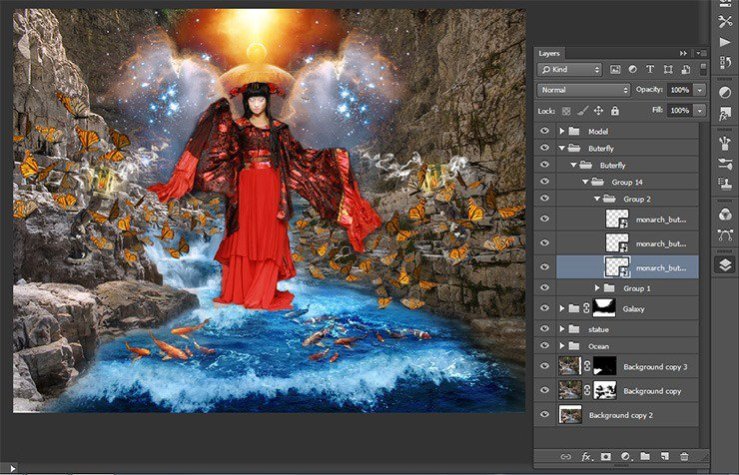
Step 110
Now go to the duplicated group. Move some layers to make it distinct from the left group.
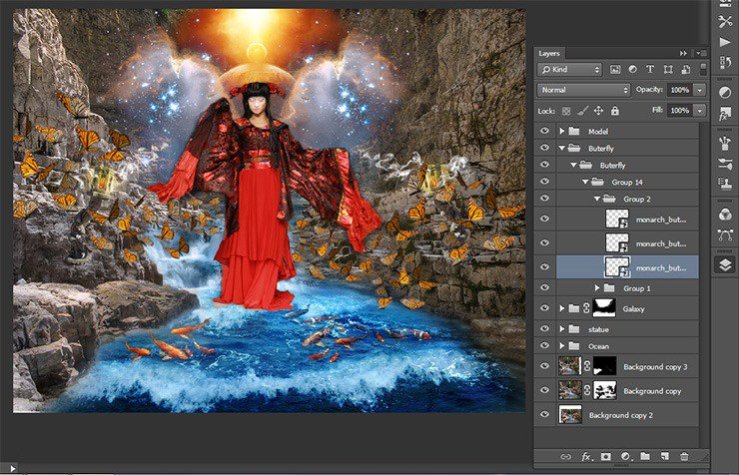
Step 111
Now add a mask to each group, and then take Brush Tool (B). Set these settings: Size: 135px, Hardness: 0% Opacity: 100% Flow: 100%. Remove some butterflies that there was a strong crowding.
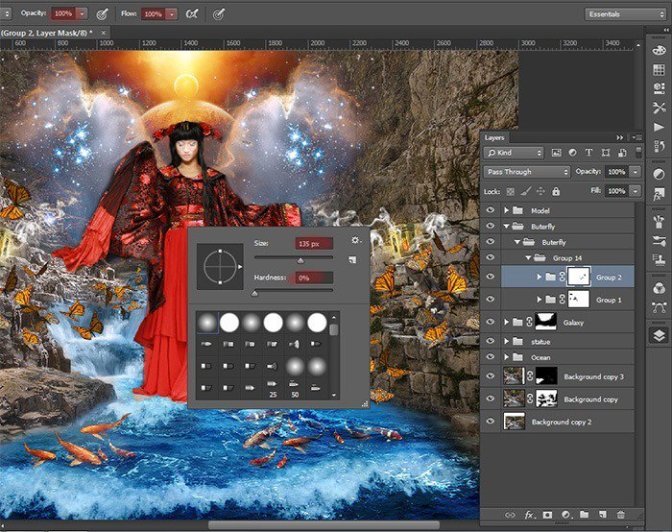
Step 112
The first figure shows the reconciliation to the mask, the second after the application of the mask.
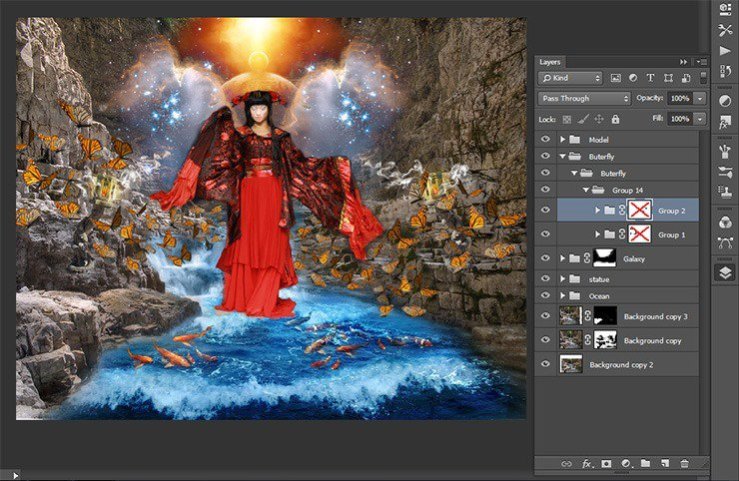
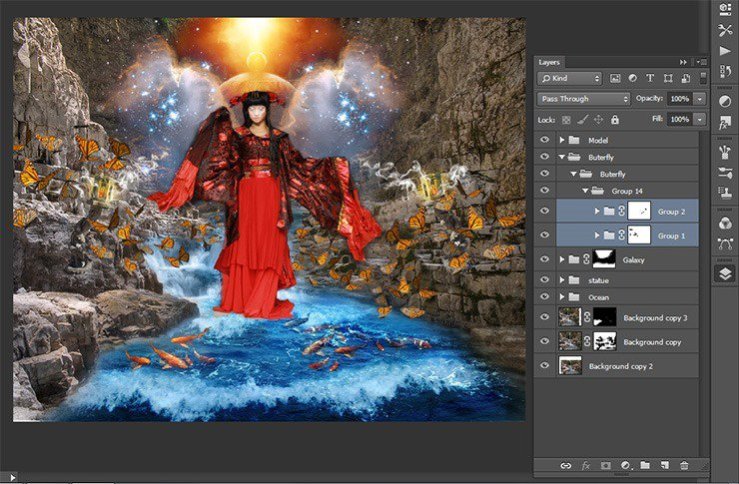
Step 113
Now combine the two groups into one (the short key Ctrl+ G).
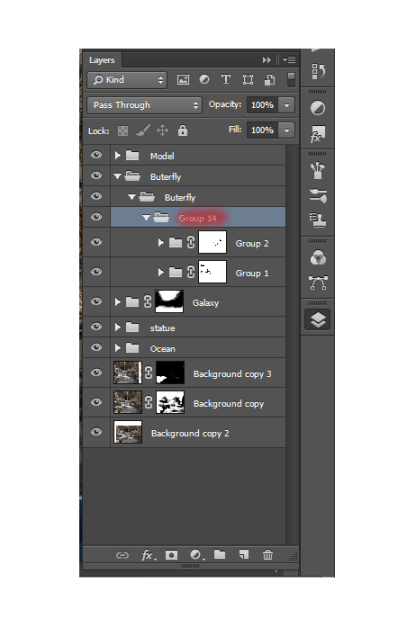
Step 114
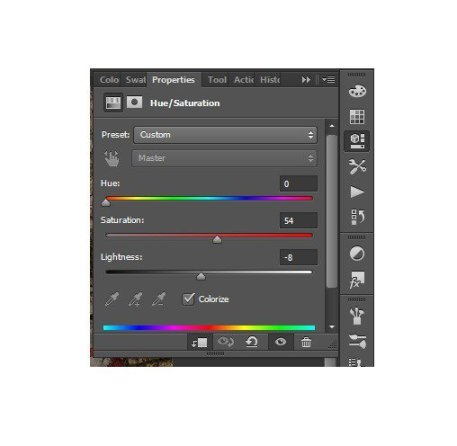
Add to a group adjustment layer Hue/Saturation…
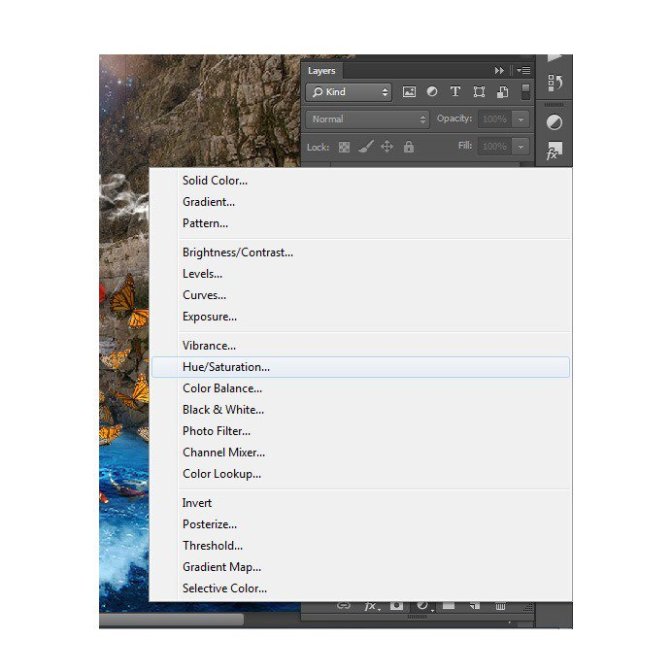
Set the settings as shown in the figure.
Step 115
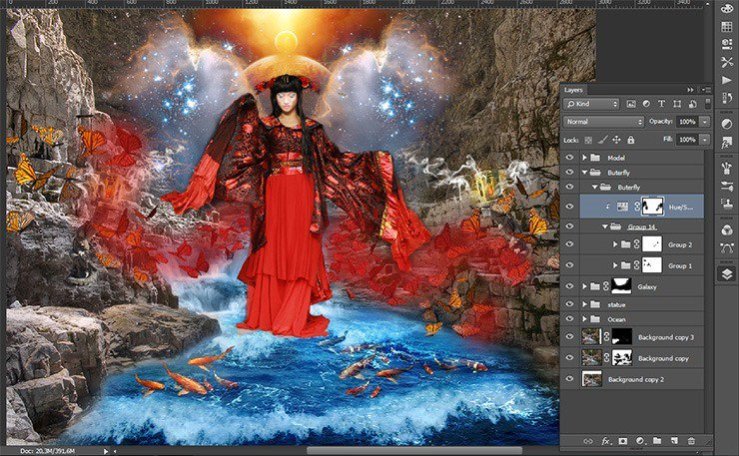
Take Brush Tool (B). Set these settings: Size: 135px, Hardness: 0% Opacity: 50% – 100%, Flow: 100%. Change the opacity of the brush to achieve a smooth transition between colors.On the layer mask, I cleaned the front with red butterflies. Red allocations where adjustment layer should remain.
Step 116
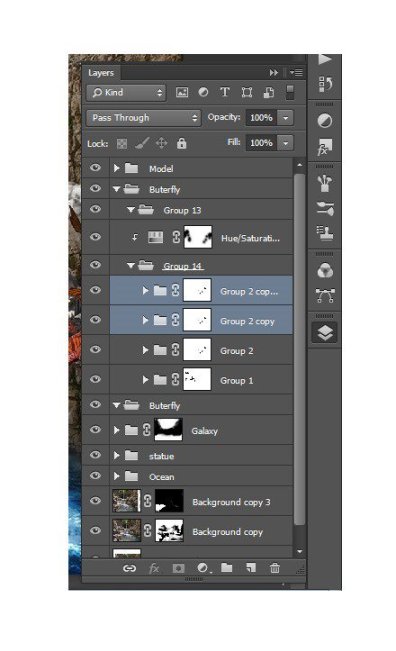
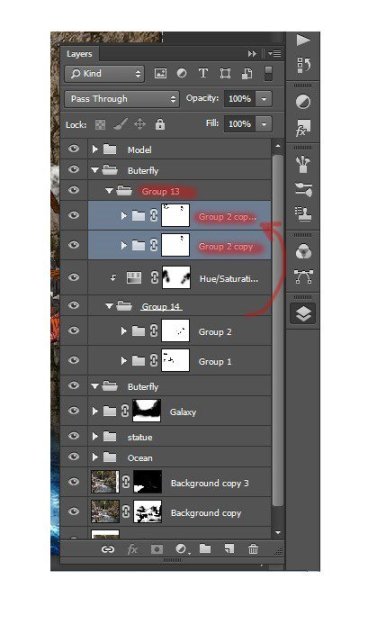
We proceed to the cosmic butterflies. Duplicate 2 times group with leftist butterflies “Group 14” and move it above the adjustment layer.
Step 117
Transform this layer the short key Ctrl+ T. Make small butterflies.
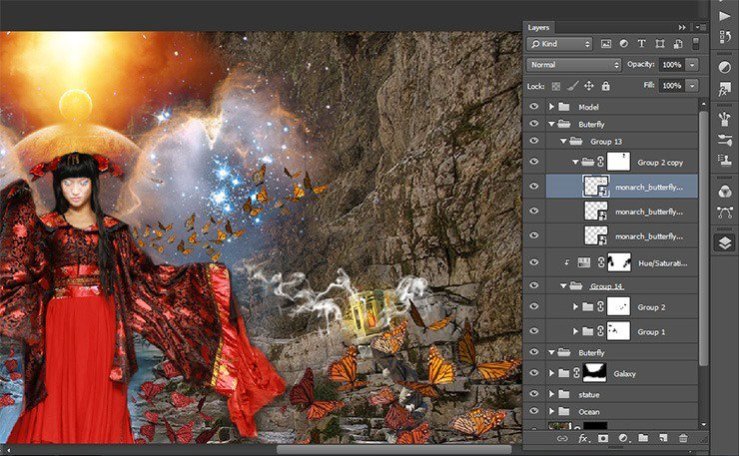
Step 118
In-group “Group 2 copy” duplicate the very first layer. Butterflies move it to obtain an extension of butterflies.
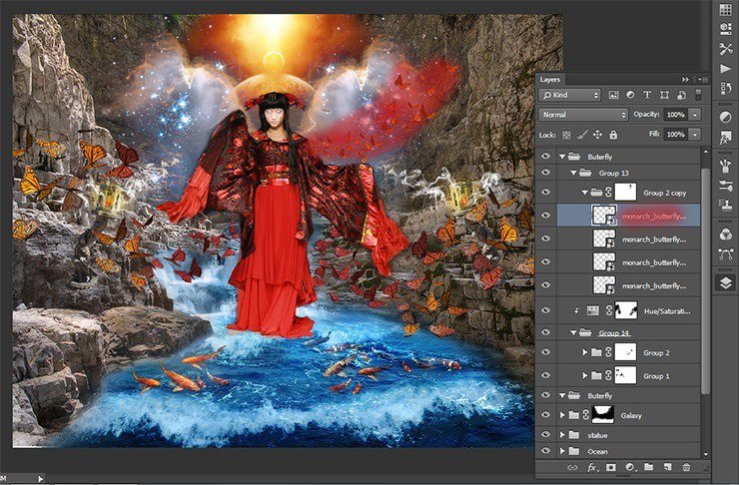
Step 119
In the same way Change the left butterflies.
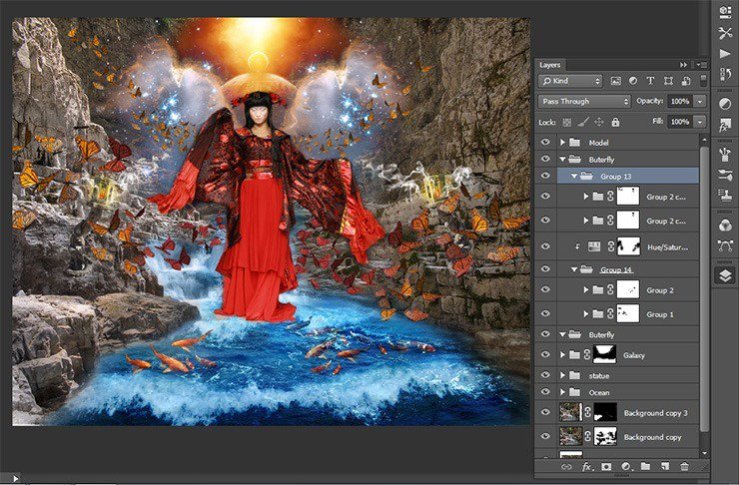
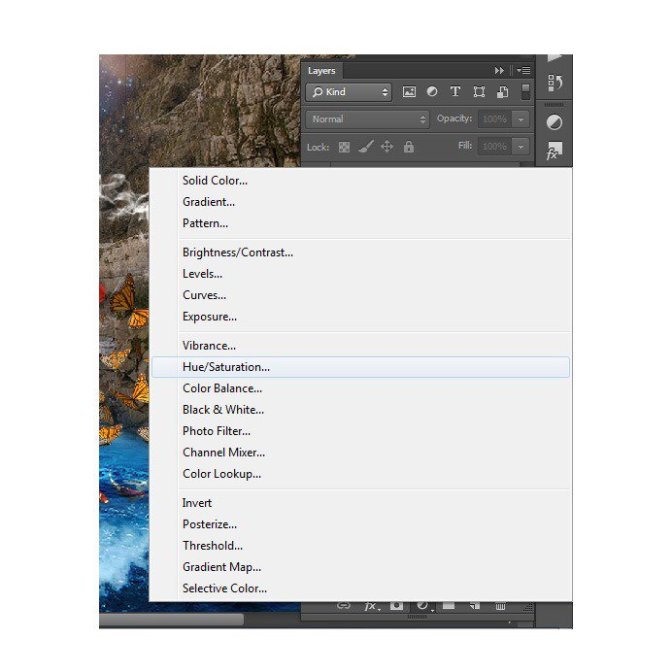
Step 120
Add to a group adjustment layer Hue/Saturation… Set the settings as shown in the figure.
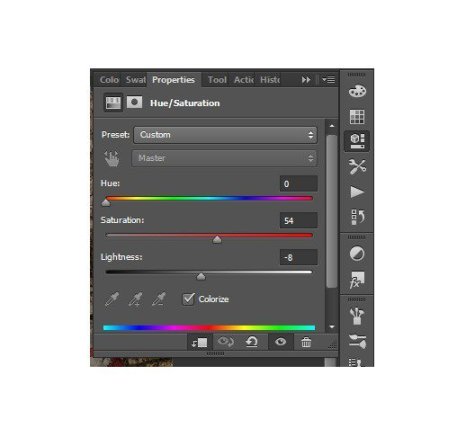
Step 121
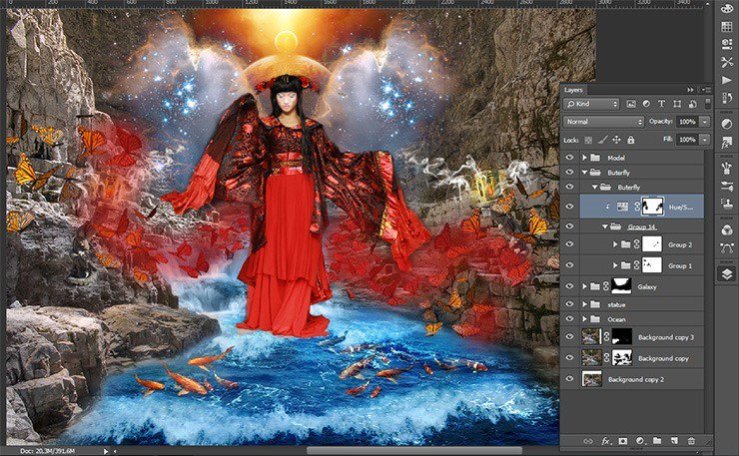
Take Brush Tool (B). Set these settings: Size: 75px, Hardness: 0% Opacity: 50% – 100%, Flow: 100%. In addition, remove the layer mask bit color.
Change the opacity of the brush to achieve a smooth transition between colors.
Step 122
Combine all the butterflies with adjustment layers in one group
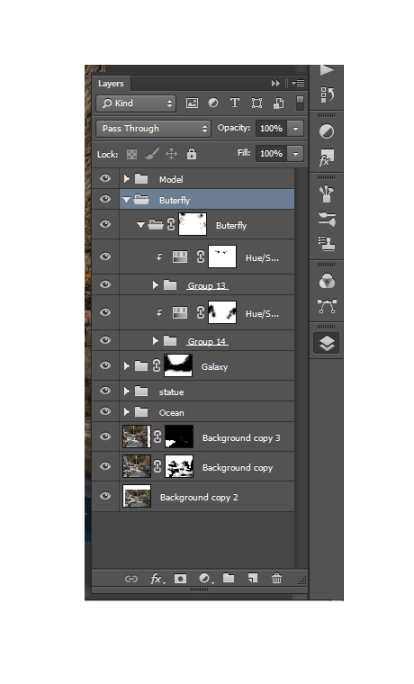
Step 123
Create a new layer above the group with butterflies. Hold down Alt and click on the group. If a new layer near an arrow, then all that will done on this layer apply only to group.
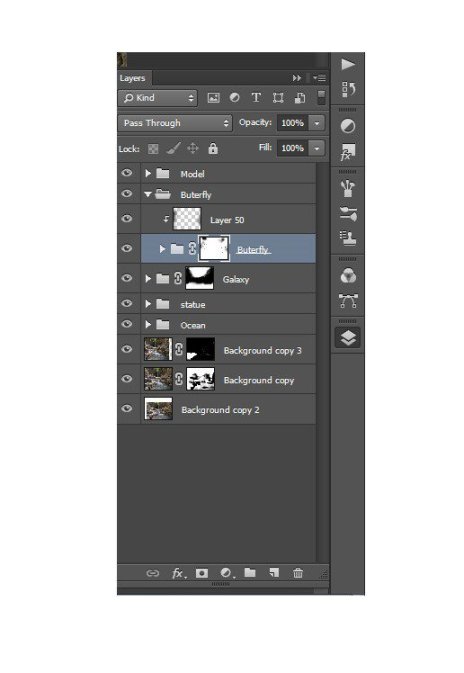
Step 124
Take Brush Tool (B). Set these settings: Size: 75px, Hardness: 0% Opacity: 50% – 100%, Flow: 100%. Set Black color and darken the edges of butterflies.
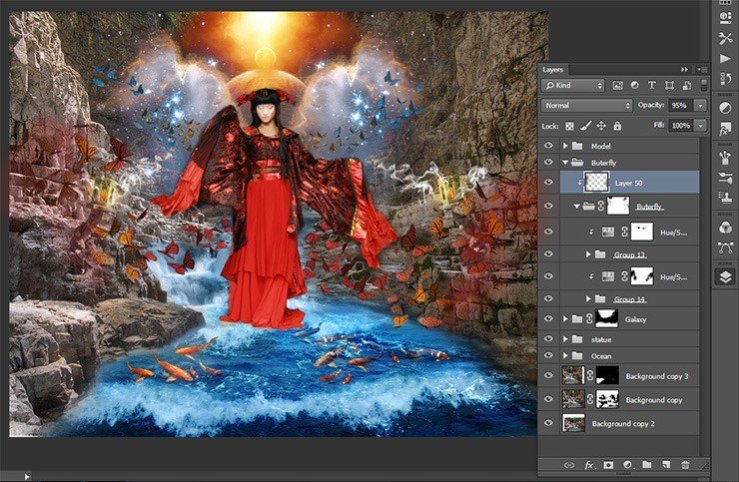
Step 125
Now add fire and flying sparks. Create a new group, name it «Fire», and create a new layer.
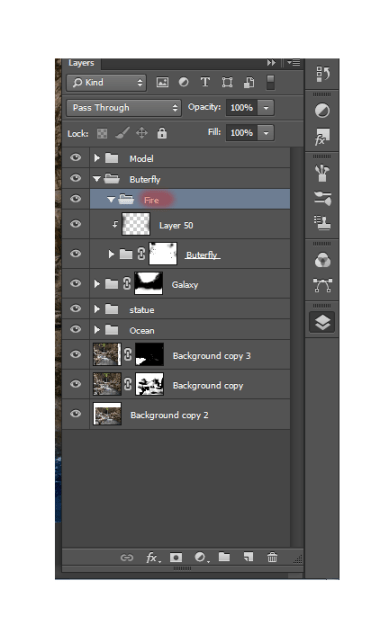
Step 126
Take Brush Tool (B). Set these settings: Size: 75px, Hardness: 0% Opacity: 60%, Flow: 100%. Choose a color # aa140d.
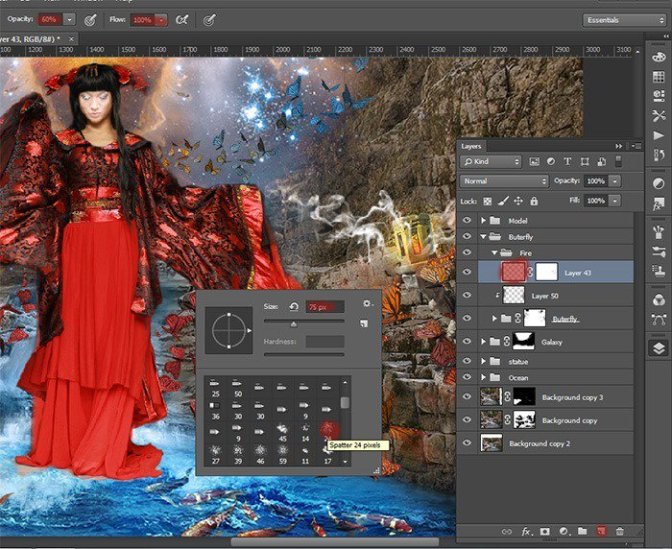
Step 127
Use this brush here. Carefully walk around it on the edges of the wings of left butterflies. Give effect fire, bringing the flames a bit.
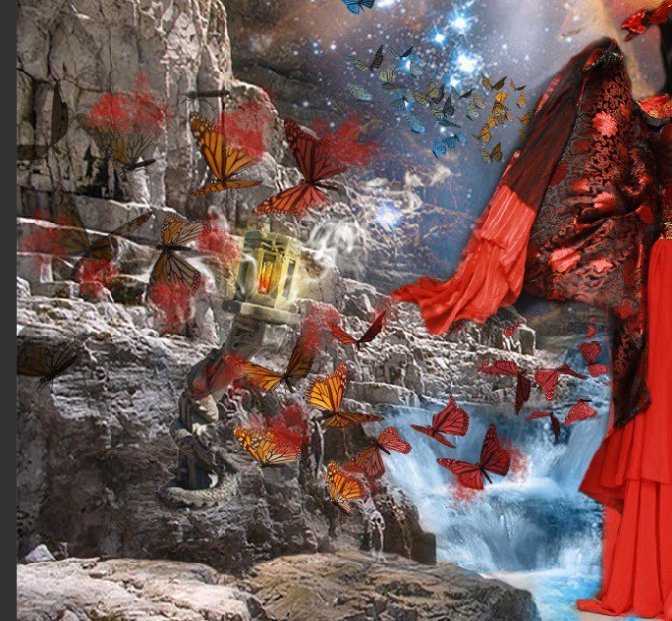
Step 128
Do, a new layer is the same with the right butterflies.
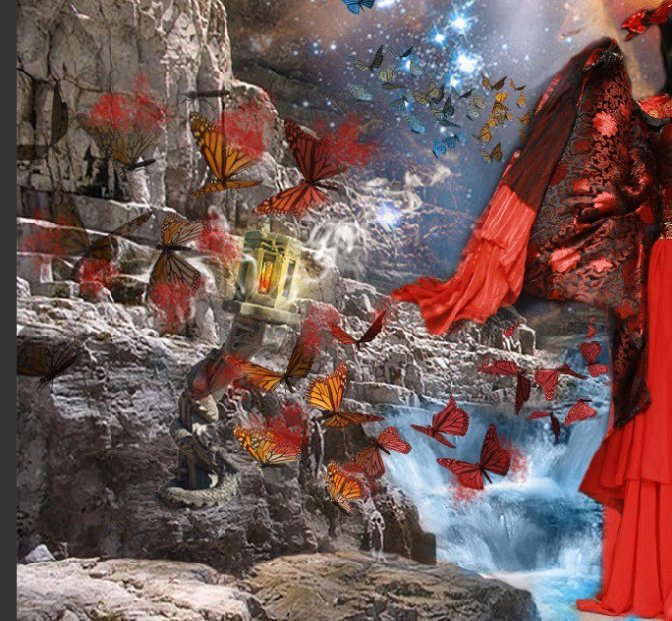
Step 129
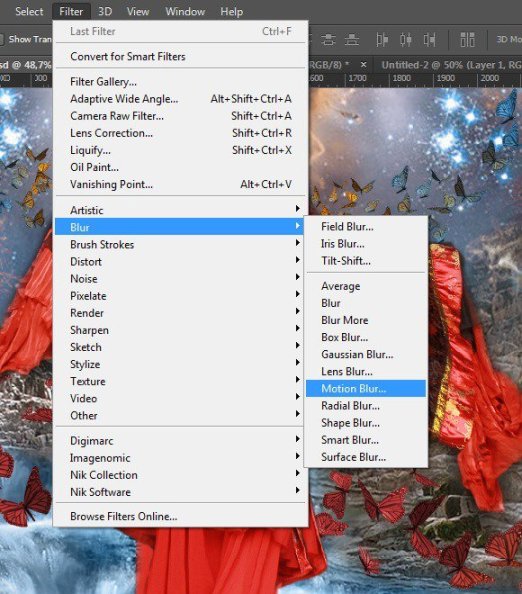
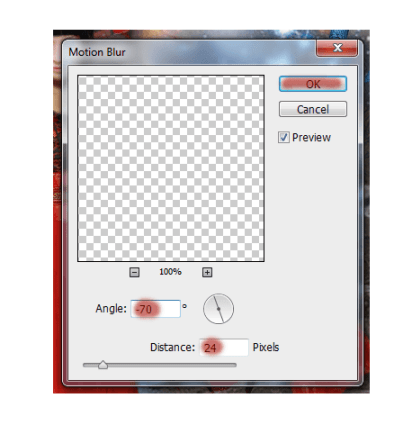
Now let us work on the fire. Apply to each layer of motion blur effect, for this go to Filter> Blur > Motion blur. In the window that appears, set the following settings for the left layer
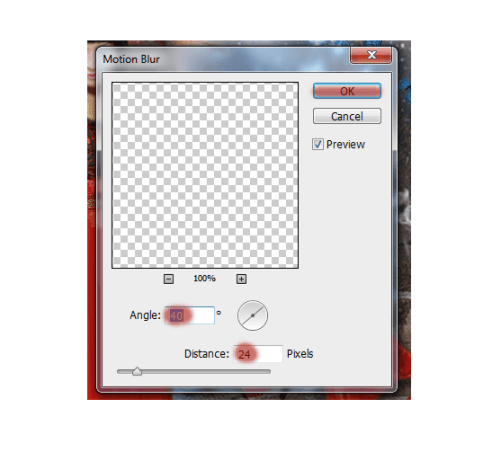
For the right layer:
Create another new layer and repeat the application of fire, but now do not blur it.
Step 130
Now add shine and light the fire on the wings of butterflies. Create a new layer. Take the brush with these settings. Choose a color № ffb400 Remember this layer is above the rest. Now carefully draw the fire and the wings of butterflies. Do not paint over them completely. Green shows where I was putting color!
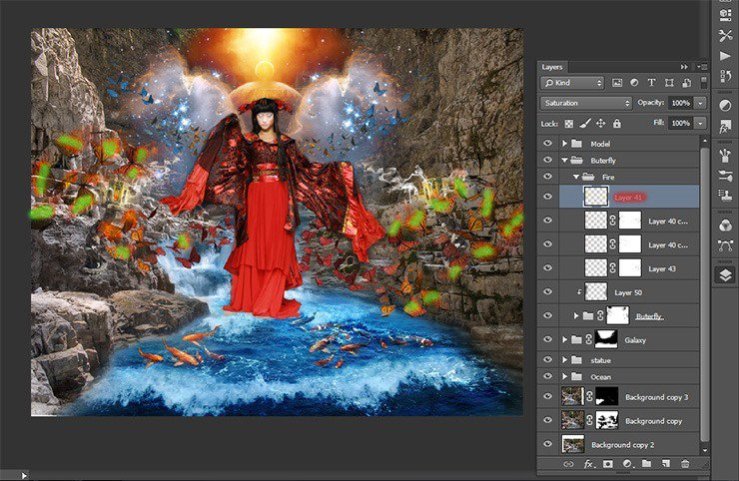
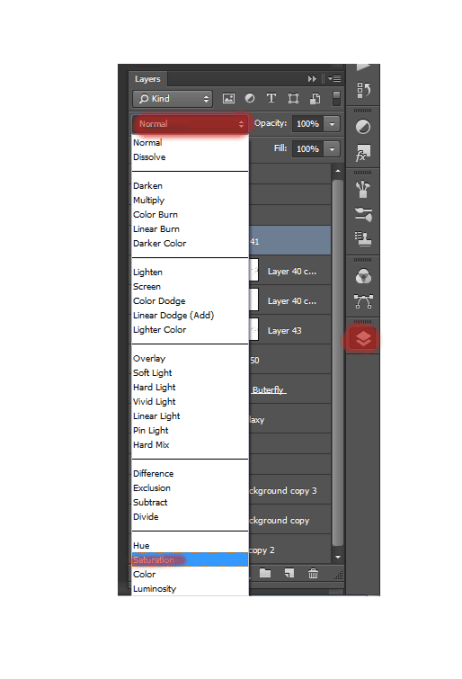
Step 131
Change the blending mode for this layer. In the Layers list, select the mode Saturation.
Step 132
Create new layer and repeat the application of fire. Take Brush Tool (B). Set these settings: Size: 75px, Hardness: 0% Opacity: 60%, Flow: 100%. Choose a color # ebb032. Add a mask to remove the group part of the lamp with the same brush that you did fire.
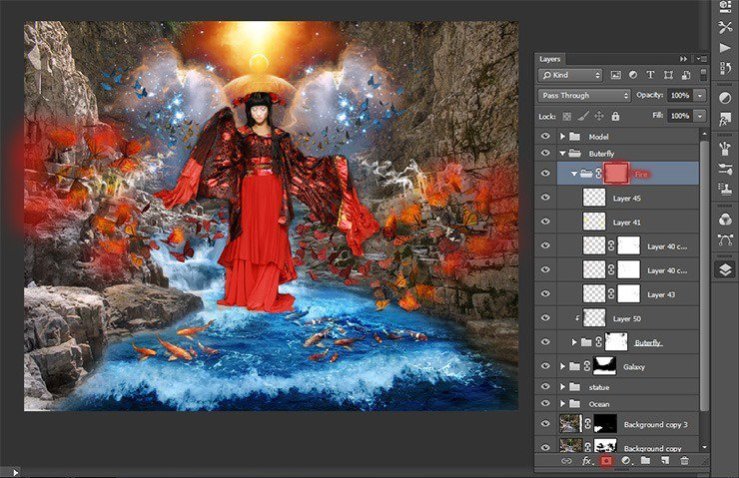
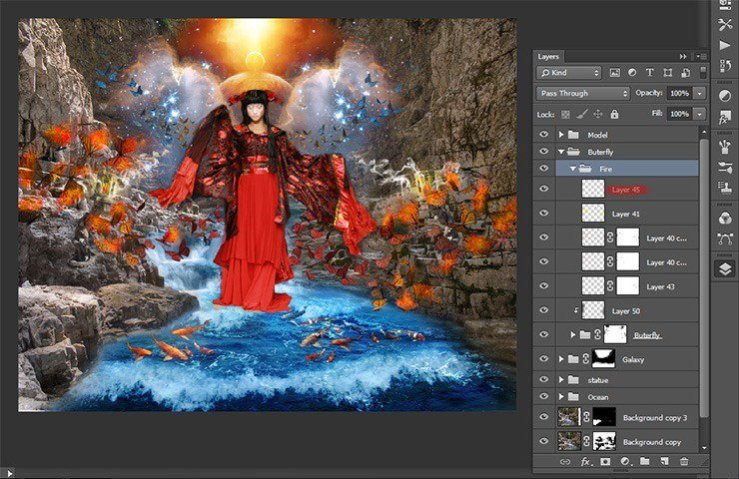
This will give the depth of the fire. The figure shows the result.
Step 133
Now add sparks Go to File>Place and select image with sparks. Create a new group and place added file there. Reduce the size of pictures that sparks were not so big and tilt them slightly.
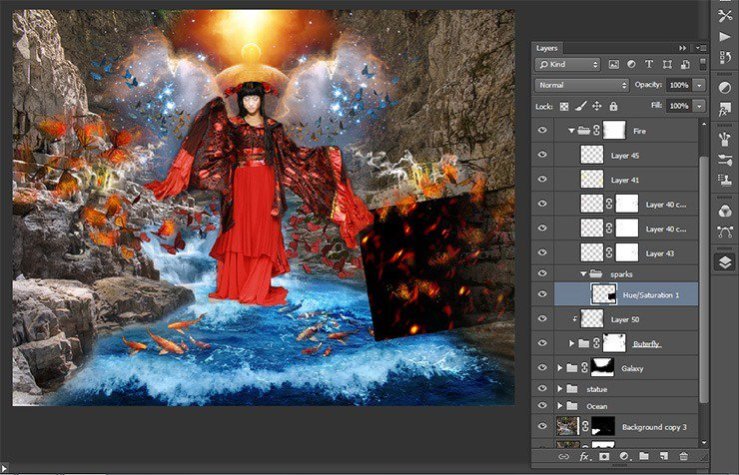
Step 134
Duplicate the layer with the sparks turned 3 times, the short key Ctrl+ J. Place two layers of the right so that sparks flew from butterflies to the water. Place the remaining two layers left.
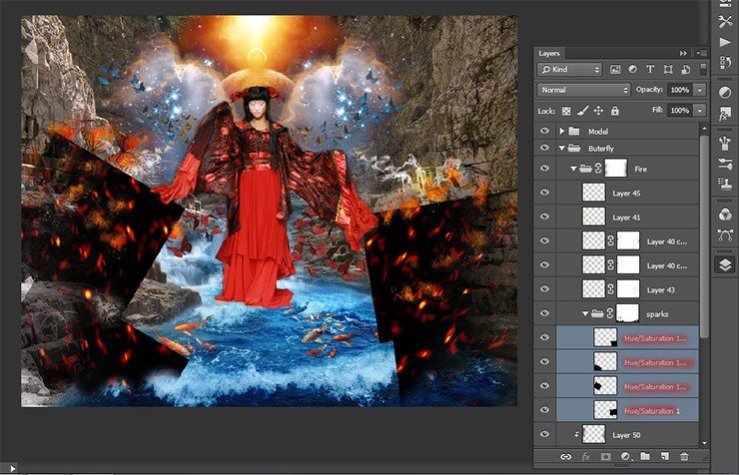
Step 135
Change the blending mode for the group with sparks on Screen.
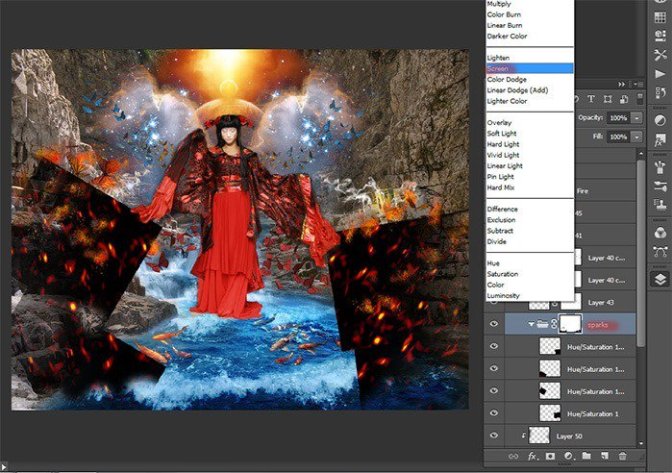
Step 136
Now add a mask to a group with sparks and remove excess. In places where it ends texture could remain flat edge of the image, remove it.
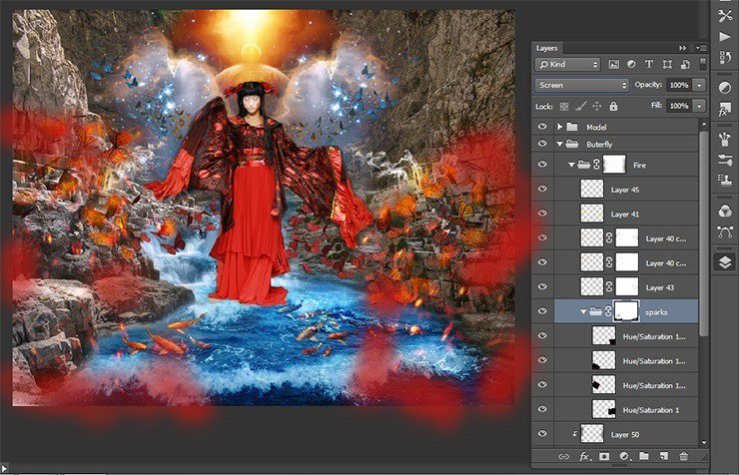
Step 137
Combine all groups with butterflies, fire and sparks in one group and call it “Butterfly” the short key Ctrl+ G
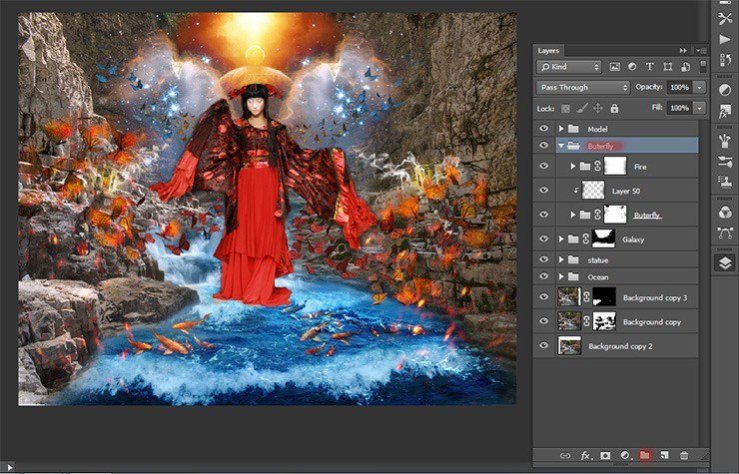
Step 138
So, you do not interfere with work sparks and butterflies make them invisible by clicking the eye icon next to the desired item. Now we transform the dress model. Add a mask to the group with the model.
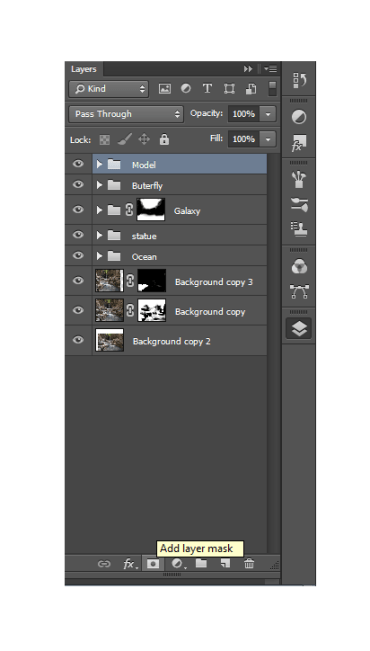
Step 139
Invert the mask the short key Ctrl+ I. Take Brush Tool (B). Set these settings: Size: 150px, Hardness: 0%, Opacity: 100% Flow: 100%. Make the main color is white. First press D for the establishment of standard colors, and then X for their switching.
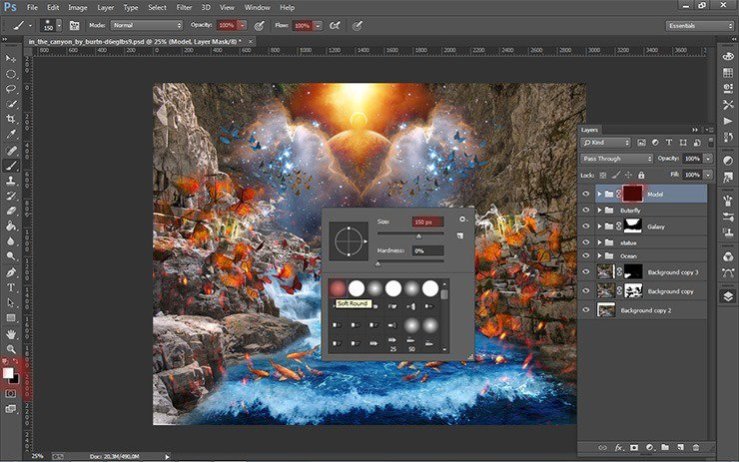
Step 140
Restore white model, but the bottom of the dresses we almost did not restore. Change the value Opacity of brush to give just a hint of texture and color.
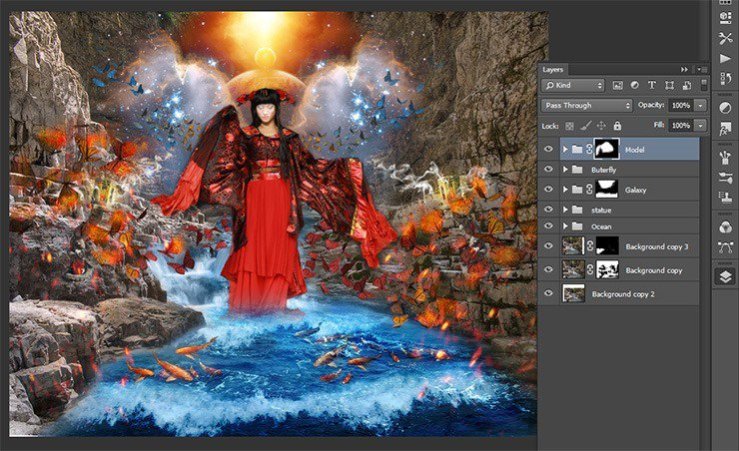
Step 141
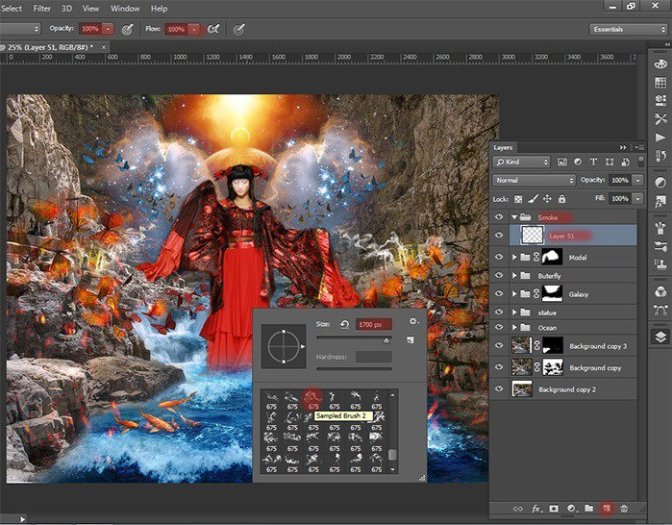
Create a new group, name it «smoke», and create a new layer. Take Brush Tool (B). Set these settings: Size: 1700px, Hardness: 0% Opacity: 100% Flow: 100%. Choose a color # c51711. Choose a smoke brush, which is show in figure or another of your choice.
Step 142
Click once somewhere in the middle bottom of the dress mid brush.
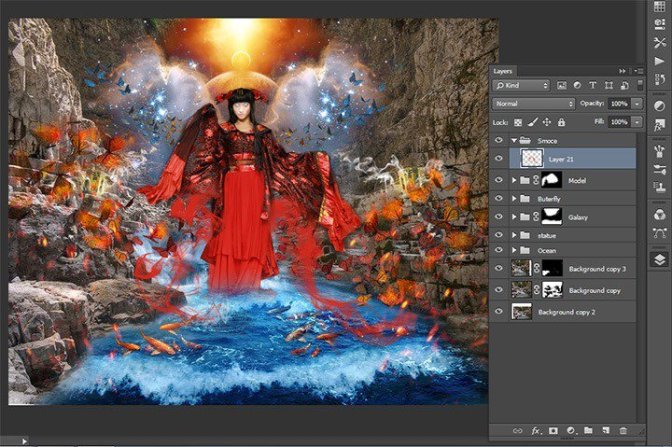
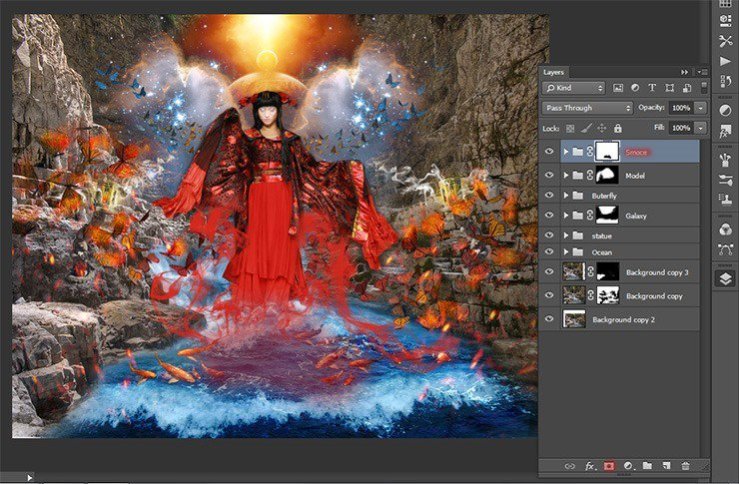
Add a mask to the group with the smoke and remove the smoke near the water where her dress model
Step 143
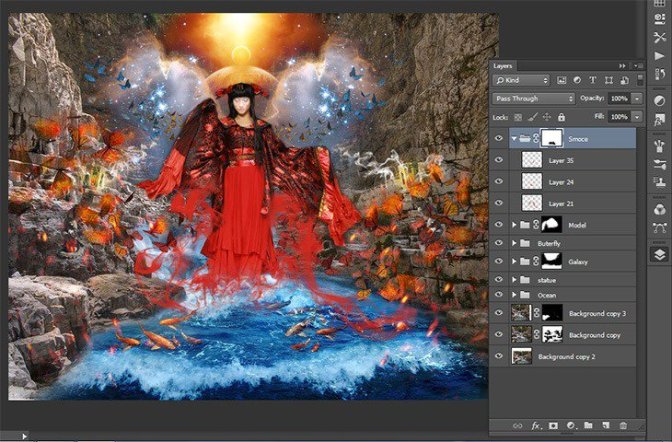
I chose a few more hands on new layers placed them. Settings remain the same, but changed size. Experiment! Here are the results of my experiments.
Step 144
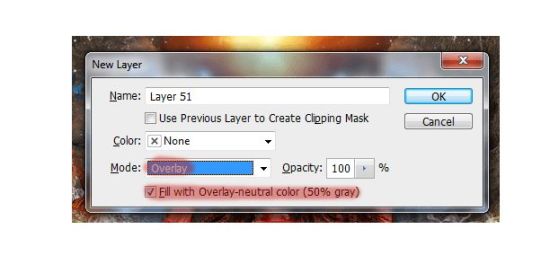
Now let us work on the shadows. Create a new layer the short key Shift+ Ctrl+ N. and set the settings as shown in Figure.
Step 145
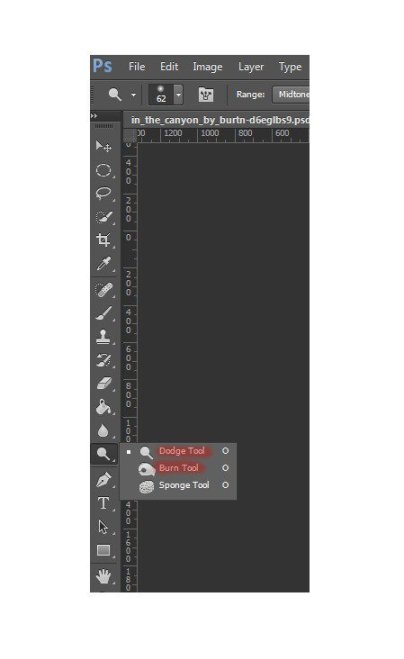
Now, use the Dodge and Burn Tool to create shadows and light.
Step 146
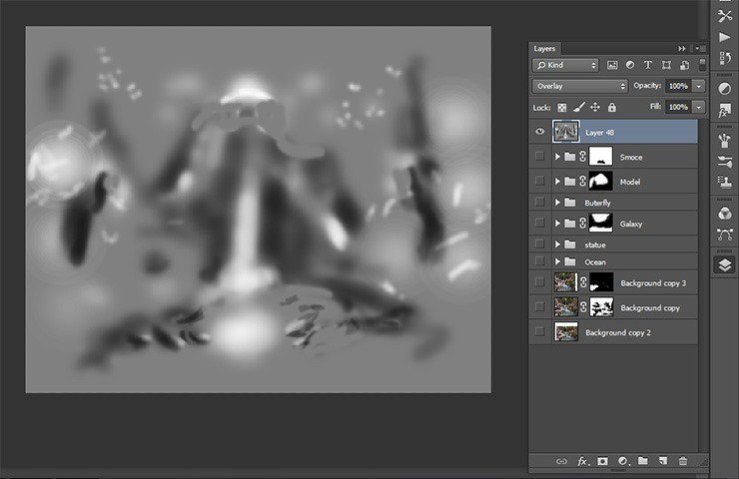
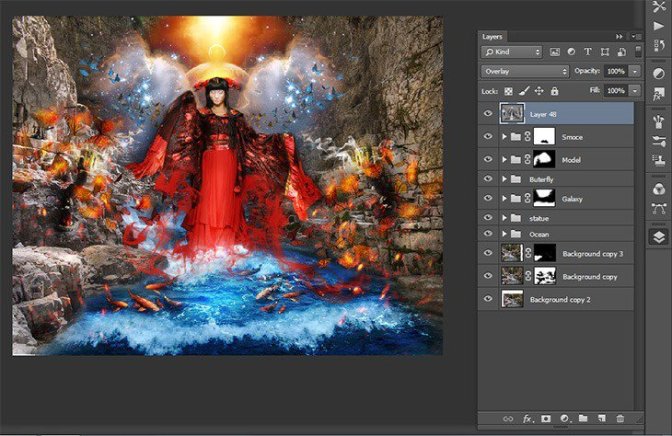
Here is how I did it. Without this study, the picture will look unnatural. Little time and effort to turn all.
Step 147
Now add magic mandala! I drew it myself :) If you do not like it, replace. Go to File> Place. Select imedge of mandala. Mandala layer must be the topmost.
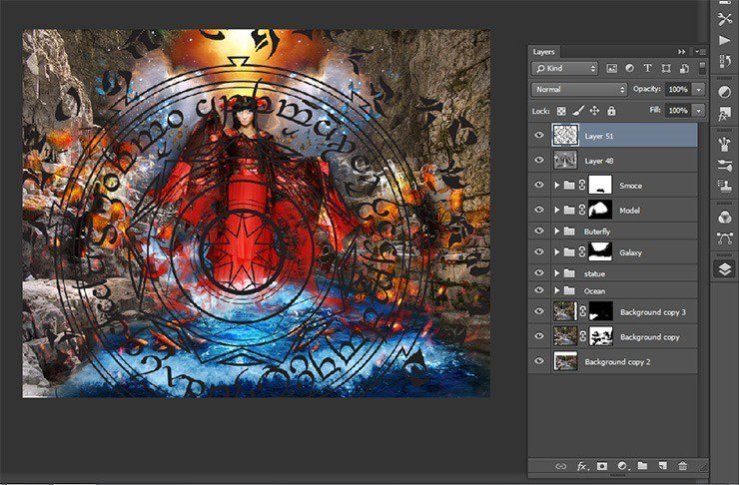
Step 148
Transform the mandala. Please change the size, to reduce the size of the circle on the water left, and then tilt it in the plane
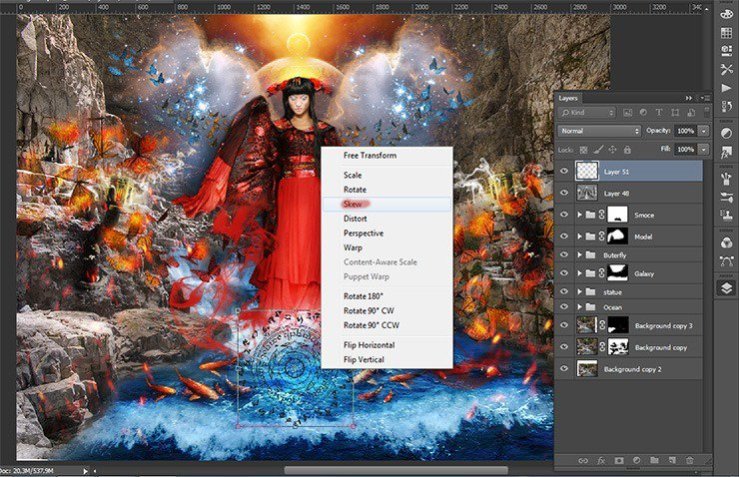
Step 149
After transformations, invert it the short key Ctrl+ Shift+ I. Duplicate the layer with the mandala the short key Ctrl+ J.
Step 150
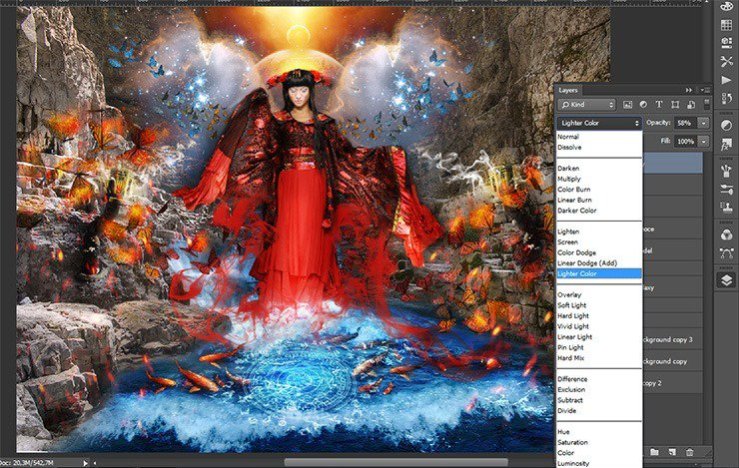
Change the blending mode for the first mandala to Overlay for a second Lighter Color.
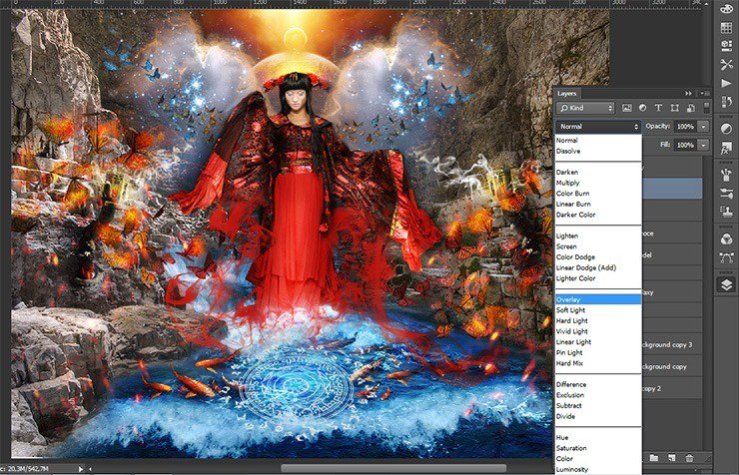
Step 151
Proceed to completion of the atmosphere. Create a new layer the short key Ctrl+ Shift+ N and fill it with black. Add a layer mask.
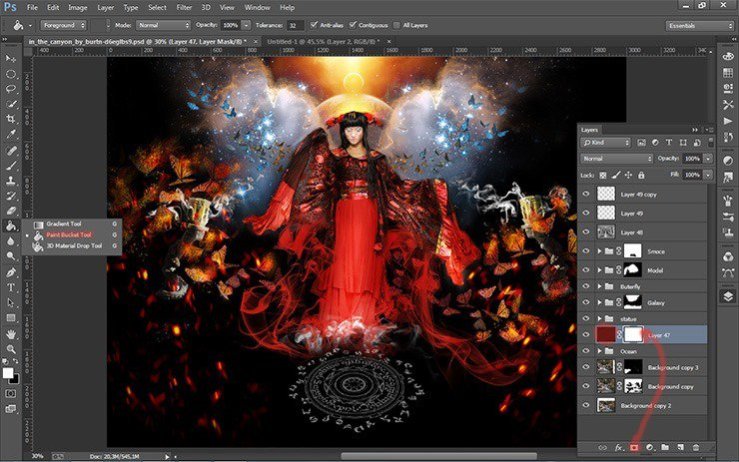
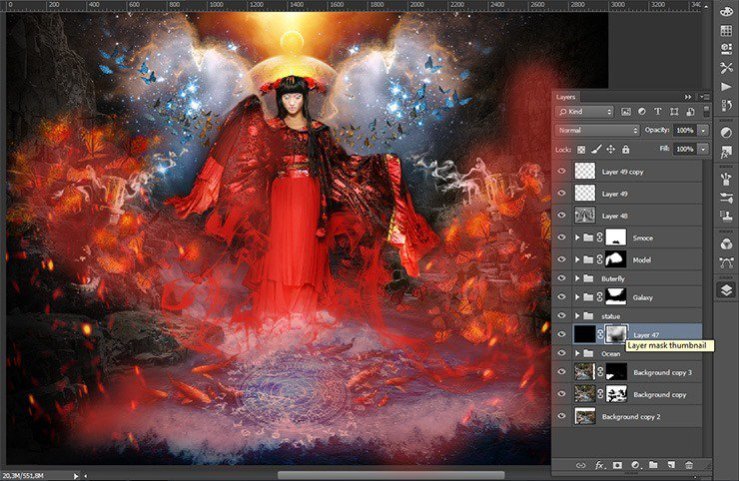
Step 152
Take Brush Tool (B). Set these settings: Size: 400px, Hardness: 0% Opacity: 60%, Flow: 100%. Remove from the middle part and of the landscape black.
Step 153
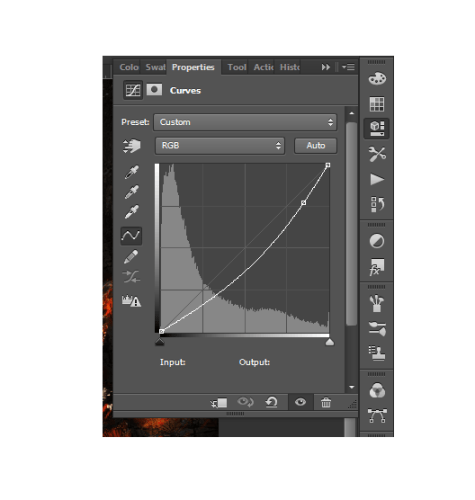
Proceed to the final part. Add two adjustment layers. The first is Curves.
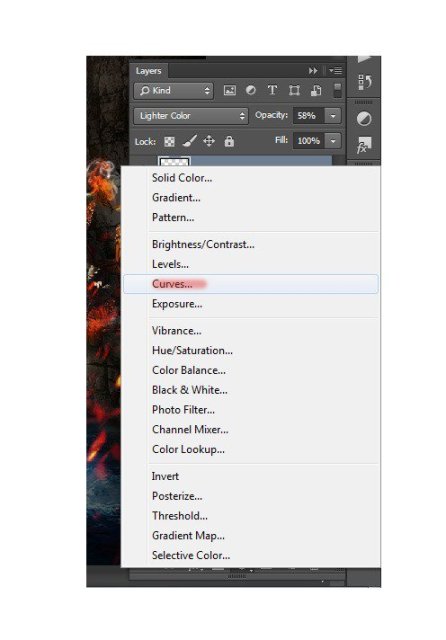
I wanted bright colors were much brighter, so set the curve as shown in the figure.
Step 154
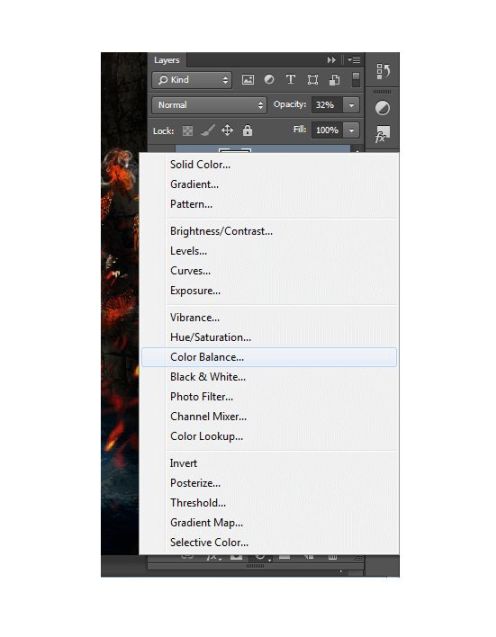
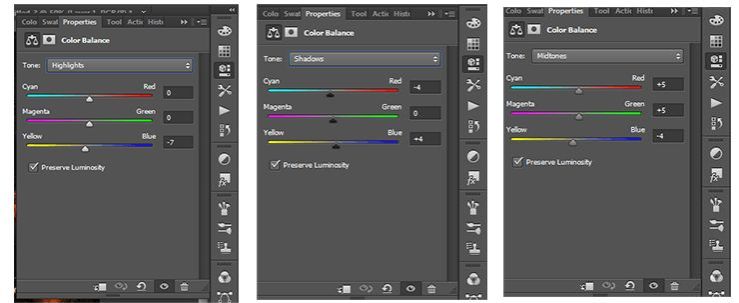
The second adjustment layer is Color Balance.
Step 155
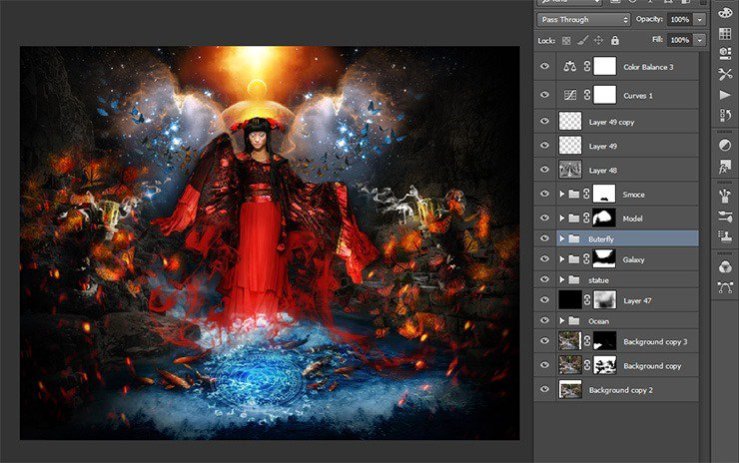
Here is the complete look of the final. Painting has done! You1 can see all the layers and their location.
Final Results
