大师级ps矢量技术:打造一个极具细节的麦克风
Master Photoshop’s Vector Capabilities: Create a Detailed Microphone Illustration
大师级ps矢量技术:打造一个极具细节的麦克风
By Andrei Marius, 11th February, 2013, 5 Comments
翻译:Steve Woolf
软件部分英文参考:overlay叠加 soft light柔光 normal正常 angle角度 multiply正片叠底
注:我不是英语专业的,照着自己理解的翻。都是利用休息时间,一个人独立完成的,所以有差错的地方还请谅解,帮忙更正,让我们共同学习。
本教程的原作者编写教程真的非常认真,相信即使是ps小白跟着操作也完全可以做出99%的程度。
翻译文章真的很辛苦,加上还要一边研究原教程的做法,断断续续花了差不多一周的时间吧。
里面也加入了一些自己的理解。
本文也对我有很大的启示,在软件使用中的一些不严谨的习惯我也要逐渐改掉。
如果你开始了,请耐心学习完,这里有比你想象中多的多的知识等着你去掌握。
If you’re really comfortable in Photoshop you may love creating stuff like photo manipulations, website layouts and other graphics.
如果你使用Photoshop真的很舒心,你可能喜欢创造东西,如照片的修饰,网站设计和其他平面设计的东西。
However, there’s a good chance that you’ve never bothered to master vector design. Often Photoshop users will simply assume that it’s something reserved for Illustrator pros, and Illustrator can be too time consuming to learn, or too expensive to buy.
如果你从来没有不屑于掌握矢量设计的话,这里有一个很好的机会。Photoshop用户会经常认为矢量图形应该给使用Illustrator的专业人士,或者Illustrator可能学习起来太费时了,又或者购买软件太贵了。
Many people end up outsourcing vector work, which puts a big whole in their pocket.
很多人最终外包矢量的工作,这要花费他们很大一笔开支。
Wouldn’t you rather master vector design in the software you’re already familiar with – Photoshop?
你希望在你已经熟悉的Photoshop中掌握矢量设计的方法吗?
Photoshop actually has some really powerful vector capabilities, and today you’ll learn them, for free.
Photoshop中其实有一些非常强大的矢量功能,今天您将免费的了解到他们。
You’ll be creating a detailed microphone illustration that’s totally vector based. You’ll master things like smart objects, warping your vector shapes, creating custom patterns, textures, lighting and more, all within a clean, non-destructive vector workflow.
你将会制作完全由矢量工具绘制的麦克风。你将掌握的东西,如智能对象,变形矢量形状,创建自定义图案,纹理,照明等等,都采用清晰的,可逆的矢量工作流程。
Let’s dive right in!
让我们开始吧!
Step1
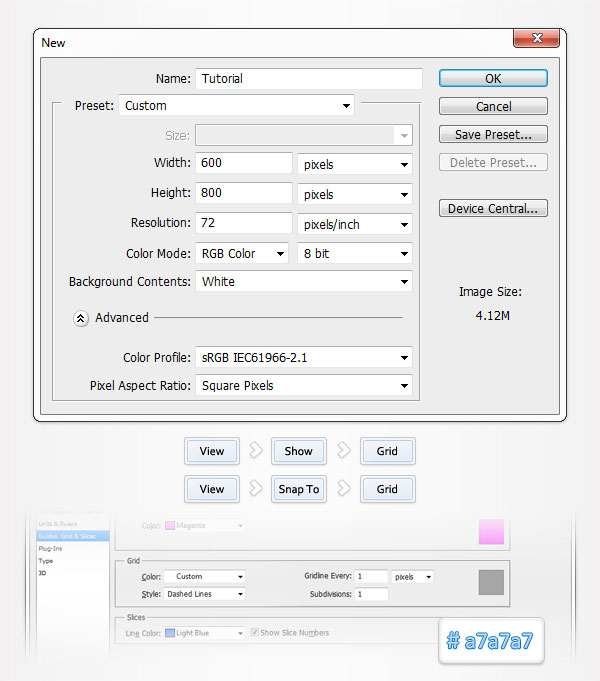
Open Photoshop and hit Control + N to create a new document. Enter all the data shown in the following image and click OK. Enable the Grid (View > Show > Grid) and the Snap to Grid (View > Snap To > Grid). For the moment you need a grid every 5px. Go to Edit > Preferences > Guides, Grid & Slices and focus on the Grid section. For starters you will need a grid every 1px. Simpy enter 1 in the Gridline Every box and 1 in the Subdivision box. Also, set the color of the grid at #a7a7a7. Once you set all these properties click OK. Don’t get discouraged by all that grid. It will ease your work later. You should also open the Info panel (Window > Info) for a live preview with the size and position of your shapes.
打开Photoshop,点击Control + N创建一个新文档。输入所有如下图所示的数据,然后单击确定。启用网格(查看>显示>网格)和对齐网格(视图>对齐>网格)。
此时,你需要每一格5px的网格。点击编辑>首选项>参考线、网格和切片,并察看网格部分。一开始,你需要每一格1px的网格。在网格线间隔输入1,在子网格输入1。另外,设置网格的颜色为#a7a7a7。一旦您设置好所有这些属性单击确定。不要认为设置这些网格没有用处。之后它会减轻你的工作。
你也应该为实时预览您的形状的大小和位置打开信息面板(窗口>信息)。
Step2
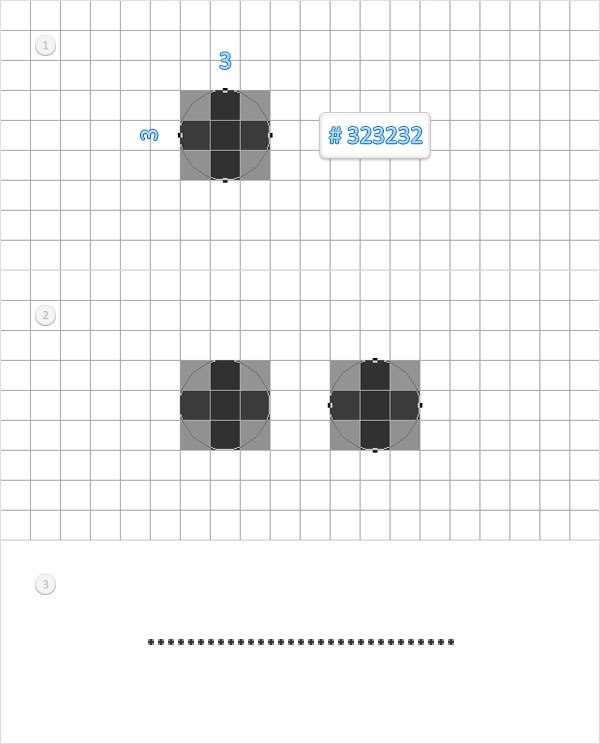
Set the foreground color at #323232, pick the Ellipse Tool and create a 3px circle. Make sure that this little vector shape is selected, switch to the Direct Selection Tool and select the four anchor points that make up your shape. Hold Alt, click inside this shape and drag it 5px to the right. In the end things should look like in the second image. Repeat this technique until you have a row with thirty one circles.
设置前景色为#323232,选择椭圆工具,创建的一个3px的圆圈。切换到直接选择工具选择这个形状的四个定位点。按住Alt键,单击该形状内部并向右拖动它5PX。最后应该像在图2中的样子。继续这样操作直到一排有31个圆圈。(注:你也可以按住Alt+Control+t键,向右移动5个像素,再按住Alt+Control+shift+t键重复前面的操作,制作一排31个圆形。特别注意:以上操作都是在一个图层中完成的)
Step3
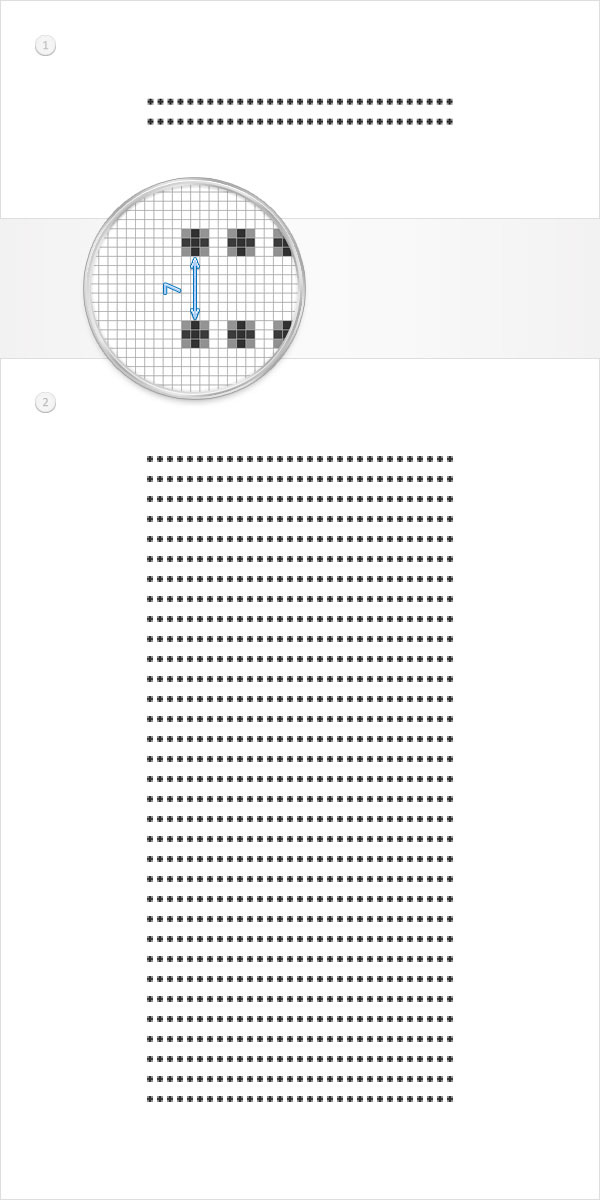
Focus on the shape made in the previous step and make sure that the Direct Selection Tool is still active. Select all the anchor points that make up the vector shape made in the previous step, hold Alt, click inside some of those circles and drag a copy 7px down as shown in the first image. Repeat this technique until you have thirty-three rows.
查看上几步所作的形状,并确保仍然被直接选择工具选中。选择上一步中所做的矢量形状的所有锚点,按住Alt键,点击里面圆圈的内部,并向下拖动并复制7px。结果如第一张图所示。重复操作直到制作33行。(注:可以用上步的方法向下移动复制共33排,每排间距7像素)。
Step4
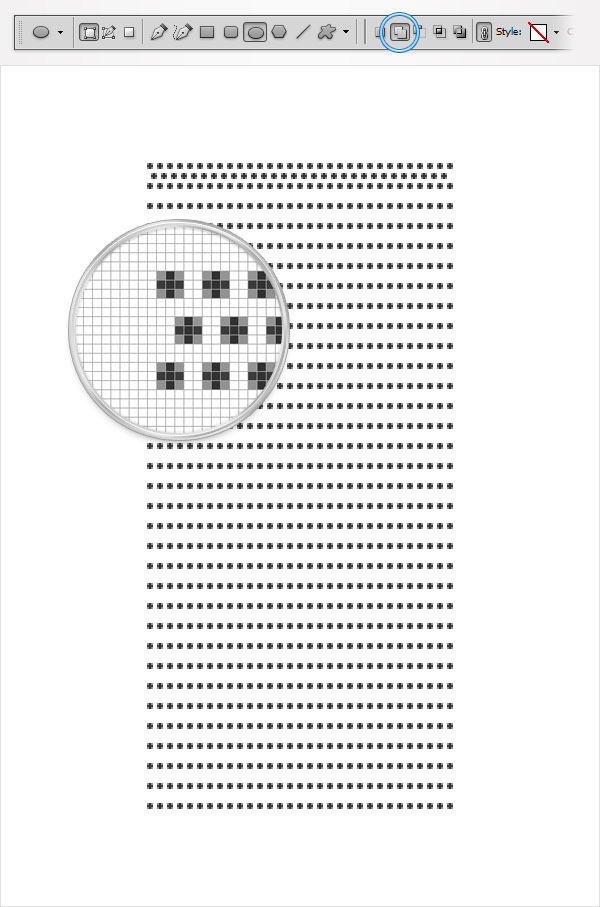
Reselect the vector edited in the previous step. Pick the Ellipse Tool, check the Add button from the top and draw a new 3px circle and place it between the top rows as shown below. Focus on this new circle, select it using the Direct Selection Tool, make a copy and drag it five pixels to the right. Repeat this technique until you have a row with 30 circles as shown in the following image.
重新选择先前的步骤中编辑的矢量图形。选择椭圆工具,按顶部栏的合并形状按钮,并绘制一个新的3px的圈,将其放置在最上面两行之间,如下图所示。查看新的圆圈,使用直接选择工具选择它,向右复制移动5PX。继续这样操作直到一排有30个圆圈.
Step5
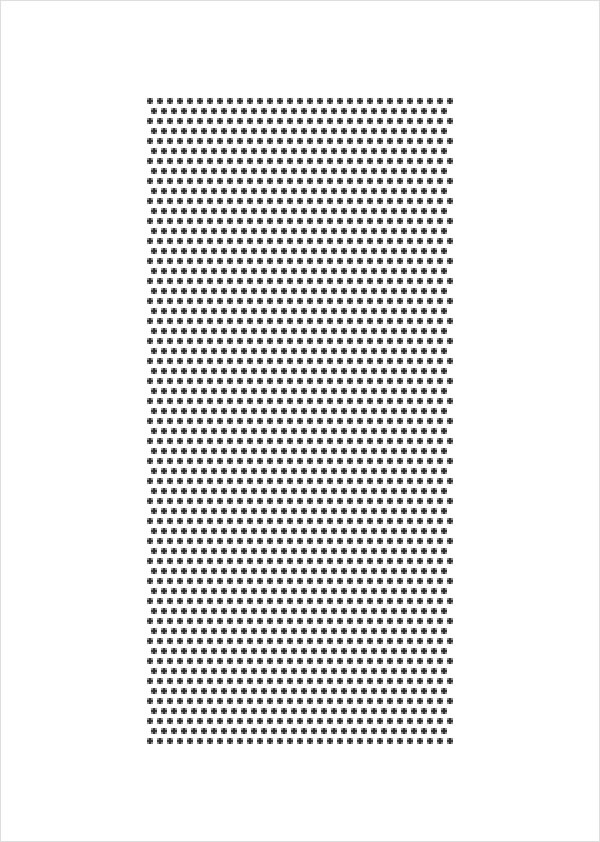
Keep focusing on the existing vector shape, select the row of circles added in the previous step made a copy and drag it 10px down. Repeat these technique thirty more times. In the end things should look like in the following image.
查看现有的矢量形状,选择在上一步中添加所有的圆圈,并将其向下移动复制10px。重复操作直到制作32行。在最后看起来应该如下图(特别注意:以上操作都是在一个图层中完成的,到目前为止加上背景图层只有两层)
Step6
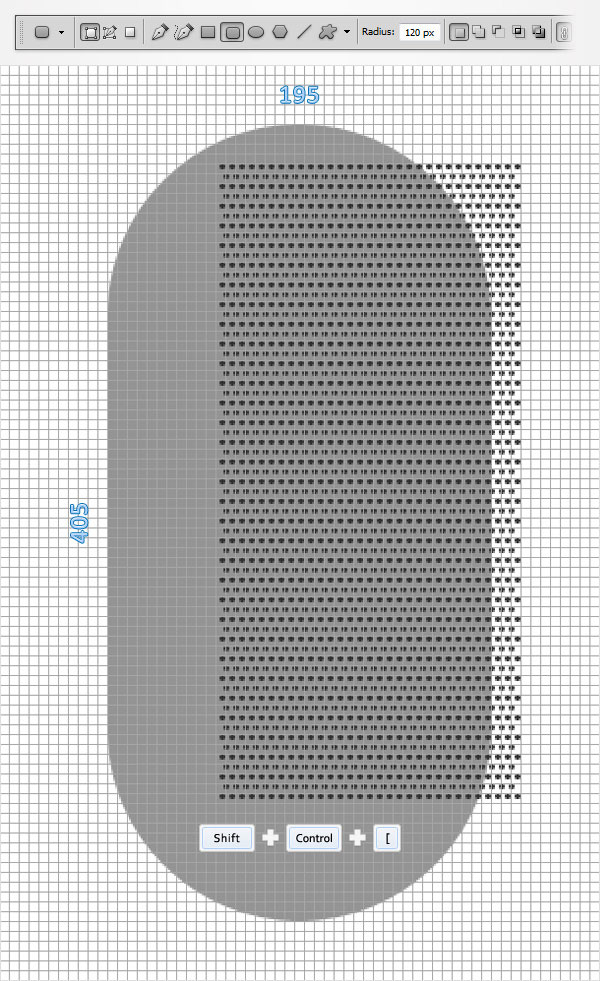
Switch to "gridline every 5px". So, simply go to Edit > Preferences > Guides, Grid & Slices and enter 5 in the Gridline Every box. Set the foreground color at #959595, pick the Rounded Rectangle Tool. Set the radius at 120px, create a 195 by 405px vector shape and send it to back (Shift + Control + [ ).
按照前面的方法,重新设置“网格间隔为5px”。把前景色设置为#959595,选择圆角矩形工具。设置圆角半径为120px,创建一个195乘405px的矢量形状,并把它放到底层(按Shift+ Control + [)。
Step7
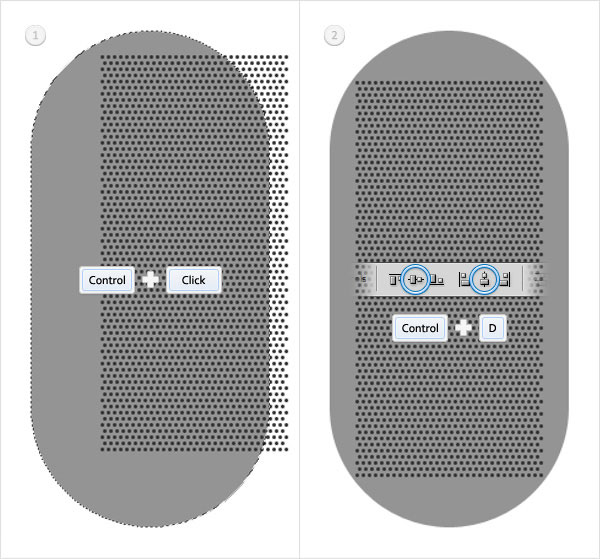
Focus on the Layers panel, hold Control and click on the vector shape made in the previous step. This should load a simple selection around your shape. Keep focusing on the Layers panel, pick the Selection Tool(V) and select the complex vector shape made in the starting shapes. Move to the top bar and click on the "Align vertical centers" and "Align horizontal centers" buttons. In the end things should look like in the second image. Finally, get rid of that selection (Control + D).
选择图层面板,按住 Control 并点击上一步中所做的圆角矩形矢量形状。加载选区。点击选择工具(V),选择图层面板中圆形矢量形状图层。单击顶部栏中的“垂直居中对齐”和“对齐水平中心”按钮。圆形矢量形状图层会以圆角矩形矢量形状图层为参照对齐。最后应该像图二中所示。完成后取消选择( Control + D)。
Step8
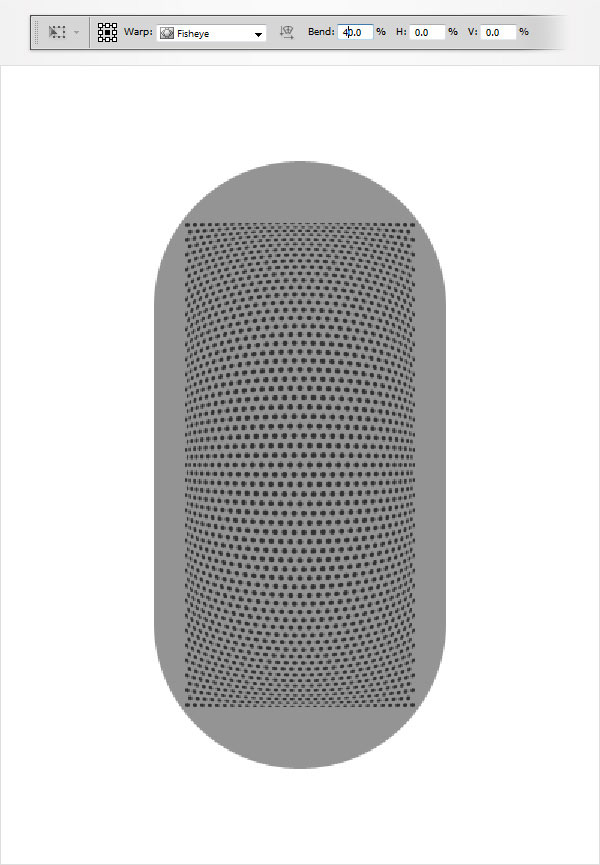
Select the complex vector shape and go to Edit > Transform > Warp. Select Fisheye from the Warp drop-down menu, enter 40 in the Bend box and hit Enter.
选择圆形矢量形状图层,点击编辑>变换>扭曲。从下拉菜单中选择鱼眼,在顶部栏弯曲选项中输入40并按Enter键。
Step9
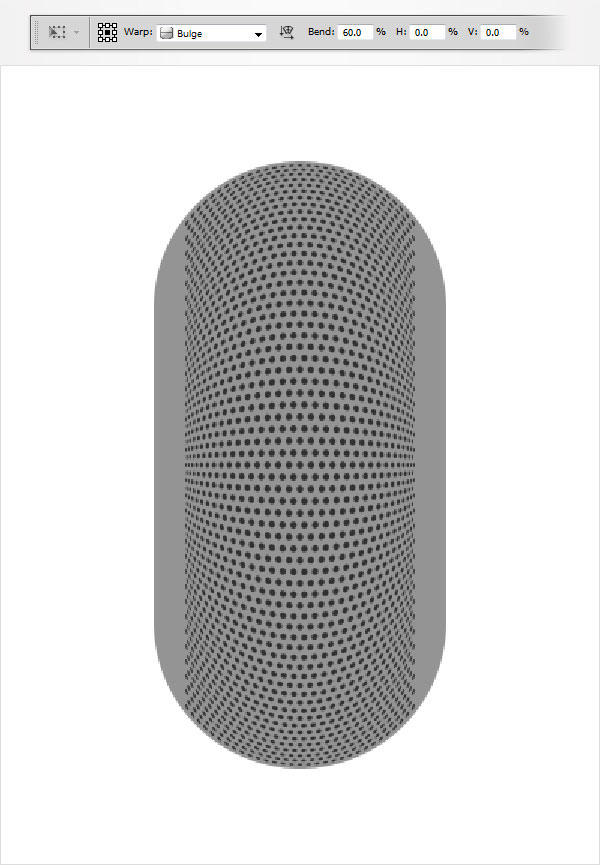
Make sure that your complex vector shape is still selected and go again to Edit > Transform > Warp. Select Bulge from the Warp drop-down menu, enter 60 in the Bend box and hit Enter.
请保持圆形矢量形状图层仍处于选中状态,并再次点击编辑>变换>扭曲。从下拉菜单中选择凸起,在顶部栏弯曲选项中输入60并按Enter键。
Step10
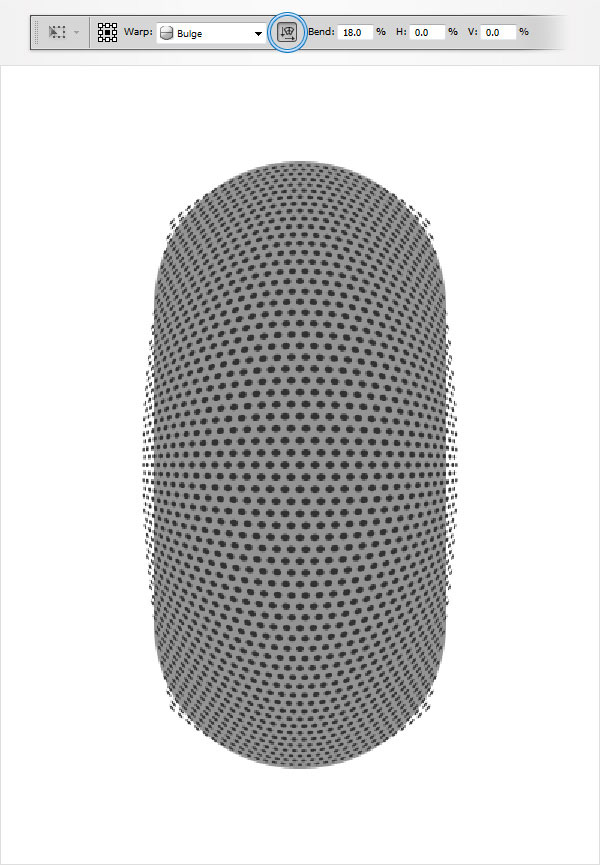
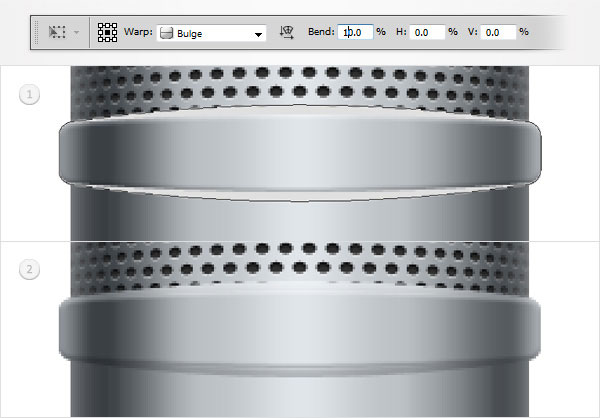
Make sure that your complex vector shape is still selected and go one more time to Edit > Transform > Warp. Select Bulge from the Warp drop-down menu, check the Orientation button, enter 18 in the Bend box and hit Enter.
请保持圆形矢量形状图层仍处于选中状态,并再次点击编辑>变换>扭曲。从下拉菜单中选择凸起,点击顶部栏更改变形的方向按钮,在顶部栏弯曲选项中输入18并按Enter键。
Step11
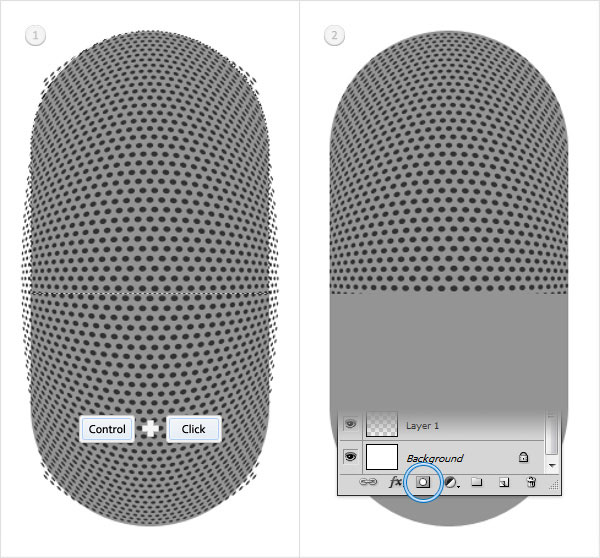
Move to the Layers panel, hold Control and click on the rounded rectangle made in the sixth step. Focus on this new selection and pick the Rectangular Marque Tool. Hold the Alt key from your keyboard and simply click and drag to remove the bottom half of your selection. Make sure that this selection stays active and return to the Layers panel. Reselect the complex vector shape and simpy click on the Add layer mask button. In the end your masked vector shape should look like in the second image. Don't forget to get rid of that selection (Control + D).
选择图层面板,按住 Control并点击圆角矩形图层。产生这个图层的选区并选择矩形选择工具。键盘按住Alt键拖动并删除下部一半的选区。保持选区被选中的状态并返回到图层面板。重新选择圆形矢量形状图层并点击添加图层蒙版按钮。最后结果应该像下方第二张图。取消选区(Control + D)。
Step12
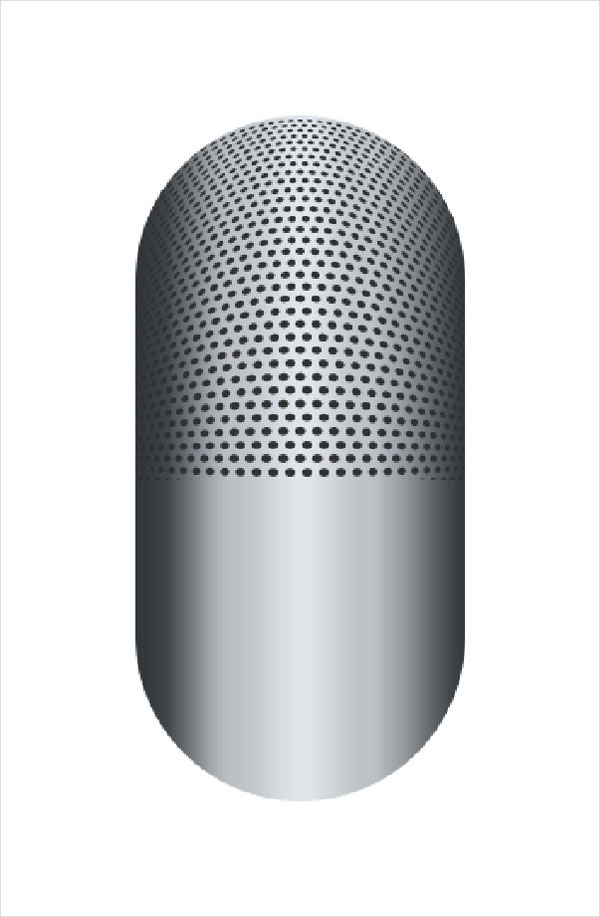
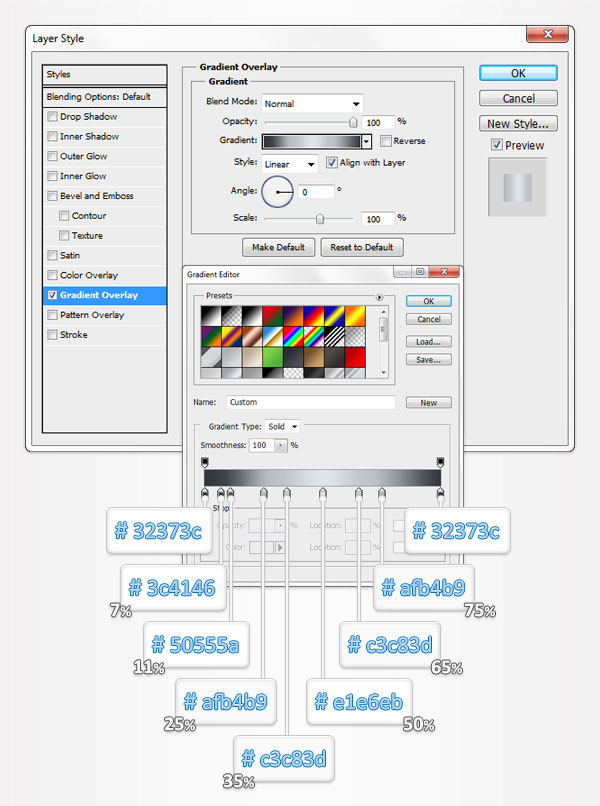
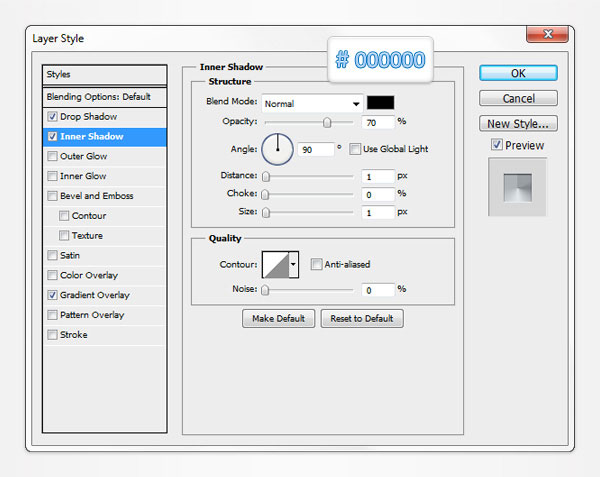
Move to the Layers panel and double click on the vector shape made in the second step to open the Layer Style window. Activate the Gradient Overlay section and enter the properties shown in the following image. The white numbers from the image stand for location percentage.
选择图层面板,双击圆角矩形图层,打开图层样式窗口。点击渐变叠加选项,然后输入如下图所示的属性。从图像中的白色数字代表的位置百分比。(注:#c3c83d可能是#c3c8cd,原图应该标注错了)
Step13
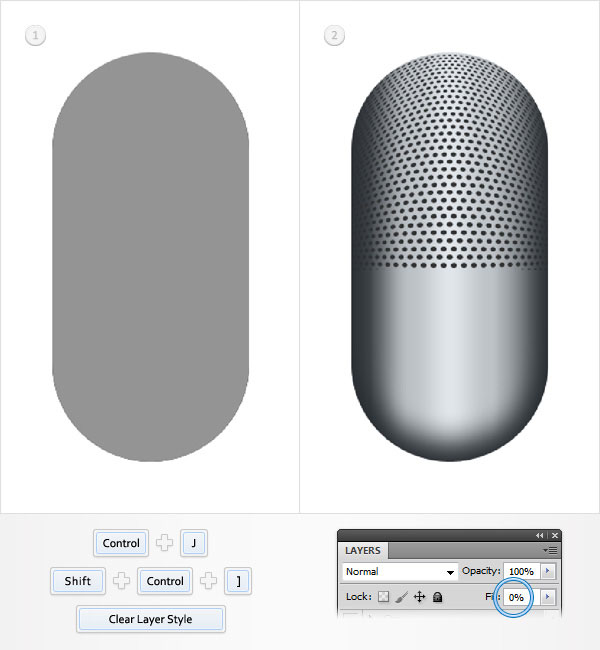
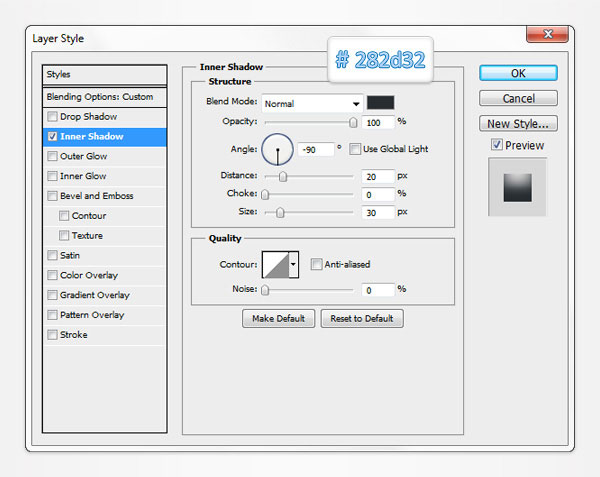
Select the vector shape edited in the previous step and duplicate it (Control + J). Focus on the Layers panel and select this copy. Bring it to front (Shift + Control + ] ) then right click on it and click on Clear Layer Style. Make sure that this copy is still selected, lower its Fill to 0% then open the Layer Style window and enter the properties shown in the following image.
选择圆角矩形矢量图层,并复制它( Control + J)。把副本图层放在前面(按Shift+ Control +]),然后右键单击它,然后单击清除图层样式。请确保此副本仍处于选中状态,降低其填充到0%,然后打开图层样式窗口,输入下图中的属性。
Step14
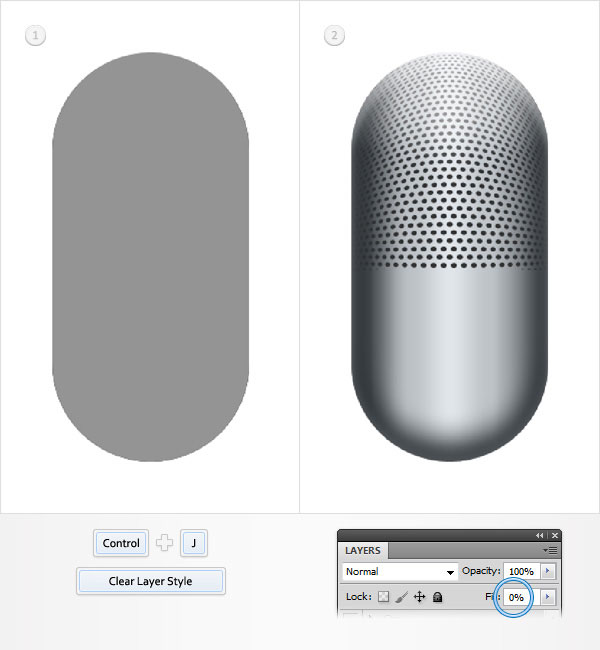
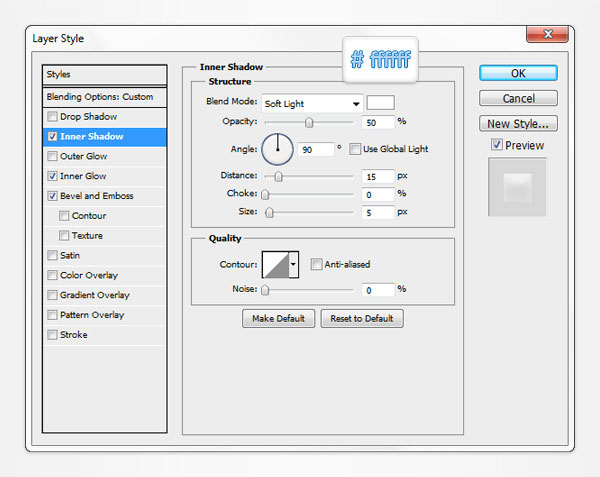
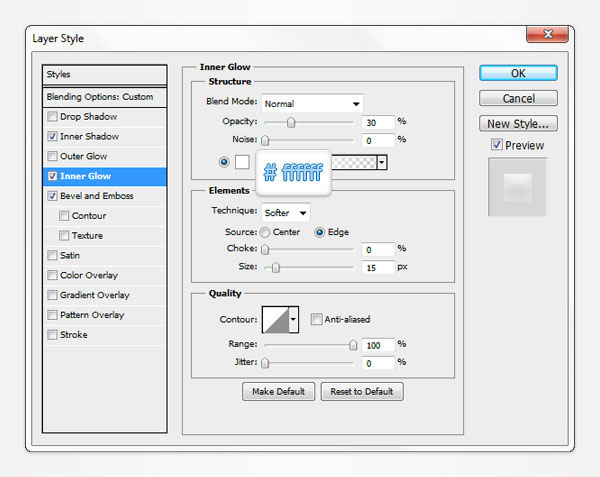
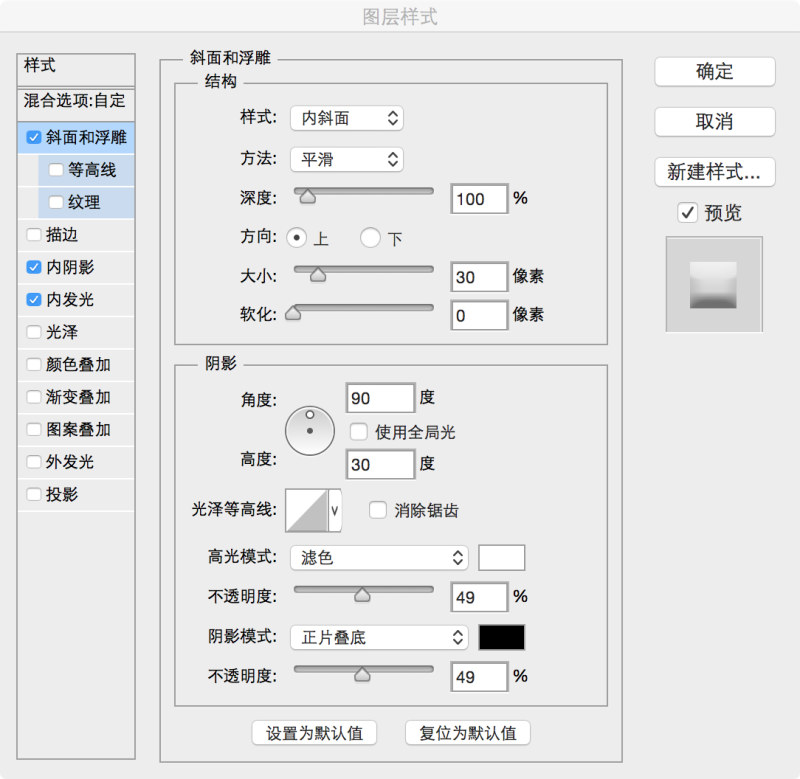
Select the vector shape edited in the previous step and duplicate it (Control + J). Focus on the Layers panel and select this copy. Clear the Layer Style, lower its Fill to 0% then open the Layer Style window and enter the properties shown in the following images.
选择圆角矩形矢量图层,并复制它( Control + J)。选择这个副本。清除图层样式,降低其填充为0%,然后打开图层样式窗口,输入下图中的属性。(注:原文漏了一个斜面浮雕的属性值,可以参考我的数值大概调一下)
Step15
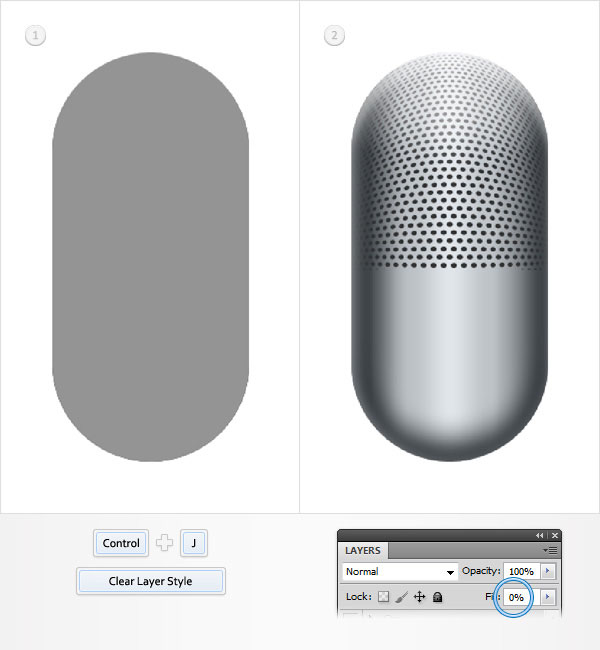
Select the vector shape edited in the previous step and duplicate it (Control + J). Focus on the Layers panel and select this copy. Clear the Layer Style, lower its Fill to 0% then open the Layer Style window and enter the properties shown in the following images.
选择圆角矩形矢量图层,并复制它( Control + J)。选择这个副本。清除图层样式,降低其填充为0%,然后打开图层样式窗口,输入下图中的属性。
Step16
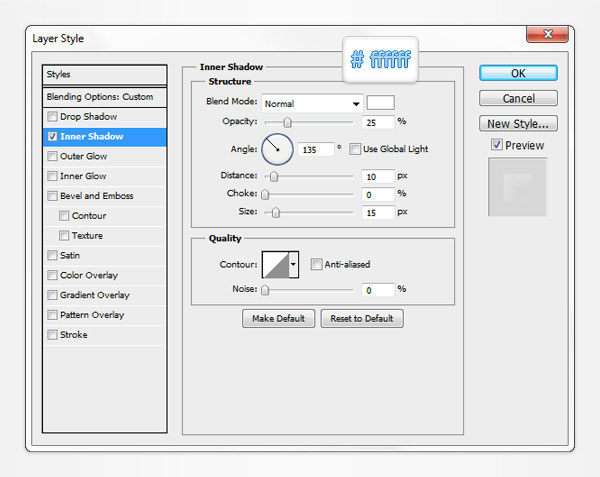
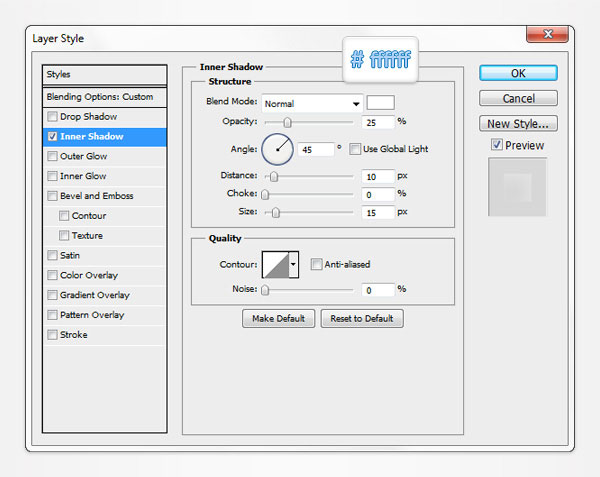
Select the vector shape edited in the previous step and duplicate it (Control + J). Focus on this copy, open the Layer Style window and edit properties used for the Inner Shadow as shown in the following image.
选择圆角矩形矢量图层,并复制它( Control + J)。选择这个副本。清除图层样式,降低其填充为0%,然后打开图层样式窗口,输入下图中的属性。

step17
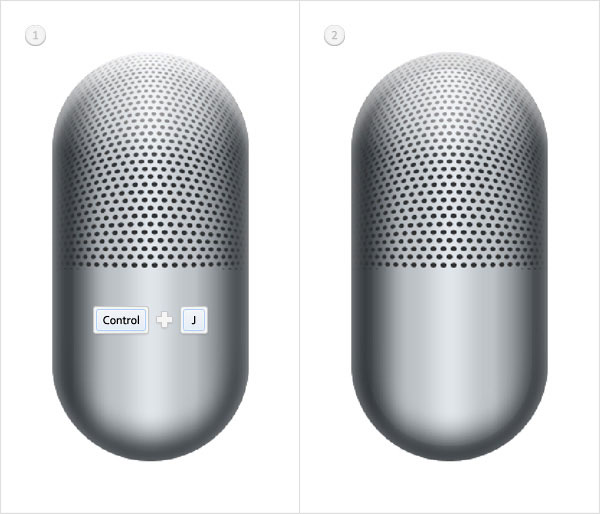
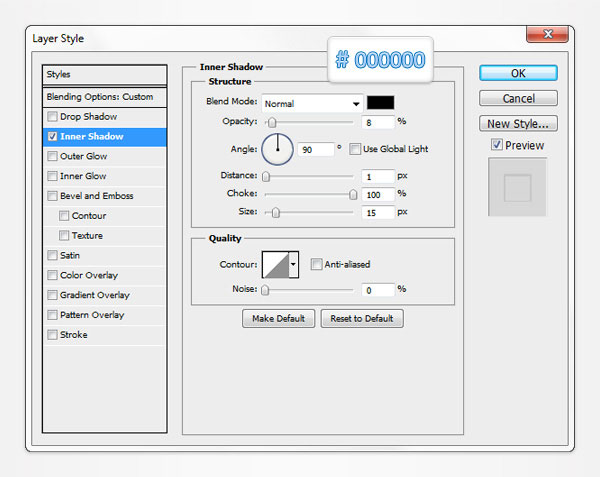
Select the vector shape edited in the previous step and duplicate it (Control + J). Focus on this copy, open the Layer Style window and edit properties used for the Inner Shadow as shown in the following image.
选择圆角矩形矢量图层,并复制它( Control + J)。选择这个副本。清除图层样式,降低其填充为0%,然后打开图层样式窗口,输入下图中的属性。
step18
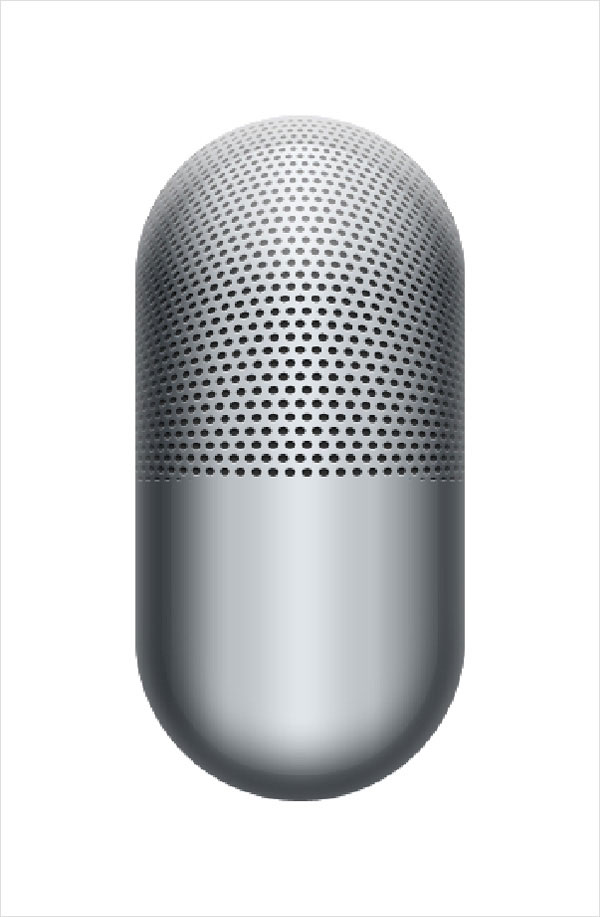
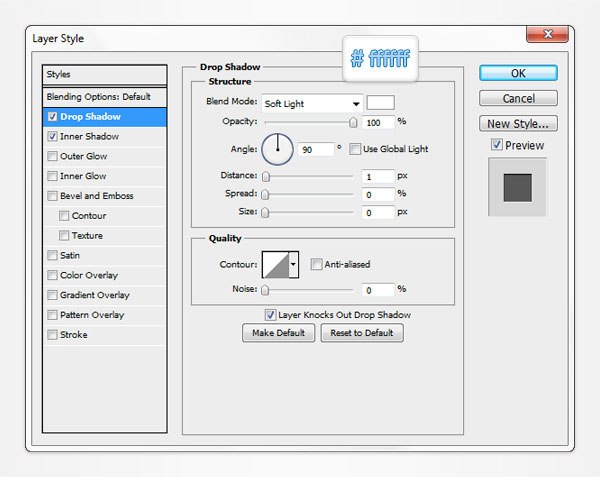
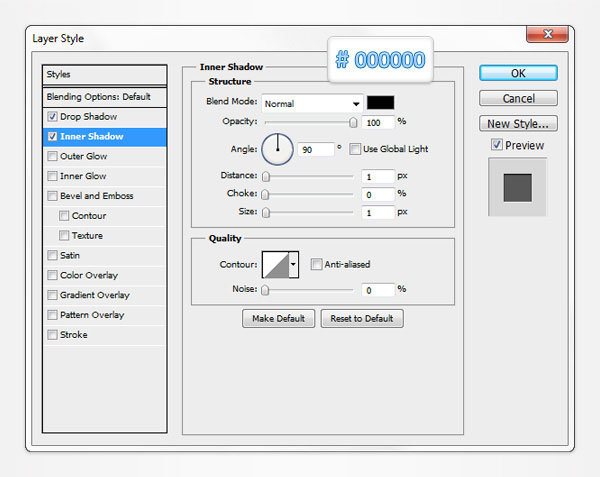
Focus on the Layers panel, open the Layer Style window for that complex vector shape and enter the properties shown in the following images.
查看图层面板,选择圆形矢量图层,打开图层样式窗口,然后输入下图中的属性。
step19
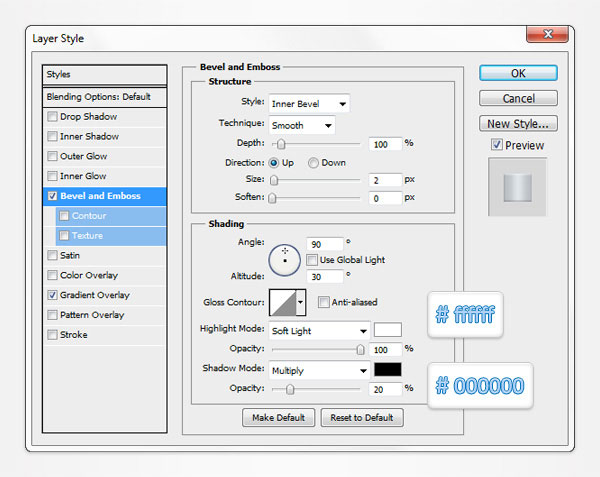
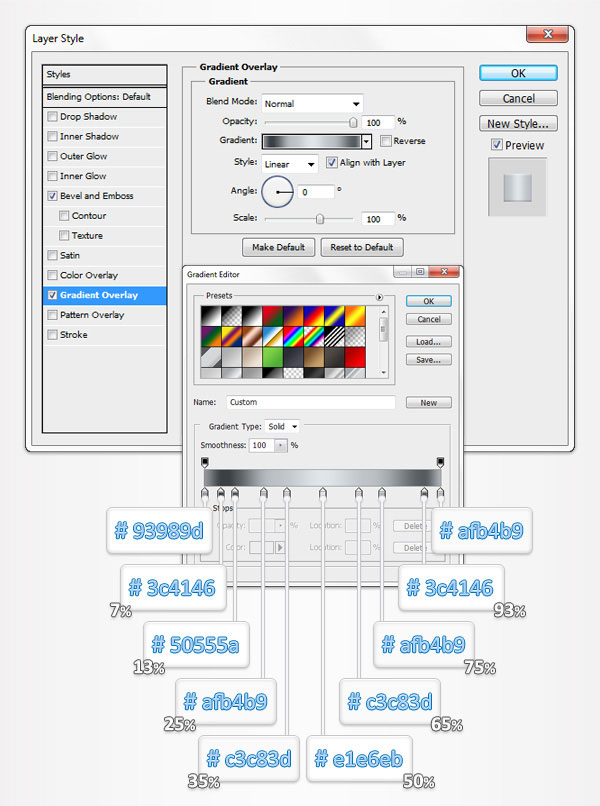
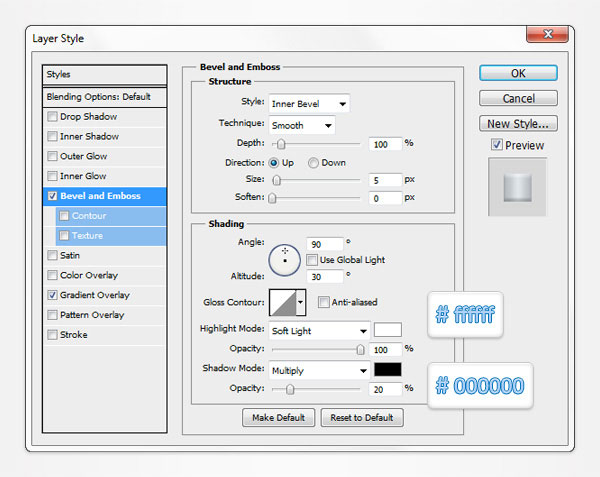
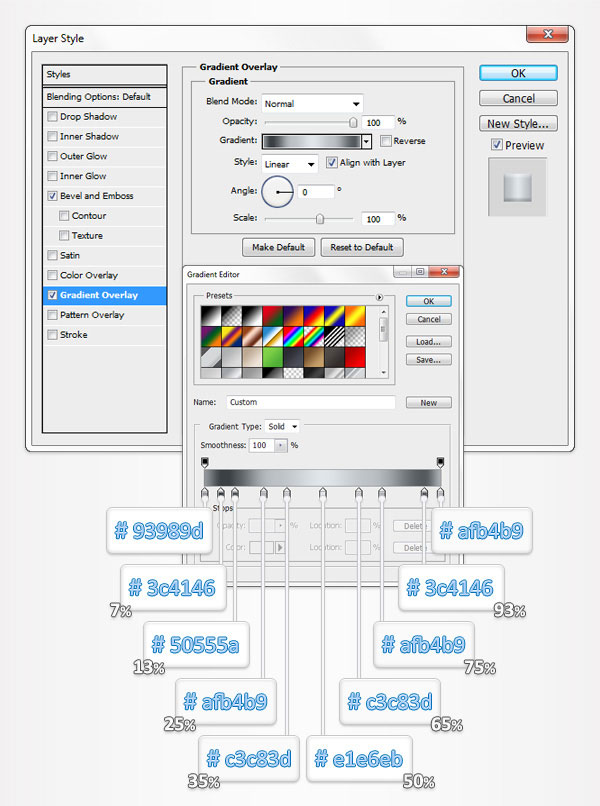
Pick the Rounded Rectangle Tool, set the radius at 5px, create a 205 by 25px vector shape and place it as shown in the first image. Make a copy of this new shape (Control + J), select it and go to Edit > Transform > Warp. Select Bulge from the Warp drop-down menu, enter 5 in the Bend box and hit Enter. Open the Layer Style window for this new vector shape and enter the properties shown in the following images.
选择圆角矩形工具,设置半径为5像素,创建一个205乘25像素的矢量形状,并将其放在如图1中所示的位置。给这个新的形状制作一个副本(Control+ J),选择它并点击编辑>变换>扭曲。从下拉菜单中选择凸起,在弯曲选项中输入5,然后按Enter键。打开这个新的矢量形状的图层样式窗口,然后输入下图中的属性。(注:#c3c83d可能是#c3c8cd,原图应该标注错了)

Step 20
Move to the Layers panel, select the other vector shape made in the previous step and go to Edit > Transform > Warp. Select Bulge from the Warp drop-down menu, enter 10 in the Bend box and hit Enter. Open the Layer Style window for this vector shape and enter the properties shown in the following images.
移动到图层面板中,选择在上一步中创造的另一个矢量形状,点击编辑>变换>扭曲。从下拉菜单中选择凸起,在弯曲选项中输入10并按Enter键。打开这个矢量形状的图层样式窗口,然后输入下图中的属性。(注:可以复制上一部做的图层样式,只用改斜面浮雕中的大小数值。)
Step 21
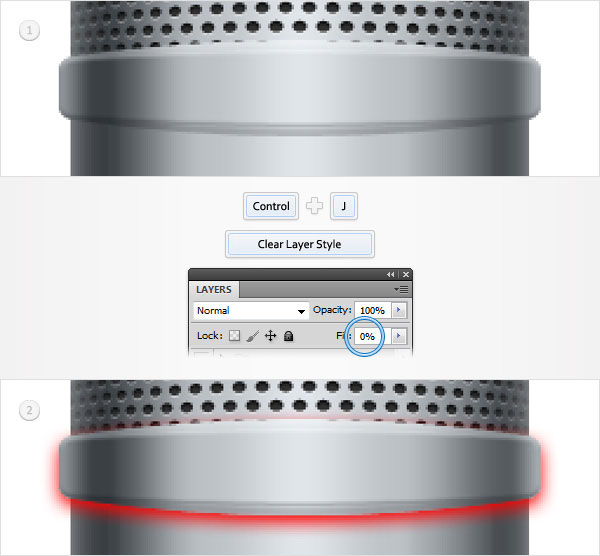
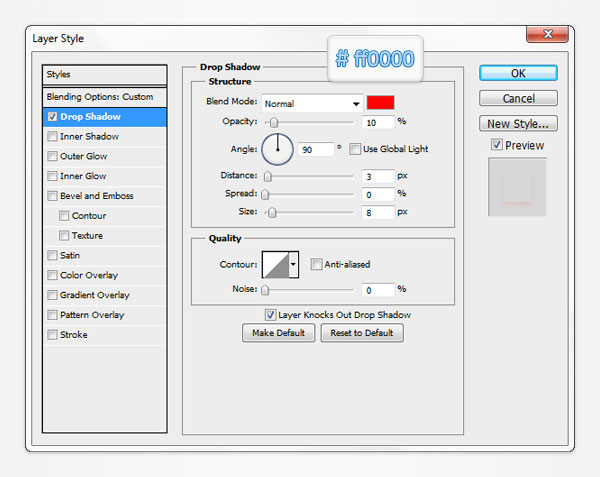
Select the vector shape edited in the previous step and duplicate it (Control + J). Focus on the Layers panel and select this copy. Clear the Layer Style, lower its Fill to 0% then open the Layer Style window and enter the properties shown in the following image. The light red used for the Drop Shadow will make it easier for you to understand the techniques that we’ll use in the next step.
选择在上一步编辑的矢量形状,并复制它(Control+ J)。查看图层面板,选择这个副本。清除它的图层样式,降低其填充为0%,然后打开图层样式窗口,然后输入如下图所示的属性。使用淡红色的阴影会让你更容易看清楚我们在下一步将做的事情。(注:红色的透明度应该是100%)
Step 22
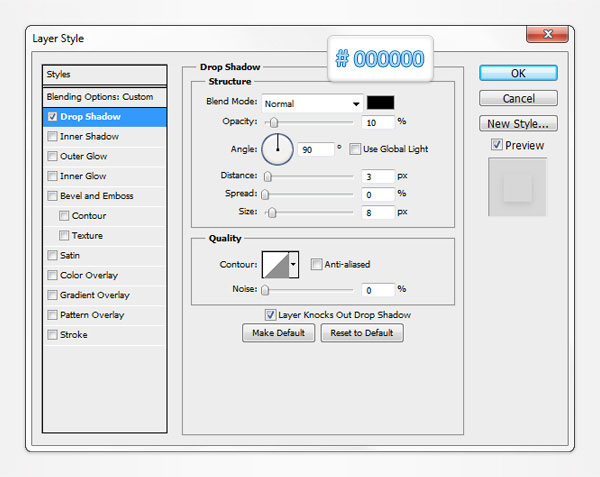
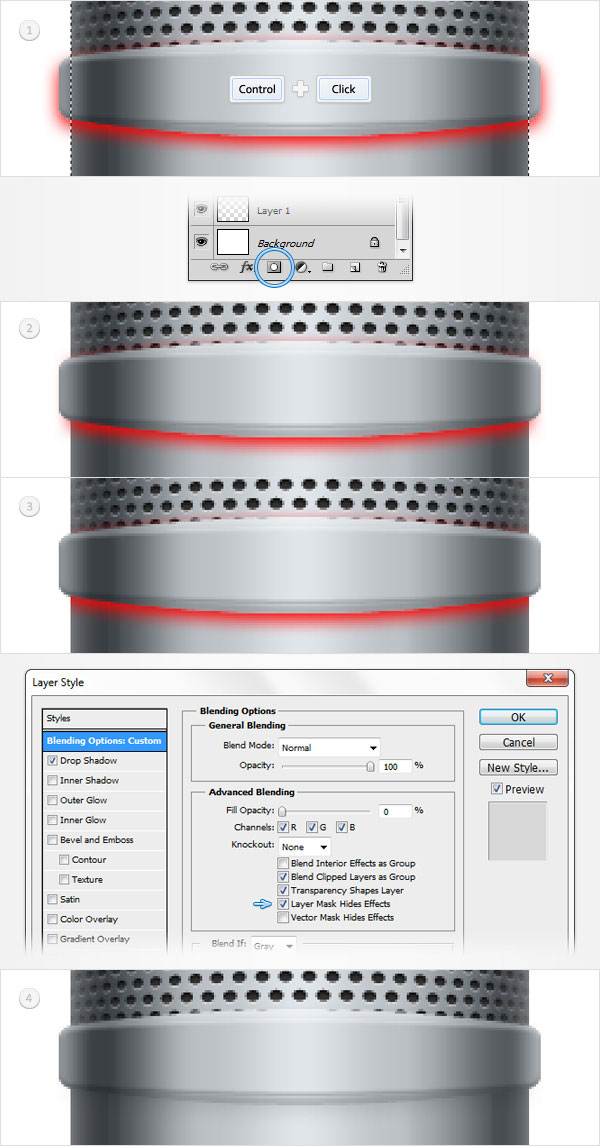
Load a new selection around the rounded rectangle made in the sixth step. Select the vector shape made in the previous step and click on the Add layer mask button. Also, open the Layer Style window for this masked vector shape and check the Layer Mask Hidden Effects box. In the end your masked vector shape should look like in the third image. Re-open the Layer Style window and simply replace the red used fro the Drop Shadow effect with a flat black.
加载第六步中圆角矩形的选区。选择在上一步中所做的矢量形状,然后单击添加图层蒙版按钮。此外,打开这个矢量蒙板图层的图层样式窗口并选中[图层蒙版隐藏效果]选项。在最后你的矢量蒙板形状看起来应该如第三图片中的效果。重新打开图层样式窗口,把阴影效果中的红色更换成黑色。
Step 23
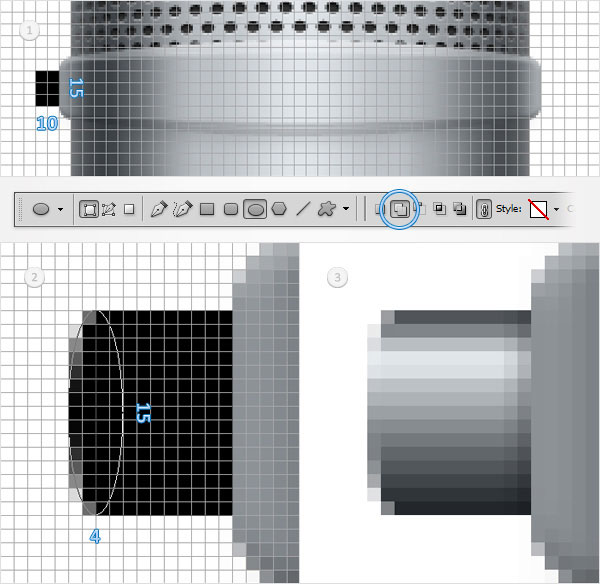
Set the foreground color at black, pick the Rectangle Tool, create a 10 by 15px vector shape and place it as shown in the first image. Return to "gridline every 1px". Again, simply go to Edit > Preferences > Guides, Grid & Slices and enter 1 in the Gridline Every box. Make sure that the little, black rectangle is still selected and focus on the top bar. Check the Add button and add a 4 by 15px shape as shown in the second image. Open the Layer Style window for this new vector shape and enter the properties shown in the following image.
将前景色设置为黑色,选择矩形工具,创建一个10乘以15px的矢量形状,并将其放在如图1中所示的位置。恢复“网格线间隔1px的”。同样只需去编辑>首选项>参考线,网格和切片,并在网格线的每个选项框中输入1。确保一点,黑色矩形仍处于选中状态,并观察顶部栏。检查Add按钮,增加一个4乘以15px,如图二所示的形状。打开这个新的矢量形状的图层样式窗口,然后输入如下图所示的属性。
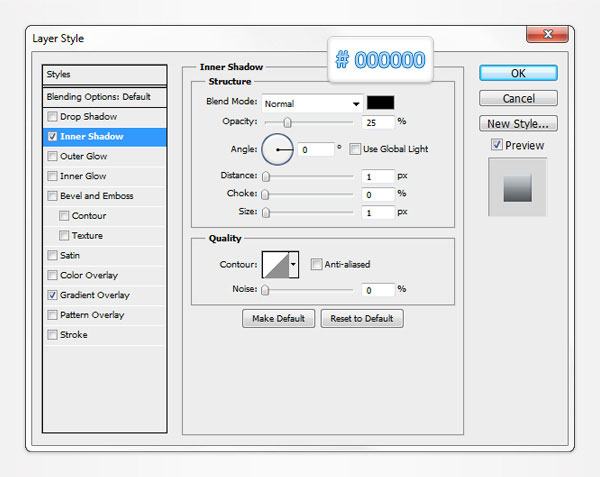
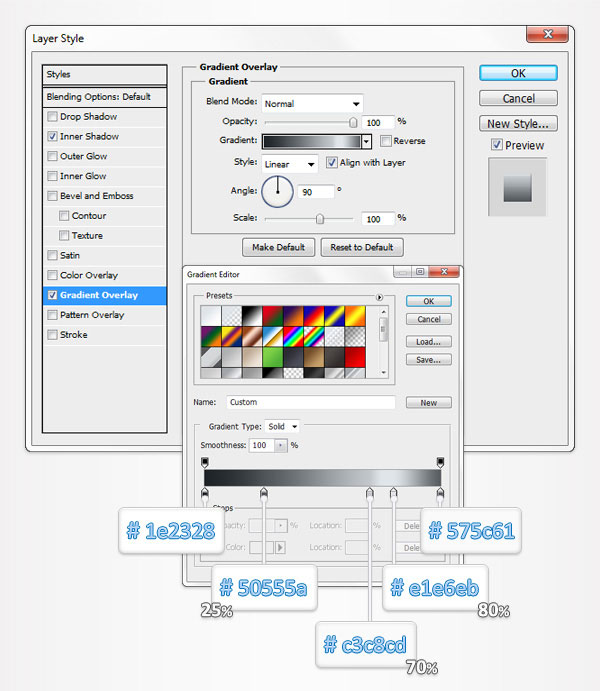
Step 24
Select the vector shape edited in the previous step and duplicate it (Control + J). Focus on the Layers panel and select this copy. Clear the Layer Style, lower its Fill to 0% then open the Layer Style window and enter the properties shown in the following image.
选择在上一步编辑的矢量形状,并复制它(控制+ J)。查看图层面板上,选择这个副本。清除图层样式,降低其填充为0%,然后打开图层样式窗口,输入如下图所示的属性。
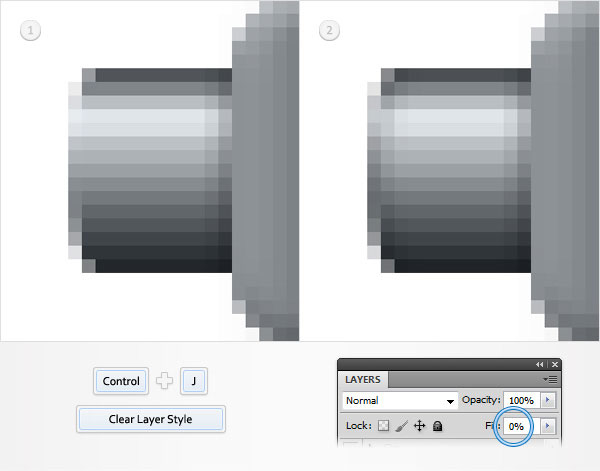
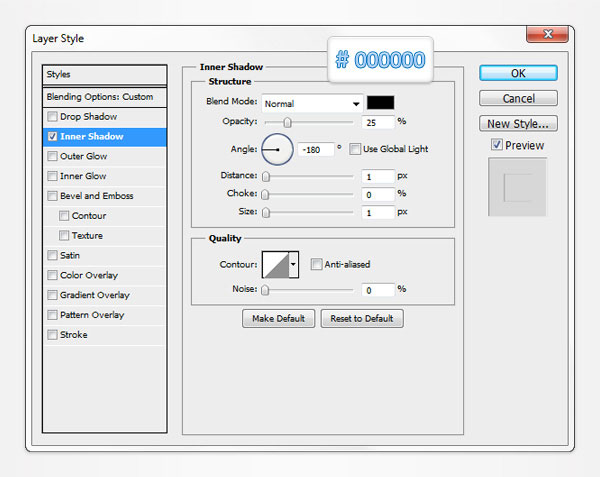
Step 25
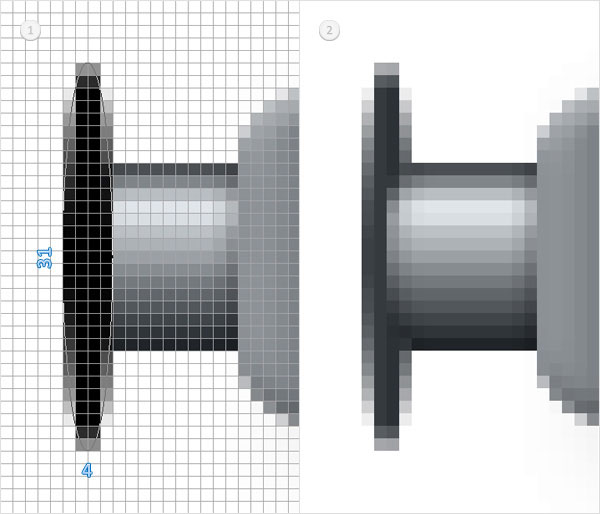
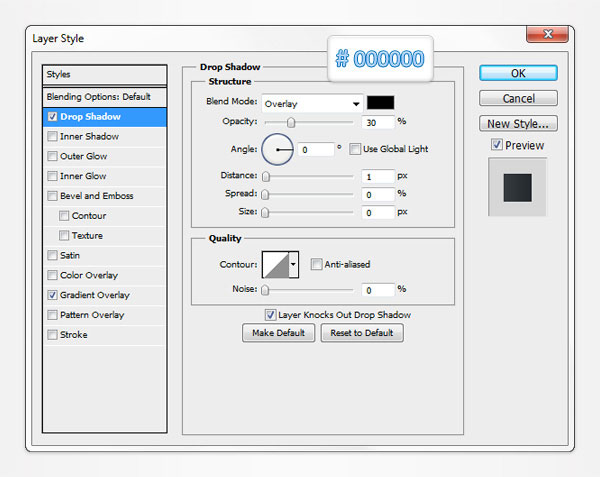
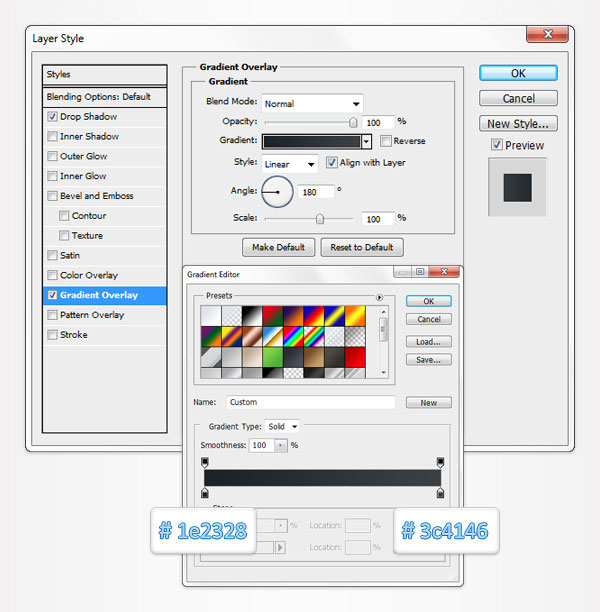
Focus on the shape made in the previous step. Pick the Ellipse Tool, create a 4 by 31px vector shape and place it as shown in the first image. Send it to back (Shift + Control + [ ) then open the Layer Style window and enter the properties shown in the following images.
查看在之前步骤中所作的形状。选择椭圆工具,创建一个4乘以31px的矢量形状并将其放在如图1中所示的位置。放置到底层(按Shift+Control + [),然后打开图层样式窗口,输入下图中的属性。
Step 26
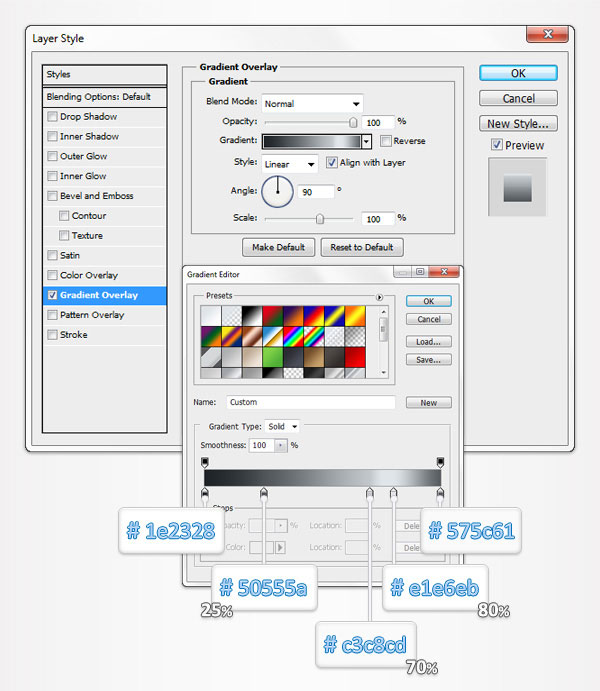
Pick the Rectangle Tool, create an 8 by 31px vector shape and place it as shown in the first image. Make sure that this new shape stays selected and switch to the Ellipse Tool. Check the Add button from the top bar and add a 4 by 31px vector shape as shown in the second image. Continue with the Ellipse Tool, check the Subtract button from the top bar and add a 4 by 31px vector shape as shown in the third image. Send this vector shape to back then open the Layer Style window and enter the properties shown in the following images.
选择矩形工具,创建一个8乘31px的矢量形状,并将其放在如图1中所示的位置。确保这一新的形状保持选定状态并切换到椭圆工具。按顶部栏的合并形状按钮,添加一个图二中的4乘31px的矢量形状。继续用椭圆工具,按顶部栏的减去顶层形状按钮,添加一个图三中的4乘31px的矢量形状。把这个矢量形状放在后一层然后打开图层样式窗口,输入下图中的属性。

Step 27
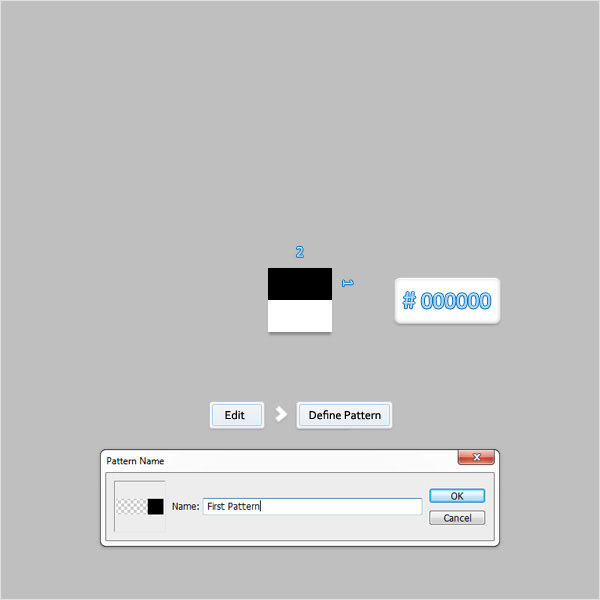
Next, you need to create your own simple pattern. First, hit Control + N to create a new document. Enter 2 in the width and height boxes and click OK. Make sure that the Grid and the Snap to Grid are enabled then delete the "Background" layer. Set the foreground color at black and grab the Rectangle Tool. Create a 2 by 1px vector shape and place it as shown in the following image. Now, simply go to Edit > Define Pattern. Pick a name for your pattern, click OK and you got your pattern. Close this document and return to the first one.
接下来,你需要自己创建一个简单图案。首先,点击Control + N创建一个新文档。在宽度和高度框中输入2,然后单击确定。确保开启了网格和对齐网格功能,然后删除“背景”图层。设置前景色为黑色并选择矩形工具,创建一个2乘1px的矢量形状,并将其放在如图中所示的位置。现在,只需去编辑>定义图案。填写你的图案名称,单击确定。你创建了自己的图案了。关闭该文件,并返回到上一个文件。(注:应该是先创建矩形工具再删除背景图层吧)
Step 28
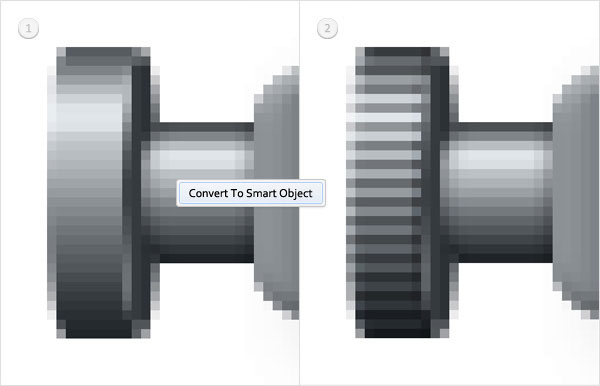
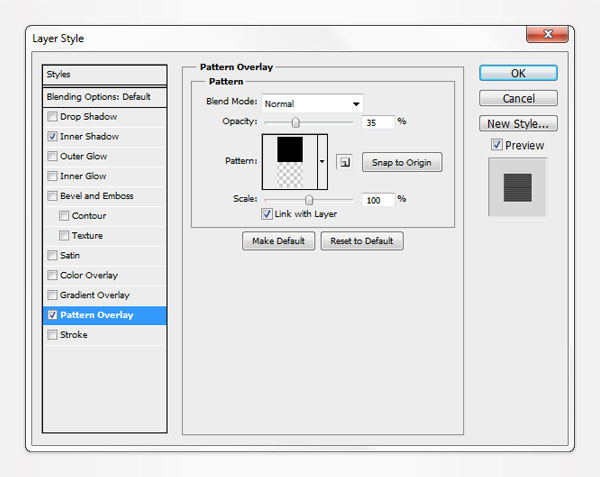
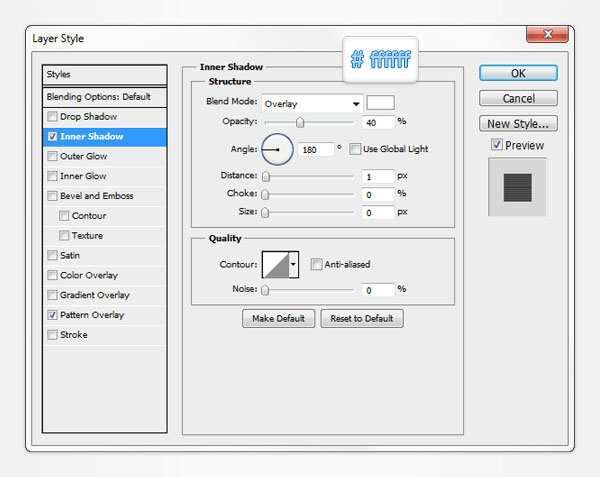
Move to the Layers panel, right click on the vector shape made in the twenty-sixth step and click on Covert to Smart Object. Select this new smart object, open the Layer Style window and enter the properties shown in the following images.
移动到图层面板中,右键单击在第二十六步中创建的矢量形状,然后单击转换为智能对象。选择这个新的智能对象,打开图层样式窗口,然后输入下图中的属性。
Step 29
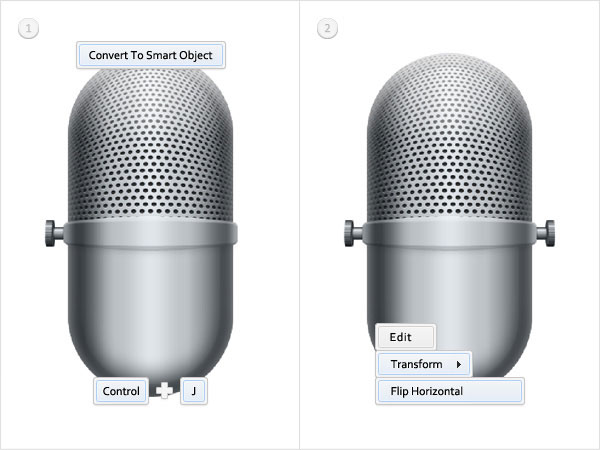
Select the smart object and the vector shapes made in the last six steps and convert them to a single smart object. Make a copy of this new smart object (Control + J), select it and go to Edit > Transform > Flip Horizontal. Make sure that this copy is still selected, drag it to the right and place it as shown in the second image.
同时选择智能对象和在上六步做的矢量图形,并将其转换为一个智能对象。给这个新的智能对象创建一个副本(Control + J),选择它,点击编辑>变换>水平翻转。请确保此副本仍处于选中状态,将其拖动到右边,并并将其放在如图2中所示的位置。
Step 30
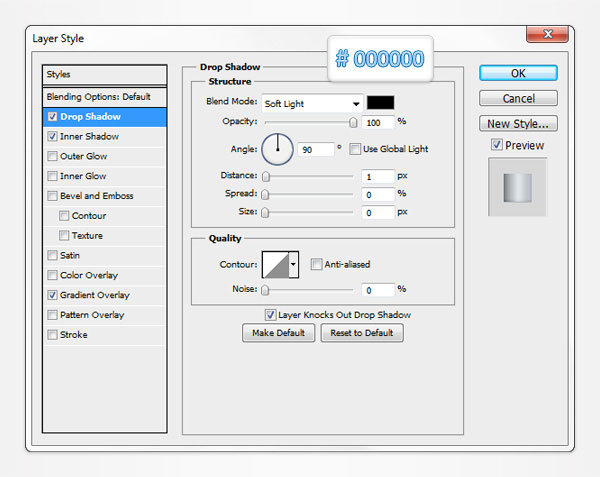
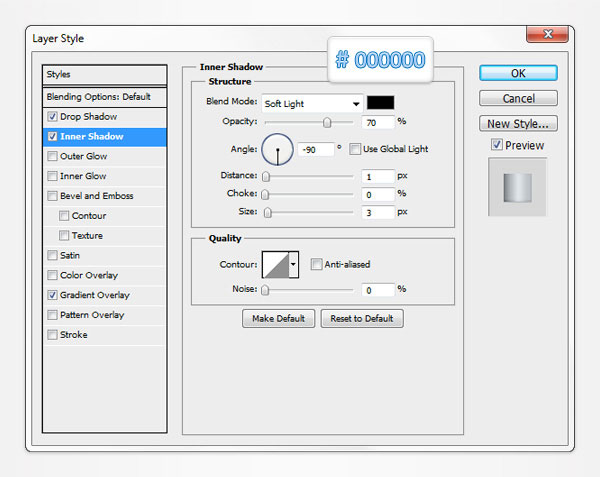
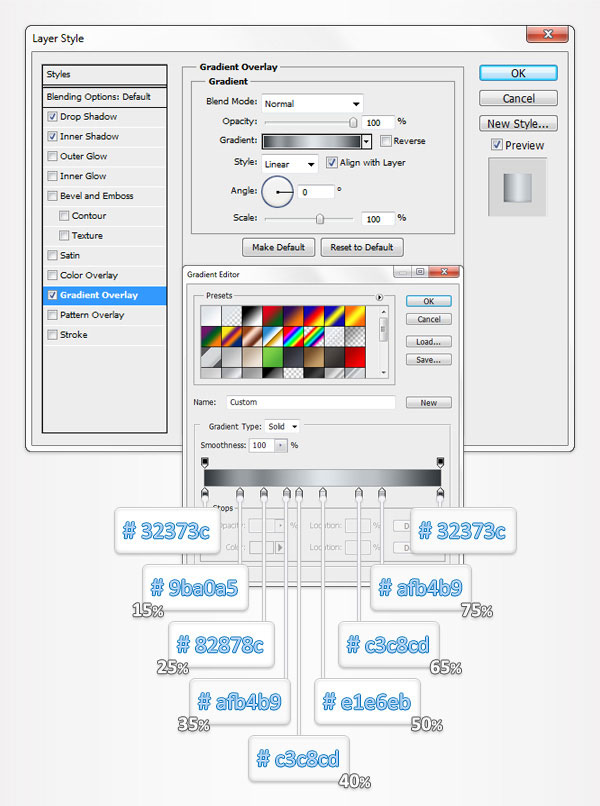
Switch to "gridline every 5px" and focus on the bottom side of the shapes created so far. Pick the Rectangle Tool, create a 25 by 100px vector shape and place it as shown in the first image. Select it, focus on the bottom side and switch to the Ellipse Tool. Check the Add button from the top bar then add a 25 by 10px vector shape as shown in the second image. Open the Layer Style window for this new vector shape and enter the properties shown in the following images.
切换到“5乘5像素的网格”,视图移动到目前创建的形状的下方。选择矩形工具,创建一个25乘100px的矢量形状,并将其放在如图1中所示的位置。选择它,视图移动到它的下方,并切换到椭圆工具。从顶部栏点击合并形状按钮,然后添加一个图二中25乘10px的矢量形状。打开这个新的矢量形状图层样式窗口,然后输入下图中的属性。

Step 31
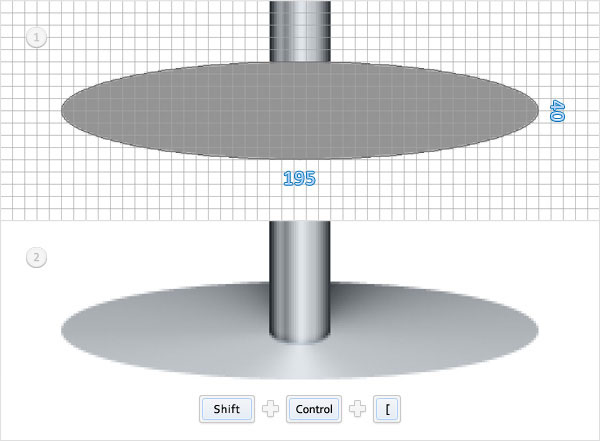
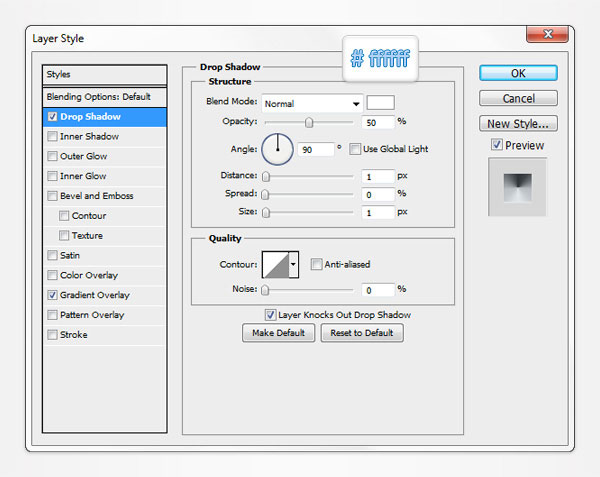
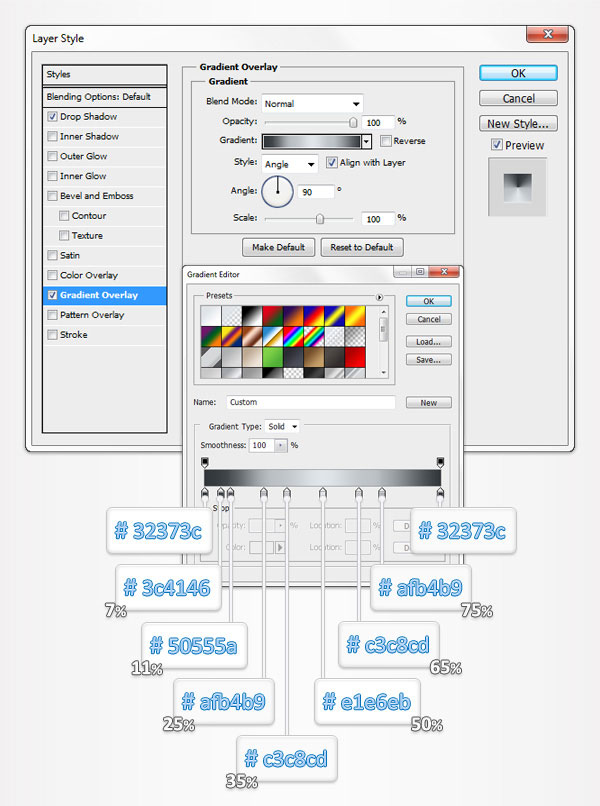
Focus on the bottom side of the vector shape made in the previous step. Pick the Ellipse Tool, create a 195 by 40px vector shape and place it as shown in the first image. Send it to back (Shift + Control + [ ) then open the Layer Style window and enter the properties shown in the following images.
视图移动到前几步中所做的矢量形状的下方。选择椭圆工具,创建一个195乘40PX矢量形状,并将其放在如图1中所示的位置。放到底层(按Shift+ Control +[ ),然后打开图层样式窗口,输入下图中的属性。
Step 32
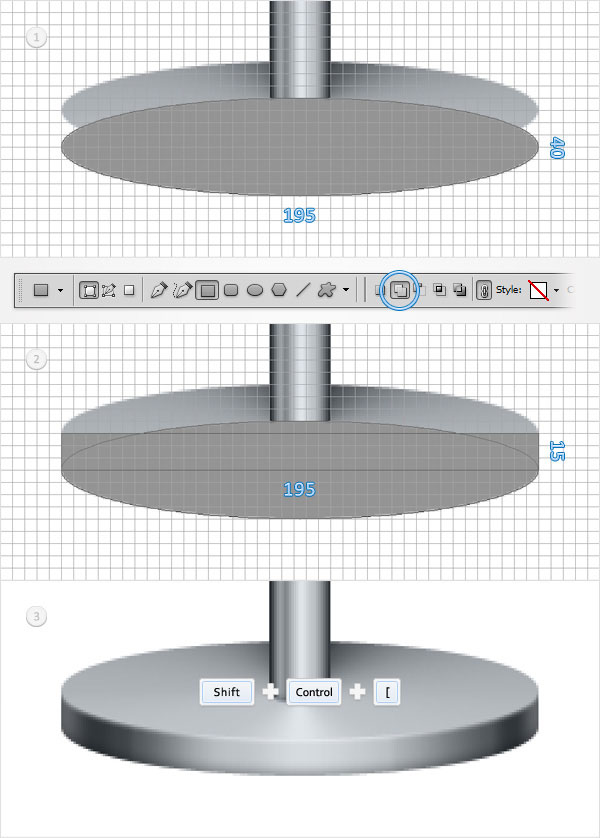
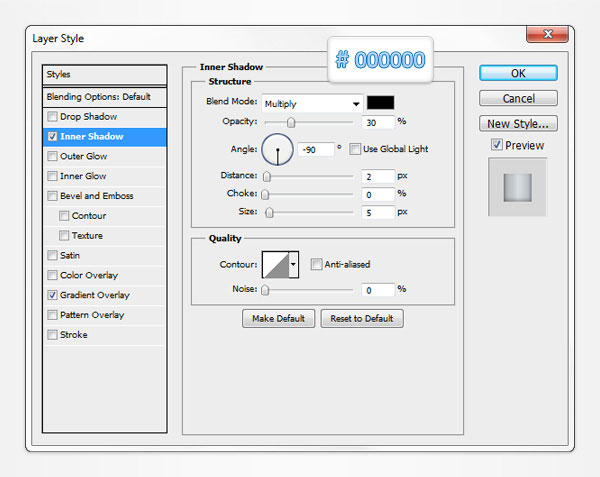
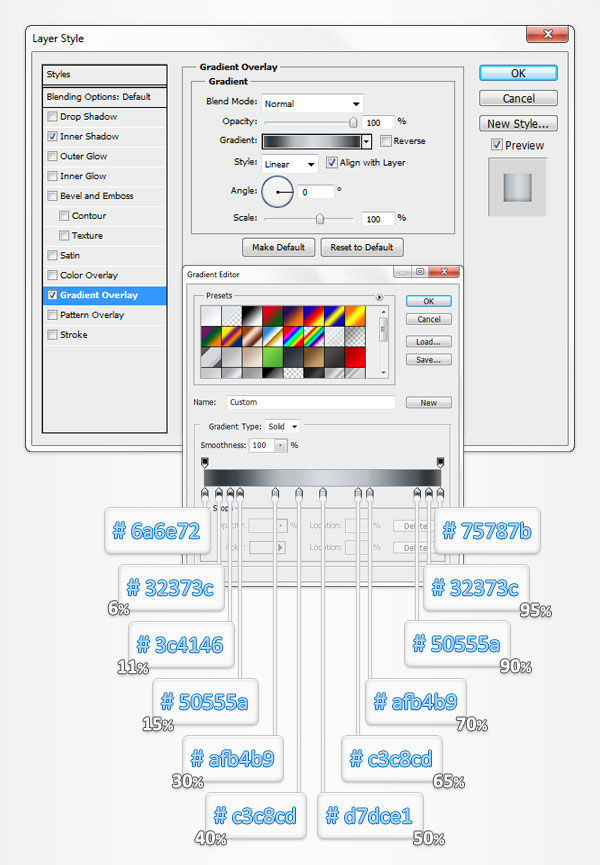
Pick the Ellipse Tool, create a 195 by 40px vector shape and place it as shown in the first image. Select this new vector shape and switch to the Rectangle Tool. Check the Add button from the top bar and add a 195 by 15px vector shape as shown in the second image. Make sure that this vector shape is still selected, send it to back (Shift + Control + [ ) then open the Layer Style window and enter the properties shown in the following images.
选择椭圆工具,创建一个195乘40PX矢量形状,并将其放在如图1中所示的位置。选择这个新的矢量形状,切换到矩形工具。按顶部栏的合并形状按钮,添加一个图2中的195乘15px的矢量形状。请确保此矢量形状仍处于选中状态,放置到底层(按Shift+ Control + [),然后打开图层样式窗口,输入下图中的属性。
Step 33
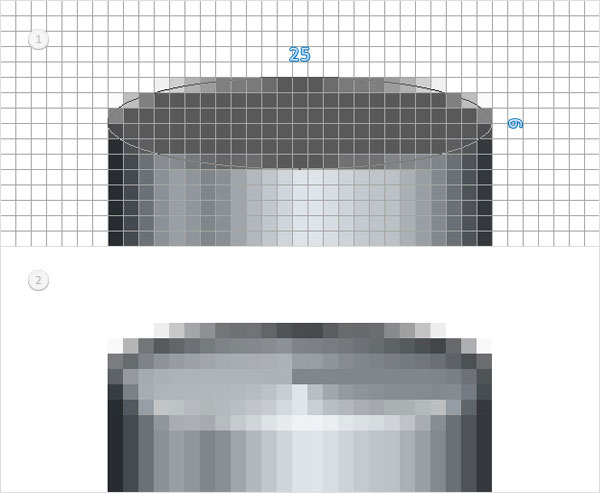
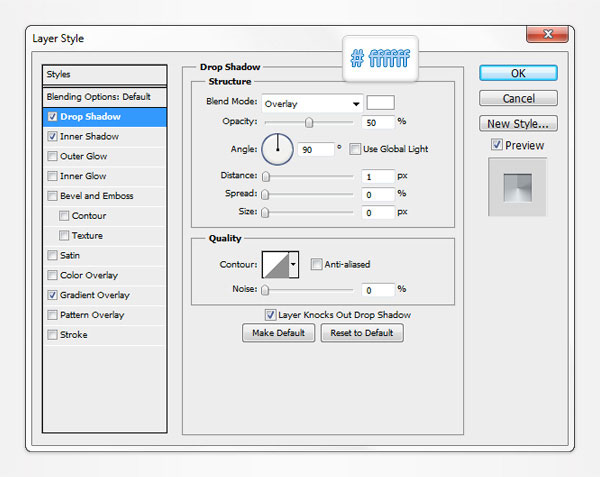
Return to "gridline every 1px" and focus on the top side of the vector shape made in the thirtieth step. Pick the Ellipse Tool, create a 25 by 6px vector shape and place it as shown in the following image. Open the Layer Style window for this new vector shape and enter the properties shown in the following images.
返回到“1乘1像素的网格”,视图移动到第三十步所作的矢量形状的上方。选择椭圆工具,创建一个25乘6px矢量形状,并将其放在下图中所示的位置。打开这个新的矢量形状的图层样式窗口,输入下图中的属性。(注:原教程少了一张渐变的属性图,大家可以自己根据前面学习到的渐变方法尝试着调一下,可以参考下面的大圆的渐变方式,不要直接复制哦,是不一样的。)
Step 34
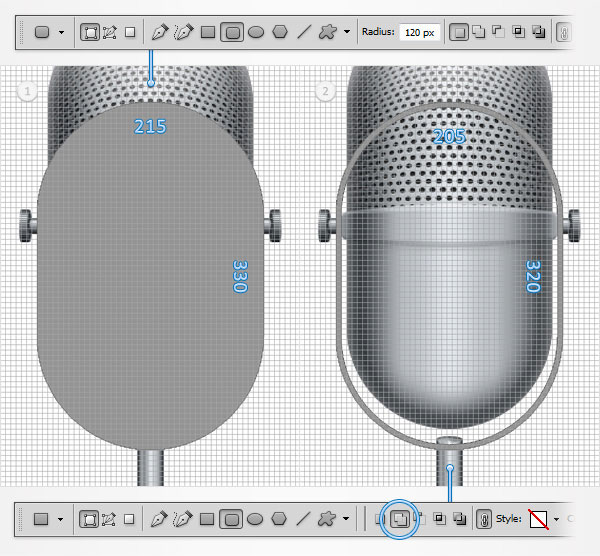
Switch to "gridline every 5px". Pick the Rounded Rectangle Tool, set the radius at 120px, create a 215 by 330px vector shape and place it as shown in the first image. Select this new vector shape, check the Subtract button from the top bar and draw a 205 by 320px vector shape as shown in the second image.
切换到“5乘5像素的网格”。挑圆角矩形工具,设置圆角半径为120px,创建一个215乘330px矢量形状,并将其放在如图1中所示的位置。选择这个新的矢量形状,按顶部栏的减去顶层形状按钮,绘制一个如图二的205乘320px的矢量形状。(注:图中按钮标注错了)
Step 35
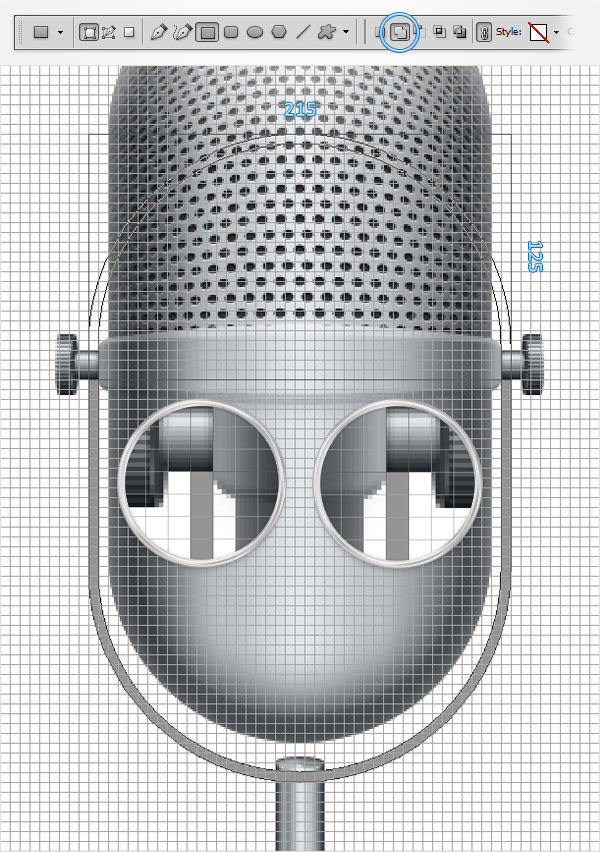
Select the vector shape made in the previous step and grab the Rectangle Tool. Check the Subtract button from the top bar and draw a 215 by 125px vector shape as shown in the following image.
选择在上一步制成的矢量形状,并选择矩形工具。按顶部栏的减去顶层形状按钮,绘制出215乘125px矢量形状,如下图所示。
Step 36
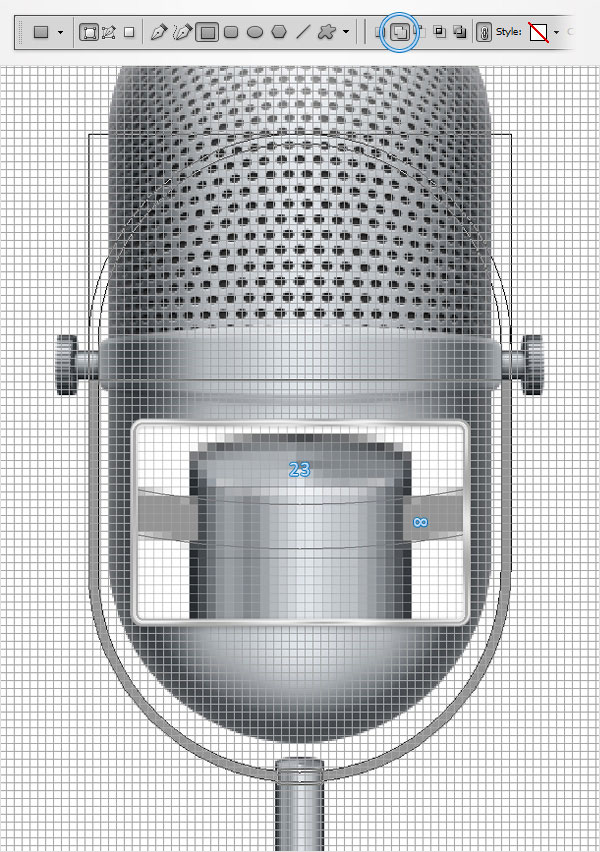
Return to "gridline every 1px". Select the vector shape edited in the previous step, pick the Rectangle Tool and focus on the bottom side. Check the Subtract button from the top bar and draw a 23 by 8px vector shape as shown in the following image.
返回到“1乘1像素的网格”。选择在上一步编辑的矢量形状,选择矩形工具,视图移动到下方。按顶部栏的减去顶层形状按钮,绘制出23乘8像素的矢量形状,如下图所示。
Step 37
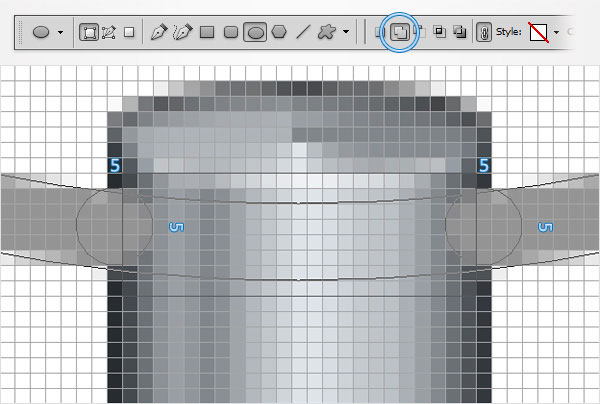
Select the vector shape edited in the previous step, pick the Ellipse Tool and focus on the bottom side. Check the Add button from the top bar and add two, 5px circles as shown in the following image.
选择在上一步编辑的矢量形状,选择椭圆工具,视图移动到下方。按顶部栏的合并形状按钮,并添加两个5px的圆圈,如下图所示。
Step 38
Select the vector shape edited in the previous step, pick the Ellipse Tool and focus on the top side. Check the Add button from the top bar and add two, 5 by 6px vector shapes as shown in the following image.
选择在上一步编辑的矢量形状,选择椭圆工具,视图移动到上方。按顶部栏的合并形状按钮,并添加两个5乘6px的圆圈,如下图所示。

Step 39
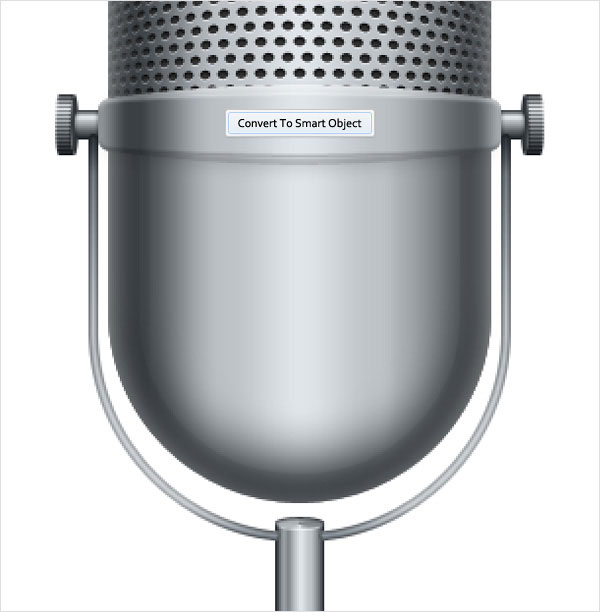
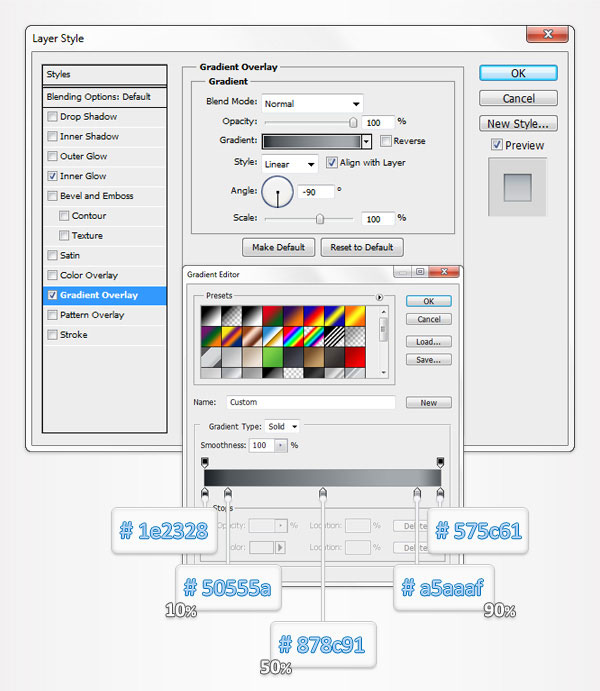
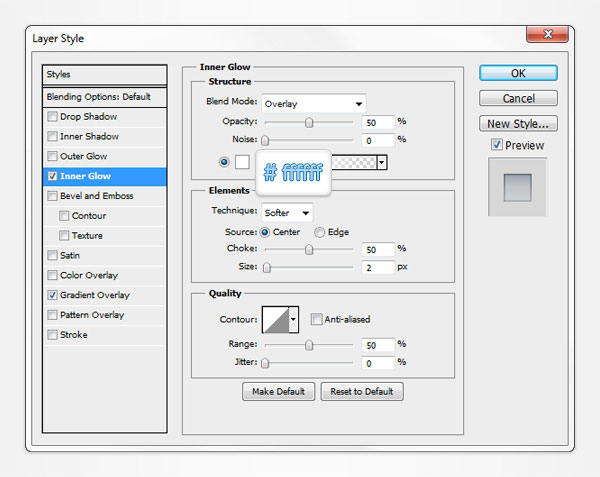
Reselect the vector shape made in the last five step and turn it into a smart object. Open the Layer Style window for this new smart object and enter the properties shown in the following images.
重新选择上五步所作的矢量图形,并把它转换成智能对象。打开这个新的智能对象的图层样式窗口,然后输入下图中的属性。
Step 40
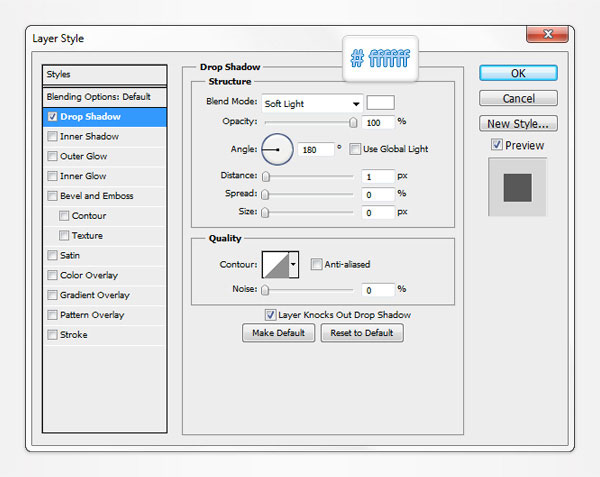
Focus on the bottom side of the smart object made in the previous step. Set the foreground at white, pick the Ellipse Tool, create two, 5px circles and place them as shown in the first image. Open the Layer Style window for the left circles and enter the properties shown in the following image. Open the Layer Style window for the right circle, enter the same properties shown in the following image, but inverse the angle.
视图移动到前几步所作的智能对象的底部。设置前景色为白色,选择椭圆工具,创建两个5px的圆圈,并将其放在如图1中所示的位置。打开左边圆圈的图层样式窗口,然后输入下图中的属性。打开右边圆圈图层样式窗口,然后输入下图中的属性,但是用相反的角度。
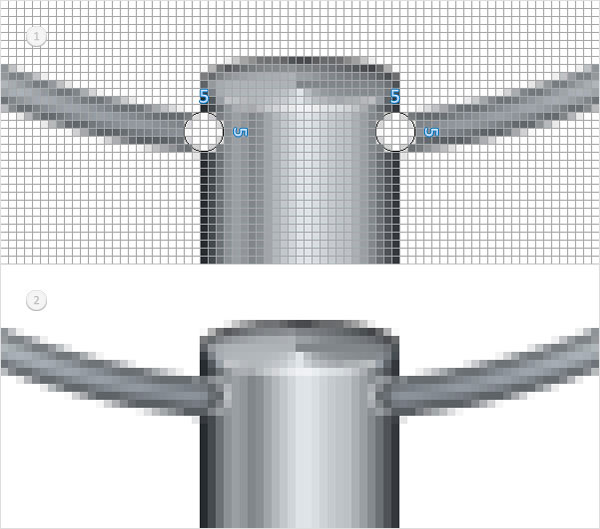
Step 41
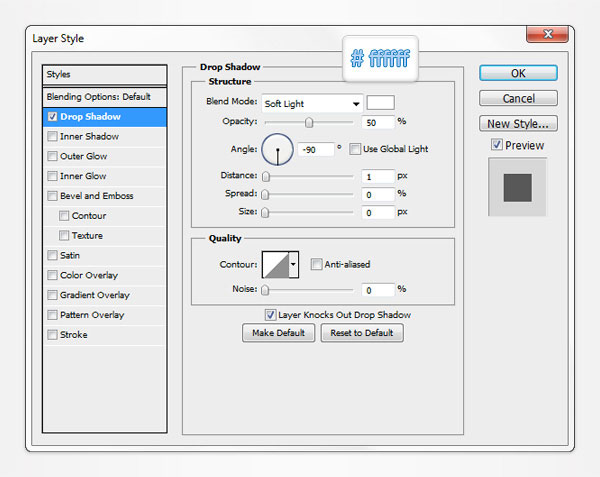
Focus on the top side of the smart object made in the thirty-ninth step and pick the Ellipse Tool. Create two, 5 by 6px vector shapes and place them as shown in the first image. Open the Layer Style window or these new shapes and enter the properties shown in the following image.
视图移动到第三十九步中的智能对象的顶部,并选择椭圆工具。创建2个5乘6px的矢量形状并将其放在如图1中所示的位置。打开这些新的形状的图层样式窗口,然后输入如下图所示的属性。

Step 42
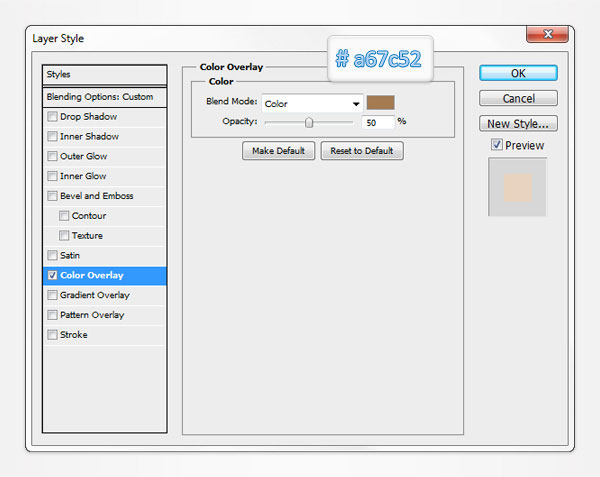
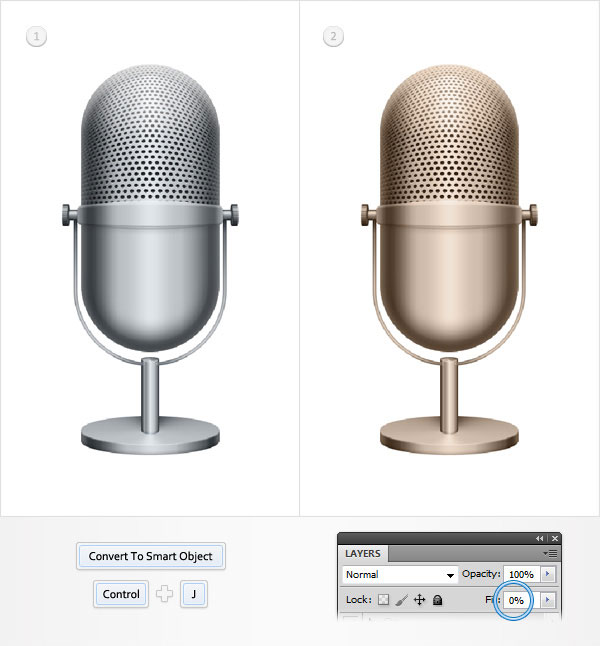
Next, we’ll play a little with the color of the microphone. Select all the shapes created so far and convert them to a smart object. Make a copy of this smart object (Control + J) and select it. Lower its Fill to 0% then open the Layer Style window and enter the properties shown in the following image.
接下来,我们将给麦克风加一点颜色。选择所有创建的形状并将其转换为智能对象。给这个智能对象创建一个副本(Control+ J),并选择它。降低它的填充为0%,然后打开图层样式窗口,输入如下图所示的属性。
Step 43
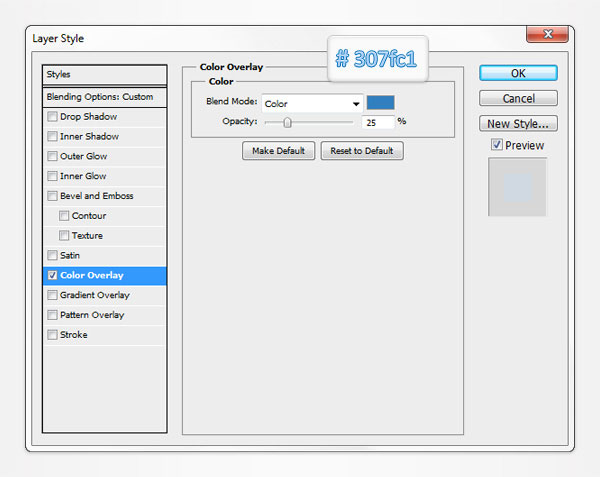
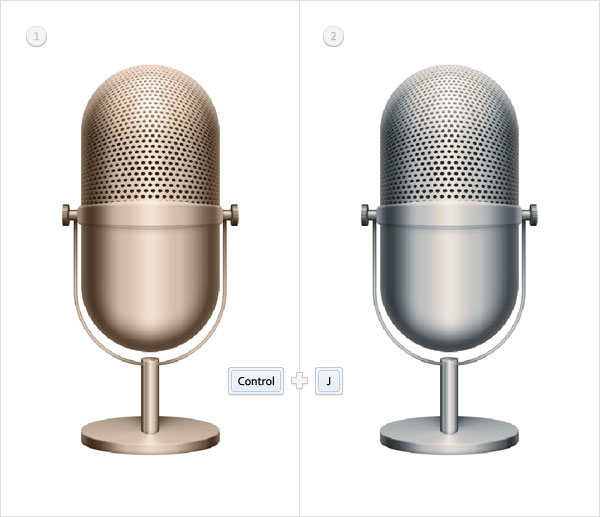
Select the second smart object made in the previous step and duplicate it (Control + J). Select this copy, open the Layer Style window and edit the properties used for the Color Overlay as shown in the following image.
选择在上个的步骤中的第二个智能对象并复制它(Control + J)。选择这个副本,打开图层样式窗口,编辑如下图所示颜色叠加的属性。
Step 44
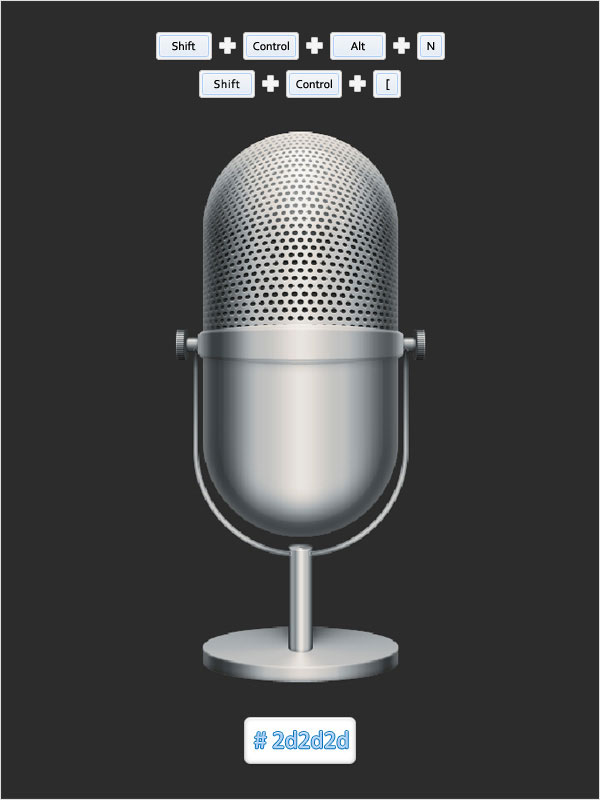
Create a new layer (Shift + Control + Alt + N) and send it to back (Shift + Control + [ ). Focus on the Layers panel and make sure that this new layer is selected. Set the foreground color at #2d2d2d, pick the Paint Bucket Tool and simply click inside your artoard.
创建一个新图层(同时按住Shift+ Control + Alt + N),并把它放到图层的最后(同时按住Shift+ Control + [)。查看图层面板,并确保选中这个新图层。设置前景色为#2d2d2d,选择油漆桶工具在图层内点击。
Step 45
Finally, select the smart objects that make up your microphone and turn them into a new smart object. Select it and go to Filter > Noise > Add Noise. Enter the properties shown in the following image, click OK and go to Filter > Render > Lens Flare. Enter the properties shown below, click OK and you’re done.
最后,选择这些智能对象,把您的麦克风变成一个新的智能对象。选择它,去滤镜>杂色>添加杂色。输入如下图所示的属性,单击OK,去滤镜>渲染>镜头光晕。进入下图所示的属性,点击确定,就大功告成了。
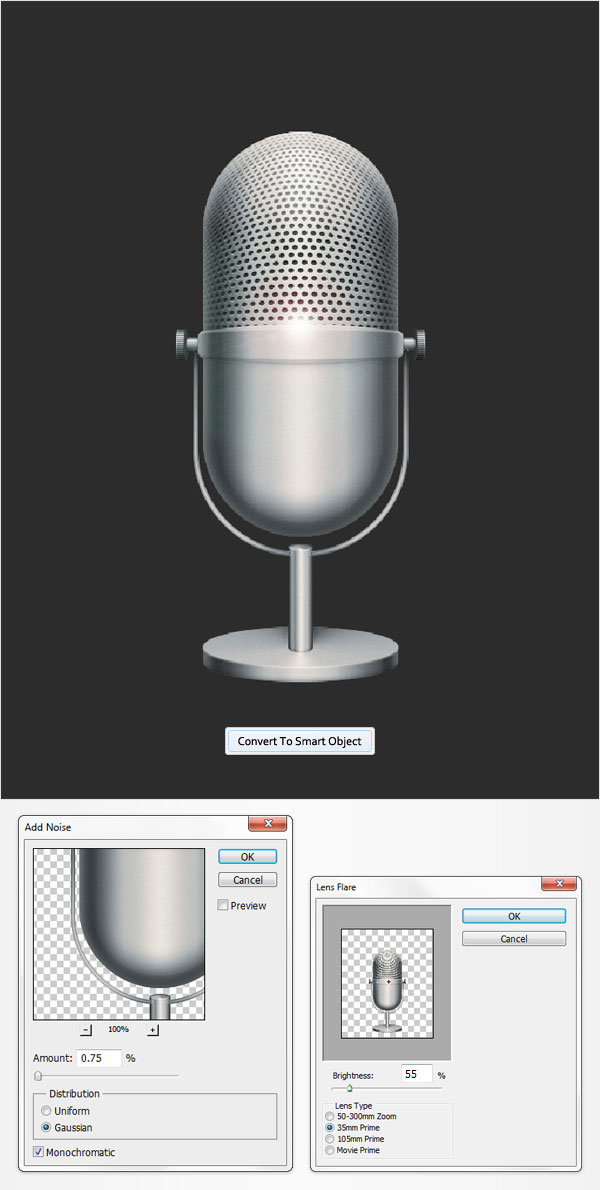
And We’re Done!
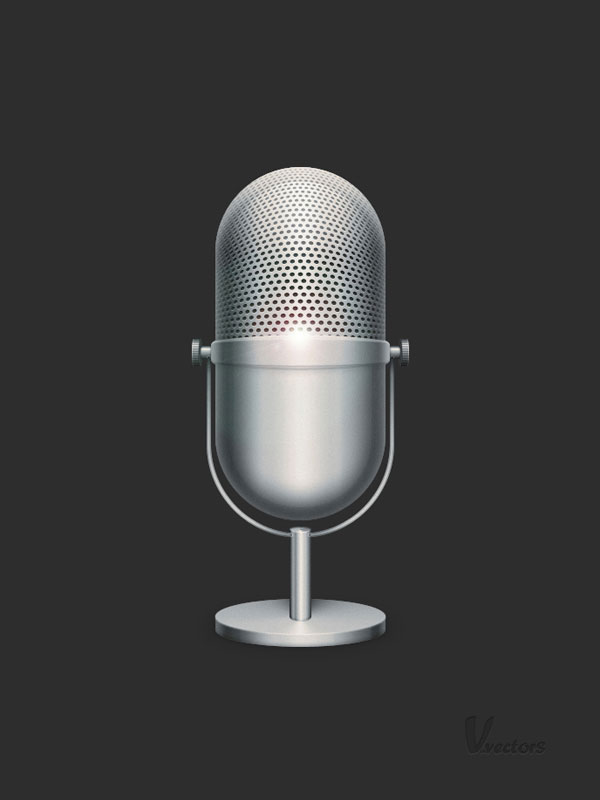
Here is how your final result should look.
好了我们大功告成了!
这就是是你的最终应该看到的样子。
下面这张图是我照着教程完成的
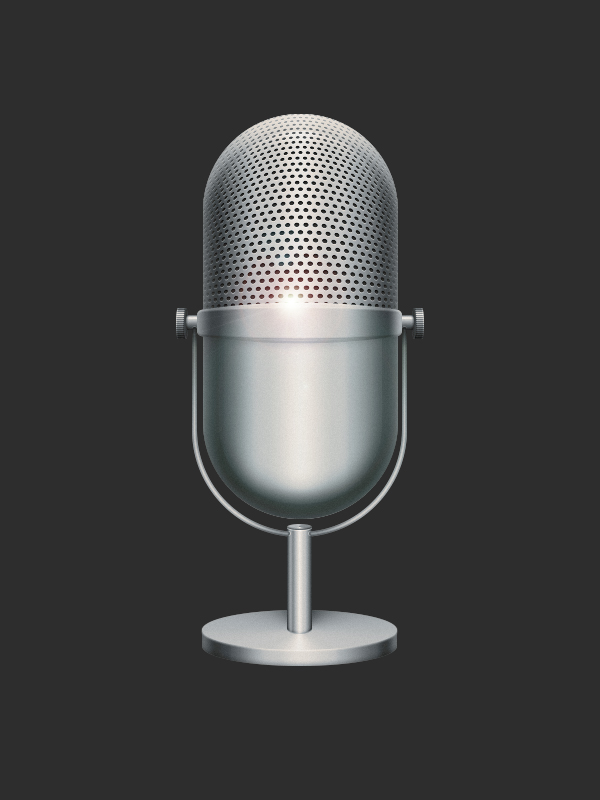
旧景重叠玩穿越...

